29 July 2016

Feline Friday: No Boys Allowed

  Tinsel is my bathroom buddy -- fierce protector of the hairbrush, mirror, and sinks.
 Every day, she hops up on the counter and patrols back and forth, purring and rubbing all over me while I try to get ready for the day. It's not easy to keep her away from the hot dryer and curling iron, nor is it efficient to stop what I'm doing to give her attention, but I always welcome Tinsel's company. For some strange reason (even after the remodel), the bathroom is pretty much the only area in the house where she is friendly and social!

 Because the bathroom is clearly HERS, Tinsel was recently rather alarmed by the contractor working on a lift outside the bathroom window. She kept a close eye on him while he was fixing our siding. I wonder if he noticed the little face peering out the window and giving him the evil eye!

After all, everyone knows that the bathroom belongs to us girls! No boys allowed...even outside! :)

jp

28 July 2016

Bedroom Update: New Bedding

We are still plugging along on the very slow bedroom update. Spouse recently finished the painting, and while our daughter was home, she helped pick out new bedding. 

I have been on the lookout for a matelasse (embroidered) coverlet in a neutral ivory/cream color so that I can use my heirloom quilts with it. Here are two inspiration photos from Pinterest so you can see what I mean!
 As shown in these photos, my plan is to add small accent pillows to match whatever quilt I may be using. That way I can add pops of color without committing long-term to any particular color scheme. I've made soooo many decorating mistakes in the past, and most of them were related to making large-scale color/pattern choices on items that were hard to change (flowered wallpaper, plaid couch, etc.). So I vow to keep things pretty neutral going forward!

 As a reminder, this is what the bedding looked like before (yikes!). When we moved to this house 22 years ago, the pink floral wallpaper border and curtains were there. Although I disliked all of it, we didn't want to spend any money updating the room so we just threw a green comforter on the bed and ignored it. After 22 years, it was obviously due for an update!

This is how it looks now. Although the room is a work in progress, it's a big improvement.


  Because the headboard is tall, we found that the bed needed two sets of shams. The ones in the back are square Euroshams. The shams in front are normal pillow-size.

Obviously, I haven't done any other decorating in the room, nor do I have any quilts or accent pillows on the bed yet. My quilts have been in storage for a very long time and need to be laundered or cleaned before using them. One thing at a time! :)

Now that we've painted and purchased new bedding, we'll be replacing the window trim and carpet this fall. Although this project is taking some time, each little step we've taken makes the room feel so much better. Progress -- even slow progress -- makes me happy!
jp

26 July 2016

Florida Album: Progress

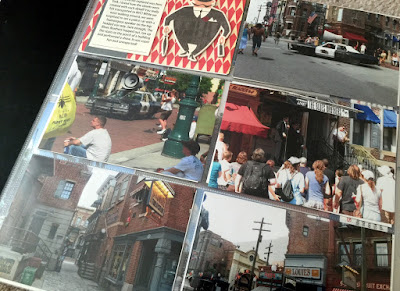
Back in March, I posted that I'd picked up an old unfinished scrapbooking project with hopes of finishing it sooner than later. Well, it's still not done, but now I can say it is HALF done! It turns out that I took more photos on this trip to Florida than would possibly fit into a single album, so this project is now a two-album "set"! 

The first album (now finished...YAY!) encompasses the time we spent at Universal Studios. The second album (soon to be started...YAY!) will include photos of our trip to the Wizarding World of Harry Potter -- ON OPENING DAY!

I followed a similar format throughout the album with a few repeating designs. The colors vary from page to page, but limiting the designs and products helps tie the album together -- and it makes scrapbooking go much faster!

I made ample use of pocket pages, one of the best products to ever hit the scrapbooking world. This was also a great opportunity to incorporate some of my slightly hoarded stash of chipboard travel embellishments.

 This chipboard guy was perfect for the Blues Brothers photos on this page, but I would never have remembered him had I not pulled all of my travel products and stored them with this project in a plastic project box. This was a great way to keep all of the materials organized, something I'll definitely do again for the next album I start!
 

Back when I started the project, I purchased a few die cut titles for my pages. Having them all stored with the product ensured that I could find them when I needed them!

 I'm quite excited to get started on the Harry Potter portion of this trip! I have a good stash of Harry Potter papers at the ready. Now to carve out a few days to finish this project completely!
jp

23 July 2016

Finishing Grandma's Quilts

Last summer about this time, I organized all of the quilts I kept from my parents' house. You can read more about that project and see lots of quilt pictures HERE.

I kept a few quilts that my maternal grandma pieced but never quilted, and I've been hoping to have them finished so I can put them to use. In fact, one of my goals as we re-decorated our bedroom was to keep the decor neutral so that I could bring out my various quilts as accent pieces.
 I recently contacted our local quilt store who put me in touch with a woman who has experience finishing old quilts using long arm quilting. I'm going to meet with her next week so she can get started!

I decided to start with the simplest one, this quilt top which I believe is a 9-square design. Unlike the other unfinished quilt tops, I don't recognize any of this fabric from Grandma's dresses or aprons, but I know she made it because my aunt (her daughter) verified it. The quilt expert I consulted confirmed that the fabrics are from the 30's and 40's, when my grandma would have been a young wife and mother.

This is how the quilt top looks unfolded. It's in very good shape, according to the lady at the quilt shop!

I purchased muslin for the back of the quilt and batting for the inside, based on what the quilter recommended. Thank goodness the woman at the quilt shop led me by the nose, because I was like a fish out of water there!

From what I can tell in looking at Grandma's quilts, she usually machine-stitched the tops then quilted them by hand. I can only imagine what a labor-intensive process it must be to do hand-quilting! I'm sure that's why she left a few quilt tops unfinished.

So next week I'll meet with the quilter, select a quilting design, and let her get to work. I'm so excited to see how it turns out! And more importantly, I'm very much looking forward to displaying and using all of my quilts, as they were meant to be.
It's so great when you actually DO something you've thought about for a very long time, and that's how I feel about this project. Stay tuned!
jp

22 July 2016

Feline Friday: The Art of the Steal

I

All this week, Lily has been on a mission to steal snacks. Wait...Who am I fooling? That's ALWAYS her mission! Anyway, one evening Lily was SOUND ASLEEP on my lap while I was watching the news. Suddenly, she sat straight up and began sniffing the air. I had no idea what she was detecting, but when I turned around, I could see that Spouse had just opened a bag of white cheddar popcorn and settled in on the couch to watch a video.

Now comes the best part. Spouse was completely engrossed in his phone when she jumped down off my lap and quietly peeked at the snack in question.

YEP, dis be popkorns!
 

 Spouse remained completely oblivious while Lily crept around to the back of the ottoman where she would have a straight shot into the open bag. 

 At this point, tears were rolling down my face as I watched her sophisticated methods. Meanwhile, Spouse STILL does did not notice that a small face was peering into his popcorn bag!

When Spouse put the phone up to his ear, I knew Lily was practically home free. She was closing in on the popcorn when he suddenly spotted our stealthy thief and shooed her away!
She didn't get any popcorn (that time) but you've got to admit, her methods are top-notch! Lily has truly perfected the "art of the steal"! :)
jp

21 July 2016

Grandma's Linens

I recently used some of my grandma's old handmade cloth napkins for the first time. Maybe this doesn't sound like a big deal but to me, it marks an important point in the healing process after losing my parents. 
 

 When Mom passed away suddenly in 2008, my dad and I were in a state of shock for quite some time. Their house was full of her things -- and my own childhood belongings -- and it was just too painful for Dad and I to handle them. He was comforted by leaving the house exactly the same so with a few exceptions, nearly everything stayed just as she had left it. And I wasn't strong enough to even touch her belongings, so frankly it was easier for me just to let it all be. Still, having all of my mom's things there made it very difficult for me to even visit my childhood home, as it somehow augmented the incredible hole her passing had left in our lives.

 In many ways, I was so focused on helping my dad through his insurmountable grief for my mom that I suppressed my own. Of course, it is not healthy to do that and eventually I had to fully process those emotions. Unfortunately (but not surprisingly), they all came to the surface in 2013 when I lost my dad. So while I was cleaning out my childhood home, I was really grieving both of my parents. I'm not exaggerating when I say that the pain of all of that grief simultaneously was almost too much to bear.

So what do my grandma's linens have to do with my grief? For me, certain items carry strong associations with people I've loved and lost. Many of Grandma's handmade items were in my parents' linen closet and my mom (her daughter) used them often. Going to the bottom of that linen closet was one of the hardest parts of cleaning out my childhood home, as each piece I pulled out evoked such vivid memories of love and loss.

So after choosing those with the strongest associations, I brought many of Grandma's linens home and just packed them away. The memories made them too painful to touch.

But at some point in this tumultuous process called grief, I began unpacking the linens from storage. I carefully unfolded them and felt the fabric in my hands. I could still smell the spray starch my mom used when ironing them. With time, some of the sharp ache softened and made space for new emotions -- the many good times we shared a lunch or a picnic on one of the tablecloths, or the times when I was sick and my mom covered me with one of Grandma's quilts. Some of that aching hole in my heart began to fill with gentler memories.


So when I pulled out Grandma's napkins to use for a recent family lunch, it didn't seem like a big deal to anyone. But for me, it marks what I believe to be an important point in my healing process. My life doesn't look like it used to, but some of the original pieces are still there. They're just sewn together differently. And I can now see that this life, although changed in nearly every way, is still a thing of beauty.
 

  My mom and my grandma would be delighted that I kept so many of the linens from my childhood. They'd be even happier to see them being put to good use for a family lunch, then laundered, ironed, and carefully tucked away until the next time. Although it is bittersweet, I'm so grateful to have these simple linens that connect me so strongly to those I've loved.
jp

15 July 2016

Feline Friday

 Our daughter was home for a few short days recently. She hadn't been seen in these parts since Christmas -- and she hadn't been home in the summer since 2014! Needless to say, all activity stopped at our house while she was home so that we could just hang out together.

 Both fur girls put up with a surprising amount of cuddling from Bailey. They were also treated to nail trims, which is always easier to do with a fellow cat person!

Here's Lily looking only somewhat annoyed. :)

 Here's Lily again in her normal evening position...just on a different lap for a few days.

Bailey and Lily pioneered the "riding on back" position. Lily will ride on my back but she clearly prefers Bailey!

Tinsel is not at all cuddly but she did put up with more handling than usual. Whenever you attempt to hold or pet Tinsel, she does much better if you support her chin as Bailey is doing here. LOL

 Here's another "Support My Chin" pic!

 But my all-time favorite photo is this one! Tinsel's expression had us all laughing hysterically!
I think Lily and (maybe) Tinsel would agree that it was great to have Bailey home for a few days! :)

14 July 2016

Violet Farm


My grandma was an expert at growing violets. I wish I had a photo of all the lush plants she kept on her windowsills. Grandma took cuttings and seemingly propagated violets at will, and they grew profusely in the slivers of light that came in to her otherwise dark house.

I've grown violets from time to time over the years but hadn't put much thought into it until our daughter Bailey started tinkering with them. She had immediate success with her plants, some of which even made the move with her from Indiana to Texas. 

I purchased a white violet at that time, and Bailey subsequently gave me a cutting from her lavender violet. Neither plant bloomed much until I moved them to a north-ish facing window, and since then they have flowered almost continuously. I recently purchased a third small violet for $2 on clearance at the grocery store, and the three plants have been doing very well. In fact, I seem to be having much more consistent success with my violets than my succulents which are supposed to be nearly maintenance-free!. Go figure!
 

When Bailey came home for a visit last week, I asked her to help me divide the largest plant since I'd never done that before. Since she had done it once, that made her an expert in my mind! :)

First she took the plant out of the pot and shook away most of the dirt. By separating the leaves with her fingers, it was easy to see where new "crowns" were growing. She sliced off the new crowns with a sharp knife.

Using African violet potting mix, we placed the new plants in small plastic containers (the ones they come in at the grocery store) with holes in the bottom. These make great little "nursery" containers for violets which must be watered from the bottom.

Once the new plants were potted, I placed the plastic pots inside small terra cotta pots with saucers to catch any drips. I read that violets should not be planted directly into terra cotta pots because they can promote mold and other issues. When a violet grows too large for its pot, look for a slightly larger plastic pot with holes at the bottom and a saucer to catch leaks.

Before situating the plants in the window, I gave them a good watering by placing them in bowls of water (with liquid violet food mixed in) for about 30 minutes. This allows the water to be soaked up from the bottom into the soil.

Now instead of three plants, I have five! I think that surely constitutes a violet farm. :)

After a few days, all of the plants are still alive and seem to be doing well. One of the new babies has even sprouted a tiny leaf in the center. Squint and you might be able to see it. :)

I wish I had a better spot for the violets than the bench in the dining room bay window, but they seem to be blooming well there so they shall not be moved.

The down side is that the violets are now are cramping Tinsel's style just a little bit, as that bench is one of her prime outdoor viewing seats. As you can see, she is not too pleased!

Sorry, Tinsel, you'll have to move over! Make room for the violet farm!
jp