Showing posts with label violets. Show all posts

10 June 2020

Dividing Violets

A couple of weeks ago, I finally got around to dividing two of my very large violets. I put it off for as long as I could because there's always a risk that the plant won't survive (at least when I'm in charge!) and I wanted to keep the parent plants as long as I could. But they were clearly suffering and would not have lived anyway so I decided to go for it. Look how sad this is!
  

  I removed the plant from the pot and could clearly see several separate "babies". With a paring knife, I cut down between them to separate them.
 

 One of the plants had lifted OUT OF THE DIRT! The brown area is exposed root. Not good!
 

 Once they were separated, I had four new plants from each original one. Now we'll see how many of these plants actually live!

I pulled off the outer leaves until I could see a decent sized stem to plant. It doesn't need to be super-long, but long enough to be planted and support the foliage until new roots take hold.

I have been saving a few small containers to put them in but I clearly didn't have enough. For violets, a cheap garden center temporary planter will do (like the ones you get when you buy bedding plants). It has to have holes in the bottom for watering. If you don't like the looks of the pot (I don't!), you can set it down in a more decorative planter.

 I filled my new containers with violet soil. This is very important as regular potting soil is much too heavy for African violets. Then I poked each new plant down into the dirt firmly.
 

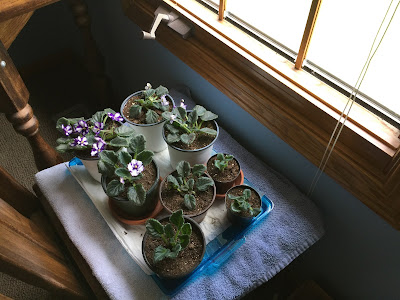
 From the two mother plants, I ended up with this many babies! I ran out of pots so had to use tiny succulent pots for two of the smaller ones. They'll work for awhile while the plants are rooting, but then those violets will need to be re-potted. Violets tend to bloom better if kept in a smaller pot, but these little containers are way too tiny!

After potting them up, I set them each down in a small bowl of water mixed with violet food. After about 30 minutes, the violets will have absorbed all the water that they can and need to be removed from the bowl.
 
 Since I'm out of room in my regular violet location, I set up a new "violet nursery" (HA!) on the same side of the house in our daughter's old bedroom. The light is just about the same so hopefully they'll be happy there. I've watered them a couple of times and so far, so good!

Fingers crossed that these sweet babies will grow up to become beautiful plants...like their mamas!
jp


03 March 2020

Violet Farm Update


I'm still loving my violets! In fact, I've got so many right now that I almost have a space problem. I can't wait until they start blooming again! That will be a beautiful sight!


As you can see, those two ginormous violets at the right need to be divided ASAP. Both of those plants will result in several new babies. That's next on the list!

Awhile back, I divided another large violet which resulted in three new plants (hence the space problem). In the past, I've never done anything other than re-pot them, but I recently saw a video (GardenAnswer -- my favorite garden YouTube channel!) suggesting that you put the baby violets in a closed plastic bag for a month. This creates a terrarium-like environment which gives them a good start.


So I decided to try it. Once the baby violets were potted, I put them into large plastic bags and loosely clipped the tops shut. The violets were well-watered before going into the bags so the bag didn't need to be opened for a month.


I checked them frequently and after 2-3 weeks, I noticed that a mold or fungus was starting to form on the soil. I'm quite sure that I over-watered the violets before putting them into the bags. Because of this, I had to remove them earlier than planned.


Once out of the bags, I cleaned up the soil and just left them out. The new violets are continuing to thrive! I don't know if the bag treatment is 100% necessary since I've had good luck without it, but if you've struggled with getting new violets started, it is definitely worth a try!


24 July 2018

Succulents and Violets

It's been a very long time since I posted about the state of my succulents and violets! I've recently re-potted both so I thought I'd share a little about my experience.

In short, I've had mixed results with my succulents. Succulents supposedly require very little care, but I've found that they're harder to grow than you'd think. It's very easy to over-water them, and they're sensitive to the amount of light they get each day -- although I haven't figured out what the "right" amount of light is! My succulents seem to be doing pretty well in the laundry room, so that's where they'll stay.
I recently added some new plants to the oval pot in the photo below. One plant had grown very leggy, so I removed it and put it in the small square pot to hopefully start afresh. It's already tipped over several times so I'd say the long-term chance of survival is slim! :)

I added the three plants at the left, back, and right of this pot to fill it up. After watching a few videos, it dawned on me that succulents do not grow quickly so they don't need a lot of extra space. Fuller planters look better to me. In fact, I probably could have squeezed a few more into this planter!
 Since I've moved the succulents to the laundry room, they seem to be doing better. I have a reminder set to water them every two weeks which seems to be just about right. We'll see how the new plants survive!

I've had better success with my violets...although I may have just ruined everything!

Recently I attempted to split two of my violets which had developed multiple crowns (new baby plants). I have only attempted this once (with Bailey) so this was the first time trying it on my own. I watched a couple of videos to learn the proper method and decided to give it a try. 

Here you can see how large this plant was! There were three or four plants in one.

I pulled it out of the pot and shook off the dirt. In retrospect, I should have done this when the plants were very dry.

I gently pulled apart the plants, trying to leave roots on each one. (This is probably where I failed...we'll see!)

 I placed the newly separated plants into small containers with violet potting mix. I use plastic containers with holes in the bottom, as violets are watered from the bottom.

 After splitting the violets, I had seven pots. I trimmed off some of the outside leaves to make them a little more balanced, watered them, and put them back in the dining room where they live for the time being.

 One week later, they're all still alive, but the leaves are not as "stiff" as I'd like them to be. When violets are thriving, their leaves stand out rather than flop down. I'm hoping they're just suffering from transplant shock and that this will improve over time. We'll see!
 
I really hope they live, but if these violets die, I'll be buying a few new ones at the grocery store. Nothing ventured, nothing gained!
jp


10 September 2016

Violets: Intervention Needed


 A couple of years ago, inspired by my daughter's success with violets, I got one of my own. It was not my first foray into the world of violets but my previous violet experiment ended badly, so I didn't expect much. Luckily, my violet lived and this little bit of success inspired me. Now I have five!

 This one just started blooming, and I love the color! To think I found it in a clearance cart at the grocery store, ready to be thrown out. Poor thing just needed a little TLC!  


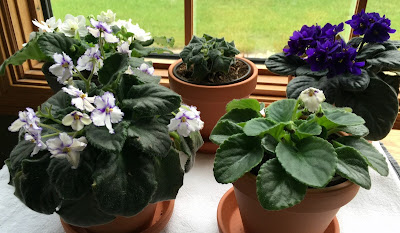
 The ruffly violet at left was a cutting from one of Bailey's violets in Texas. It started out very small but has done quite well. When she was home recently, she made a cutting from this plant to create the smaller one at the right. The baby now has blooms of her own!


My original violet has done extremely well, now that I've figured out the proper light (east or north windows are best). We divided this one, too. After that, I trimmed off some of the leaves so it's a bit lopsided, but it is looking a little more balanced over time.
 

 Violet leaves should be stiff and sturdy, like this...
 

...not like this. Although this cutting from my original plant has sprouted new leaves, they're always limp.

If the soil is dry and the leaves are limp, that's when you know to water it, but if the leaves STAY limp after watering, there's a problem. According to the violet websites I checked, limp leaves are often a symptom of over-watering or root rot. The only way to determine this is to un-pot the plant.

I did as directed and immediately found the soil to be pretty wet. Obviously I have over-watered this plant, thinking the limp leaves meant that it needed water. NOPE. Too much of a good thing, I guess! I shook the dirt off the roots and did not see any signs of rot.

I re-potted it in new dry violet potting soil, this time setting the plant a bit lower so it would not be so wobbly. I will wait to water it until the soil REALLY dries out and that moisture on the roots has a chance to get absorbed. I'll give it a few days and see how it looks.
 

Here's hoping this intervention does the trick!
jp


14 July 2016

Violet Farm


My grandma was an expert at growing violets. I wish I had a photo of all the lush plants she kept on her windowsills. Grandma took cuttings and seemingly propagated violets at will, and they grew profusely in the slivers of light that came in to her otherwise dark house.

I've grown violets from time to time over the years but hadn't put much thought into it until our daughter Bailey started tinkering with them. She had immediate success with her plants, some of which even made the move with her from Indiana to Texas. 

I purchased a white violet at that time, and Bailey subsequently gave me a cutting from her lavender violet. Neither plant bloomed much until I moved them to a north-ish facing window, and since then they have flowered almost continuously. I recently purchased a third small violet for $2 on clearance at the grocery store, and the three plants have been doing very well. In fact, I seem to be having much more consistent success with my violets than my succulents which are supposed to be nearly maintenance-free!. Go figure!
 

When Bailey came home for a visit last week, I asked her to help me divide the largest plant since I'd never done that before. Since she had done it once, that made her an expert in my mind! :)

First she took the plant out of the pot and shook away most of the dirt. By separating the leaves with her fingers, it was easy to see where new "crowns" were growing. She sliced off the new crowns with a sharp knife.

Using African violet potting mix, we placed the new plants in small plastic containers (the ones they come in at the grocery store) with holes in the bottom. These make great little "nursery" containers for violets which must be watered from the bottom.

Once the new plants were potted, I placed the plastic pots inside small terra cotta pots with saucers to catch any drips. I read that violets should not be planted directly into terra cotta pots because they can promote mold and other issues. When a violet grows too large for its pot, look for a slightly larger plastic pot with holes at the bottom and a saucer to catch leaks.

Before situating the plants in the window, I gave them a good watering by placing them in bowls of water (with liquid violet food mixed in) for about 30 minutes. This allows the water to be soaked up from the bottom into the soil.

Now instead of three plants, I have five! I think that surely constitutes a violet farm. :)

After a few days, all of the plants are still alive and seem to be doing well. One of the new babies has even sprouted a tiny leaf in the center. Squint and you might be able to see it. :)

I wish I had a better spot for the violets than the bench in the dining room bay window, but they seem to be blooming well there so they shall not be moved.

The down side is that the violets are now are cramping Tinsel's style just a little bit, as that bench is one of her prime outdoor viewing seats. As you can see, she is not too pleased!

Sorry, Tinsel, you'll have to move over! Make room for the violet farm!
jp

11 October 2015

Violets -- in a New Light!

Bailey's African violets traveled from Indiana to Texas (one even made the trip from Iowa) and they're all doing great! Since Rory came to live with her, she's had to move them around somewhat because New Kitty seems to have a keen interest in the foliage, yet her violets are still thriving!

But my violet (shown on the left) had not bloomed since I purchased it with her back in March. The clipping she gave me in August is doing great but isn't large enough to bloom quite yet.
 

According to Bailey, who clearly has a green thumb for violets and has read up on such things, violets need light from an east or north window. My violets had been in front of a south(ish) window. After I moved them to a north(ish) window and started feeding them more regularly, my original plant generated buds...

...and then this!

 My north window is in our dining room, not an ideal place for a violet nursery, but they're doing great so there they'll stay!