Showing posts with label cards. Show all posts

11 August 2022

Cards from the Scrap Box

I recently had a bout of low crafting mojo. It happens from time to time...nothing to worry about! Two things always help with that: 

1) Organizing my craft room

2) Making cards to give away


In the past year or so, I've made and donated a lot of cards to the Cards for Kindness program. If you enjoy making cards and have more cards than people to send them to, you may enjoy sending your extras to this wonderful program. Donated cards go to a variety of organizations and are put to good use. Do check the website before you make or send cards as the themes needed vary from time to time. All cards should be blank inside and must include an envelope.

On this occasion, I made cards in the "Happy Hello" theme and decided to use up a lot of leftovers from my scrap box as well as my extra die cut pieces. It was just a matter of mixing and matching until I had paper, die cuts, and sentiments that coordinated.

  I kept the designs simple and in no time at all, I had a whole batch of cards ready to send.

And the next thing you know, I'd found my missing mojo and could get back to crafting! That's a win-win in my book!


21 November 2021

More Christmas Card Stash-Buster Cards

As I've come to the end of some of my (hoarded) Christmas stash, I've made a few "one-off" cards. That means there is only one of them! 

In years past, ALL of my Christmas cards were one-off cards but that is just crazy-making. Nowadays, I'll repeat designs even if some of the materials are different. I'll do that until I reach the end of a collection, then I'll make a "one-off" card. Such cards are also great stash-busters.

Here are some examples from this fall's Christmas card lollapalooza, which is just a fancy word for the mess happening right now in my craft room:

 This first card is not a new design but it worked well to use up the tiny (and I do mean TINY!) bits from this paper collection. And believe it or not, I think I MIGHT be able to eke out another notecard or two from what I now have left. At some point, I'm going to have to quit with these leftovers but I just love them so much!

This card used up an October Afternoon elf and two strips of my hoarded Authentique papers. Sadly, this is another company that I think is now out of business, so I can hardly stand to use these papers! I will probably have to keep a small stash just to look at from time to time. *sigh*

My long-time scrapbooking friends will remember Ki Memories, one of my all-time favorite companies, also long out of business. Somehow I still have stashes of Ki paper which occasionally work for cards. The inspiration for this card was the snowman. When cleaning out some embellishments, I ran across his hat, body, and scarf separately. I glued them together, vowing that he'd find his way to a card this year!


At the bottom of my die cut bin I found several large circular pieces (I think they are also hoarded October Afternoon bits). I arranged three coordinating bits in a zig-zag formation on my card front, then added in Santa, a greeting, and some glittered greenery. This zig-zag design is one I know I'll use again for different themes.

The red and green chipboard stockings were the inspiration for this card. I don't even remember where they came from, but they've waited a very long time to be used on a card! As I dug through my stash, I found a grinch-style die cut tree that matched perfectly. After that, it was just a matter of finding some paper to coordinate, and this card pretty much made itself.


Having made these and several other "one-off" cards, I'd suggest starting with the focal point and not the paper -- in this case, the stockings, Santa, snowman, elf, etc. For me, it seems easier to find paper to coordinate with those items than it is to find focal point pieces to match papers. And keep in mind, the paper you use does not even need to be Christmas themed, as long as the colors and patterns coordinate. Many of the papers I used, especially for envelope liners, are not designed for holidays. 

Here's to more stash-busters...so we can make room for new and beautiful goodies!

Thanks for stopping by today!
Janet

17 November 2021

Handmade Christmas Cards: Use That Stash!

 I freely admit that I'm usually quite late to start my personal Christmas cards. A lot of that has to do with the Christmas card classes and kits I design for Memory Bound. Those big projects tend to occupy a lot of my time during the fall months when one would normally work on Christmas cards.


Instead of rushing around at the last minute, this year I decided to try something different. I've been working on my cards for several months now off and on as the mood strikes. This has turned out to be a very good process for me and now I have 45+ cards already done. Since I'm still on a roll I'll just keep going, and any extra cards I don't need will be saved for next year.

 One thing that has helped me be more productive this fall is setting up a little "station" with my Christmas card stash. I bought a new line from Stamperia this year (like I needed more Christmas stuff...HA!) and filled one of my mom's old glass fridge containers with the chunky die cuts. In the other one I placed some larger pieces I've had for years. I love some of them so much that I don't know if I'll every be able to use them, but step one is having them handy! In the small bowls I placed text pieces I've made and cut apart and smaller die cut pieces. My glitter, Nuvo Drops, and sparkle brush also fit nicely on the tray.


 I have a small enamelware tin which came from Mom's kitchen filled with extra die cuts and punched pieces. I will often make a few of these from scraps of cardstock to have on hand for cards. It's really nice to be able to dig around and find just what you need.


So with this set-up, whenever I feel like making a card I have everything I need to get started.

I started putting the completed cards and lined envelopes into one of my many Longaberger baskets. As the year has progressed, I had to break out a bigger basket to hold them all! It's nice to have a visual reminder of my progress.

In addition to making cards with newer products, I'm really making a concerted effort this year to use up some older stash. One of my favorite companies (now sadly out of business) was October Afternoon. I have a lot of their products that I just can't bring myself to use...especially for cards that will be given away. But I finally decided I COULD use some of the papers in this old 8x8 pad.

In looking through my stash of die cuts, I found a lot of kraft tags, so I decided to come up with a design to use a few of them up. I started with a panel of patterned paper from the pad, then added a cream die cut stitched rectangle and tag. Beyond that foundation, each of these cards varies a bit based on the cut-apart artwork I used on the front.

I still have plenty of these papers left so I may make a few more October Afternoon cards from my stash. I also have a lots of kraft tags left so I know I'll be using this design again! It's a good foundation for any card for any occasion.


Here's to finally using up that stash!
Thanks for stopping by!
Janet


15 November 2021

Cat Cards from Scraps

I've been going through my paper stash and pulling out the bits and pieces that would make good cards. I recently ran across what was left of the older Graphic 45 collection, "Raining Cats and Dogs". I had just a few paper strips, chipboard pieces, stickers, and cut-aparts and decided to make up a few cards to have on hand for my cat-loving friends. I love the colors in this collection! 

Now that I think of it, the floral paper was the only one original to this paper line. I added in the orange check and blue dot from my stash. Even though pickin's were slim, it doesn't take much to make a perfectly acceptable card!


For two of the cards I used the same "strip card" design I posted previously, supplementing it with punched flowers and greenery. 

 I used 3x4 cut-aparts on two cards and finished up a sheet of stickers with a notecard. When I get down to just a few small pieces, I switch to a smaller card base. Works great!


I added stickers to the insides of some cards. This is a practical way to use up little bits of this and that.


 It's always a fun challenge to see how many cards I can make from scraps. Now on to the next batch of odds and ends from my stash!

Thanks for stopping by today!
jp


03 November 2021

Christmas Cards from Scraps


After Christmas last year, since we were still on lock-down, I decided to continue making Christmas cards. Every time I had a few minutes, I tried to make at least two or three. I continued doing this through the spring and before I knew it, I had a 24 or so cards ready to go for this year. The fact that I'm making my own Christmas cards before December 1 is quite remarkable. And I'll admit that it's a good feeling!

Before starting on my Christmas cards again this fall, I decided to clean out my box of holiday papers. It is quite amazing the amount of stuff I've accumulated over the years. Considering how I enjoy making cards from scraps, I have the potential in this box to make several hundred Christmas cards...way more than I'd ever need!

It doesn't take much product to make a nice card, especially if you supplement your paper with die cut pieces. For instance, I had just a small baggie of my favorite 6x6" (hoarded!) Authentique papers left and decided to see if I could use it all up (I still haven't!).  I've made Christmas cards with this pad for at least two years so you know I'm coming to the end of my stash! Along with the few pieces of Authentique, I also had a few scraps of coordinating papers.


I started by sorting the papers into piles by pattern. At that point, I realized that I had four Santa pieces which would make nice card fronts. The challenge was that this Santa piece was long and skinny, and none of my paper scraps were very large.


With my papers sorted, I came up with a design that would enable me to make four nearly identical cards. Since I had a lot of 1" strips, I started with one at the left. Next came the Santa piece. I also had a few 2x3" pieces so used one on each card at the right, followed by a horizontal 1x4" strip across the bottom. The pieces were arranged in a stair-step fashion which worked great for the narrow Santa. When adhering them, I started with the right-hand piece, overlapping each one slightly so that Santa appears to be looking out from behind the strip at the left.


The strip across the bottom covers the cut edges and provides a "ledge" for the text piece and embellishments to come.


I added a text piece made with MS Word text boxes, then finished each card with some glittered greenery, a die cut poinsettia, and punched circles. I really like the pop of black which ties into Santa's buckle, so I repeated it three times in the punched circles, Nuvo Crystal Drops, and text piece.

After making Card #1, I created the remaining cards in assembly line fashion which made the whole process quite fast!


For the past few years, I've been lining the envelopes for all of my cards. This is a great way to step up your card presentation. So after making these cards, I found a coordinating green paper and cut liners for each envelope. 
 
In addition, I also like to run my envelopes through the printer with the addresses formatted in a pretty font. Along with the liner, the printed address makes the card presentation a little more special. After the envelope is printed, I adhere the liner. In the meantime, I'll store the cards, envelopes, and liners together so that everything is ready when I sit down to print on my envelopes.
 

In addition to these cards, I had a couple of small pieces of Authentique artwork left to use on my favorite "strip cards". This is a design I tend to use when I'm coming to the end of a paper collection and just have small strips. It works for any occasion. I made graduation cards with this design back in May, as well as on several occasions since then!


This is such a handy design and one that you can make with almost nothing! While I was at it, I cut liners for the envelopes so they are ready to go.

Another time-saving measure is printing directly on the insides of my cards. I have formatted a MS Word document with a text box that prints on the upper right of each card base. For me, this is definitely faster than stamping and much more efficient than printing my card inserts separately and gluing them inside each card.


As I sorted through my scraps, I found enough to make 10 Christmas cards for the Cards for Kindness program. If you enjoy making cards but perhaps (like me) don't have a ton of people to send them to, I'd encourage you to check it out! It's a wonderful way to use your card-making skills and stash to spread a little kindness in the world. And it's not just for Christmas cards! They need cards in a variety of themes all year long. In addition to making 10 Christmas cards, I also made 10 "hello" cards, all using scraps in similar designs to the ones shown above. It was a great feeling boxing them up and sending them off this week!

Thanks for stopping by the blog today! My goal is to post more frequently and so far, so good!

jp


31 October 2021

Handmade Sympathy Cards

This has been a sad week. My cousin passed away from lung cancer, the same type of cancer that took my dad, her uncle. It was heartbreaking and took me to a really bad place. The entire situation happened so fast that I'm honestly still in shock. Cancer has affected too many people in our family. 

This situation left me feeling powerless and vulnerable at the same time. The only thing I COULD do was send a handmade card offering my support.


I always tell people that the time to make a sympathy card is NOT when you're in the midst of dealing with a loss. Sympathy cards are really the most important to have on hand but unfortunately, I found my card basket lacking. In this case, I needed to make six separate cards to send to the many family members affected by her passing. So I came up with a really simple design that could be replicated easily.

To start, I cut my card bases down to 4x5.25". My cousin loved her flowers so I found a sheet of floral paper and cut it into 2.5x4" pieces. I added the floral paper to the tops of the cards, followed by a 1x4" strip of coordinating paper.

I die cut and embossed two flowers from coordinating cardstock, then tucked some punched greenery behind. I finished with a printed text piece and Nuvo Drops on the flower centers.

To make the presentation a little more special, I printed the addresses on the fronts of the envelopes on my printer (not shown) using a nice font. Once printed, I added a coordinating liner to each envelope.

My advice to all of my card-making friends is to stop what you're doing and make some sympathy cards to have on hand when you need them! If you need a design, this is a super-easy one to replicate. To make it more masculine, you could use different paper (I like neutral plaids) and substitute die-cut leaves for the flowers. 

You'll be glad you have a card or two on hand for those sad occasions when you need to reach out to someone who has experienced a loss.

jp


24 October 2021

Where Have I Been?


Blogging friends, it's time for me to be upfront about my blog. That sounds more ominous than it really is!

My poor blog has been neglected for so long that I sometimes wonder if I should even keep it up. My posts have been reduced to weekly Feline Fridays and this is far from the vision I had when I first started blogging.

The current State-of-the-Blog just makes me sad. 

It nags at me like an unfinished project.

As it happens, I've had conversations with a few people lately about blogging in general. In these casual chats, I've heard myself saying things like:

* Blogging isn't as popular as it once was.
* Videos have somewhat/largely replaced blogging.
* Privacy and safety concerns have led to the demise of some blogs.
* Google no longer supports Blogger and as a result, it has few features. Heck, there's not even an app!
* Moving my blog to another platform like Wordpress seems like more trouble than it's worth.
* Life has gotten in the way of my blogging. The pandemic situation resulted in a big uptick in my creative endeavors for the store where I teach. It's been super fun but has limited my time for blogging.

On the other hand, these things are also true:

* I still love writing, even though my lack of self-confidence sometimes gets in the way of it.
* I have relied heavily on my blog as a record to support my scrapbooking.
* Blogging gives me a way to share about topics of interest to me.
* I would be terribly sad to give up my blog.

So weighing all of these things, all of the positives are much more important to me than the negatives. So the logical answer to this situation is for me to dedicate more time to my blog and get back to the aspects of blogging I have always enjoyed. 

And just see how it goes. 

I think I still have a few folks out there who read my blog and there's a slight possibility I'd have more if I actually posted once in awhile! 😀

So here's to posting a little more frequently -- and about more than just CATS. After all, this blog is supposed to be about BOTH CATS and CARDSTOCK. I still love cardstock -- probably not as much as cats but it's close! 

Let's "get this party started" (this is as close to partying as I get) with some examples of cards I've made in recent months for various occasions. And yep, all of these cards feature cardstock!

I made this first card about a year ago on the occasion of a very special engagement! The hearts are from a large Hero Arts die set and instead of layering them, I inlayed each one to create a flat surface. This is a trick that's easy to do with any nesting die set you may have. I added die cut flowers, foliage, and a word at the bottom. To give the word more emphasis, I cut it three times and glued the layers together.

  
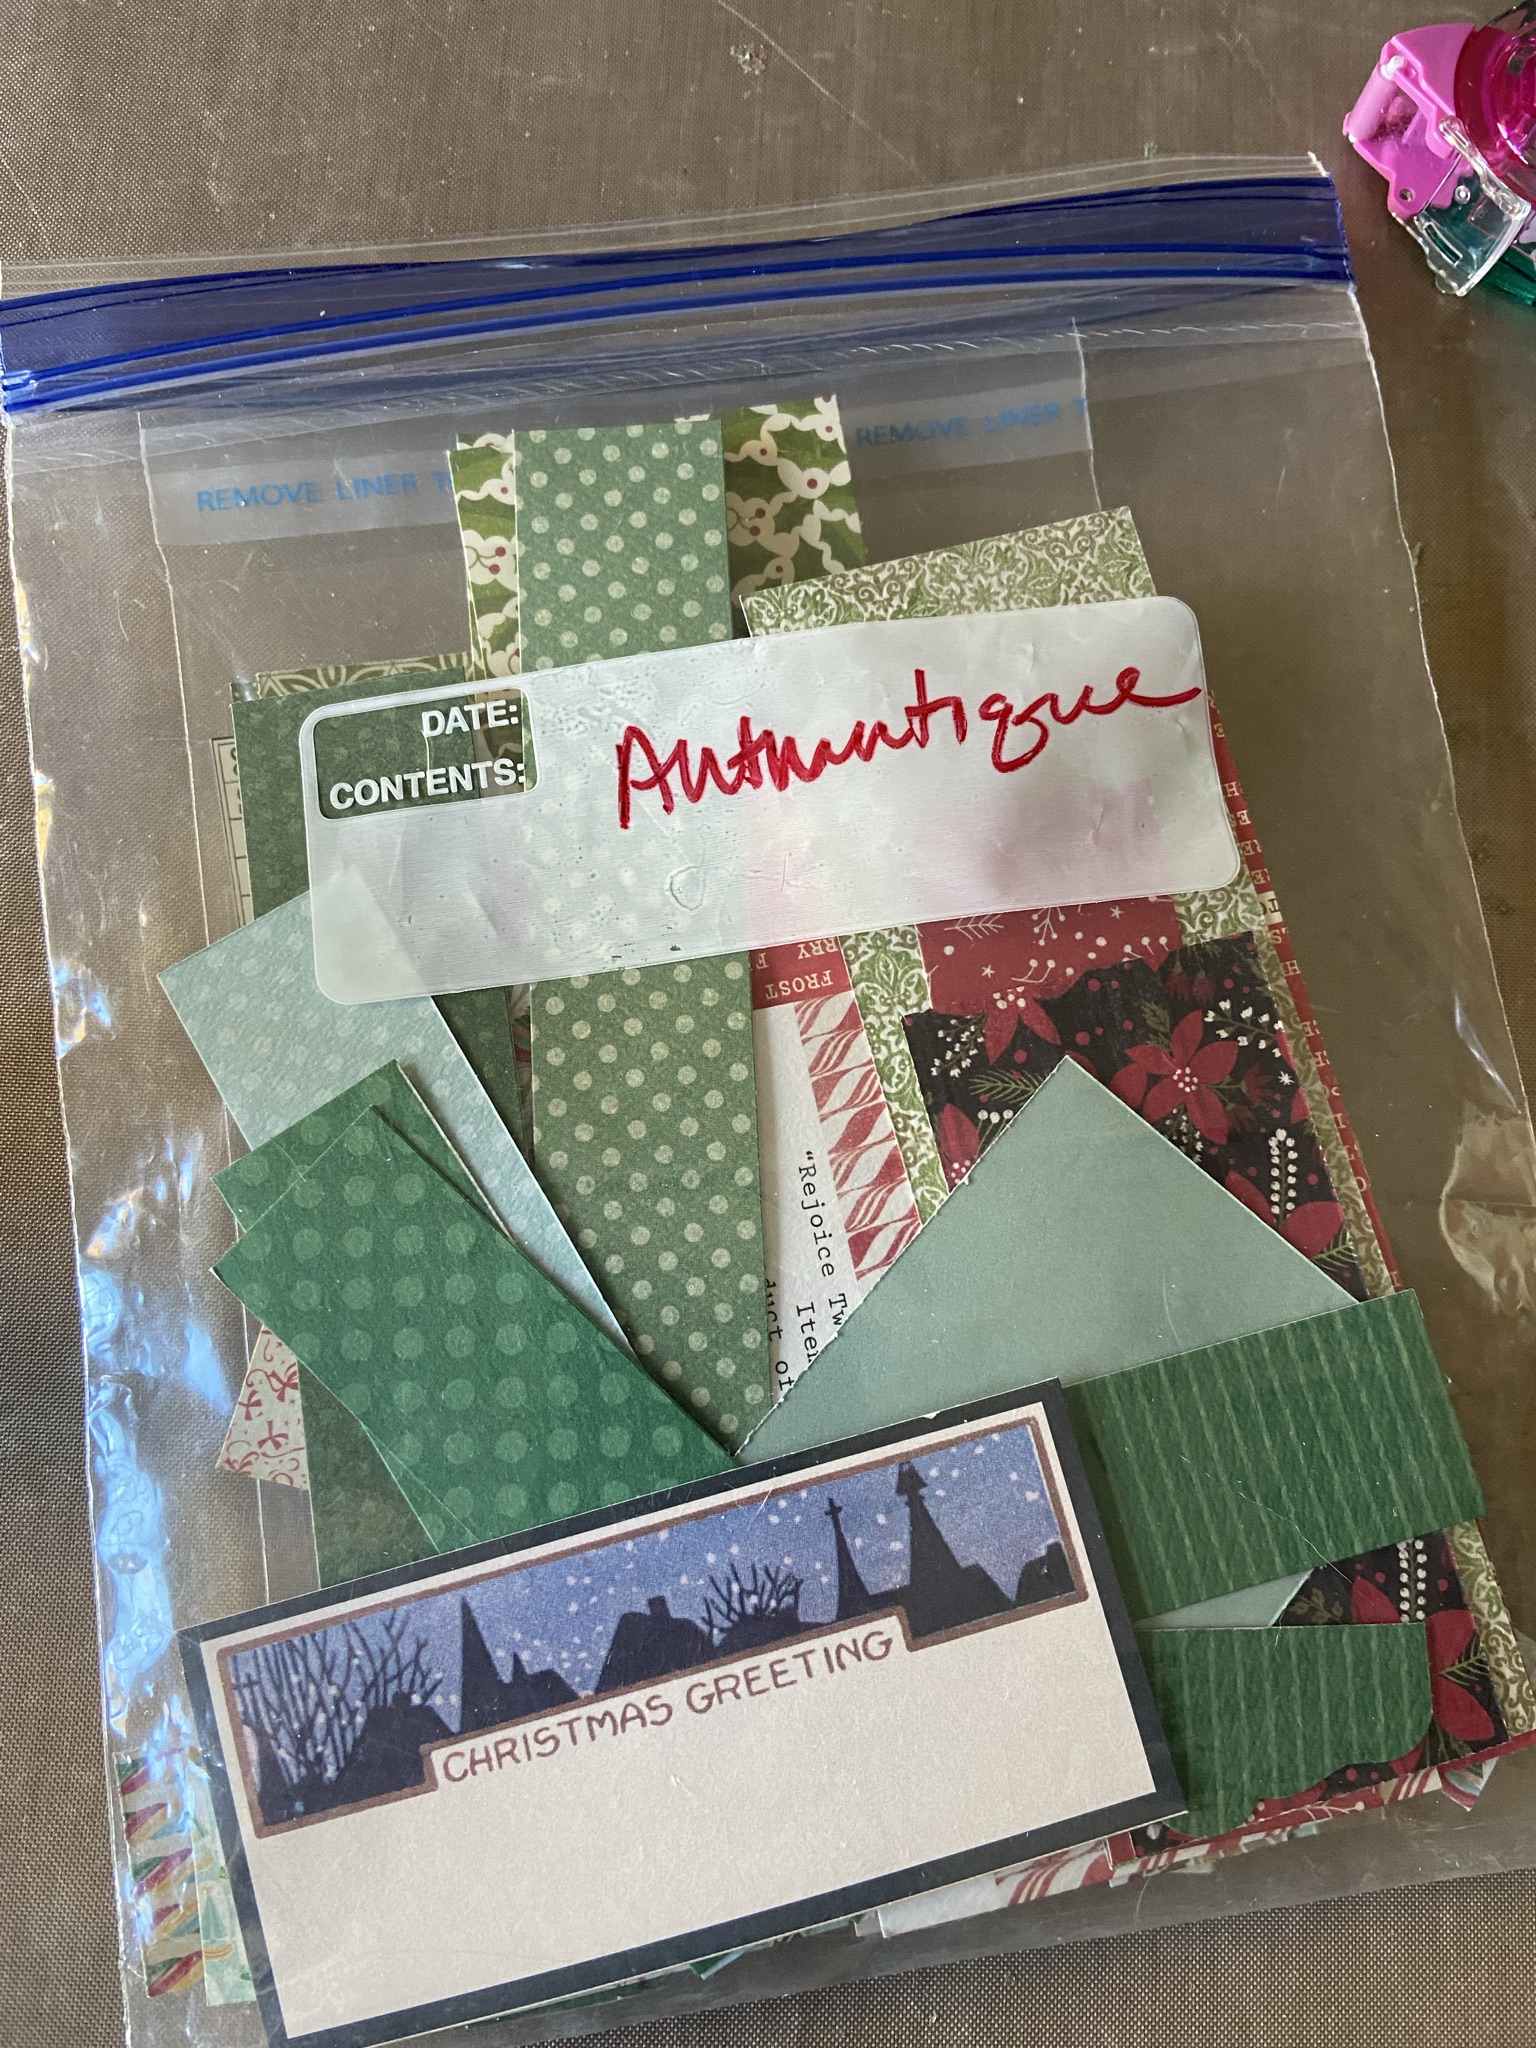
From the side, you can see that this card has a lot of texture and dimension but still mailed quite nicely. Incidentally, the paper is from an older 6x6 Authentique pad which has sort of a Bohemian vibe. Sadly, Authentique seems to be out of business, or at least not actively in business at this time. 

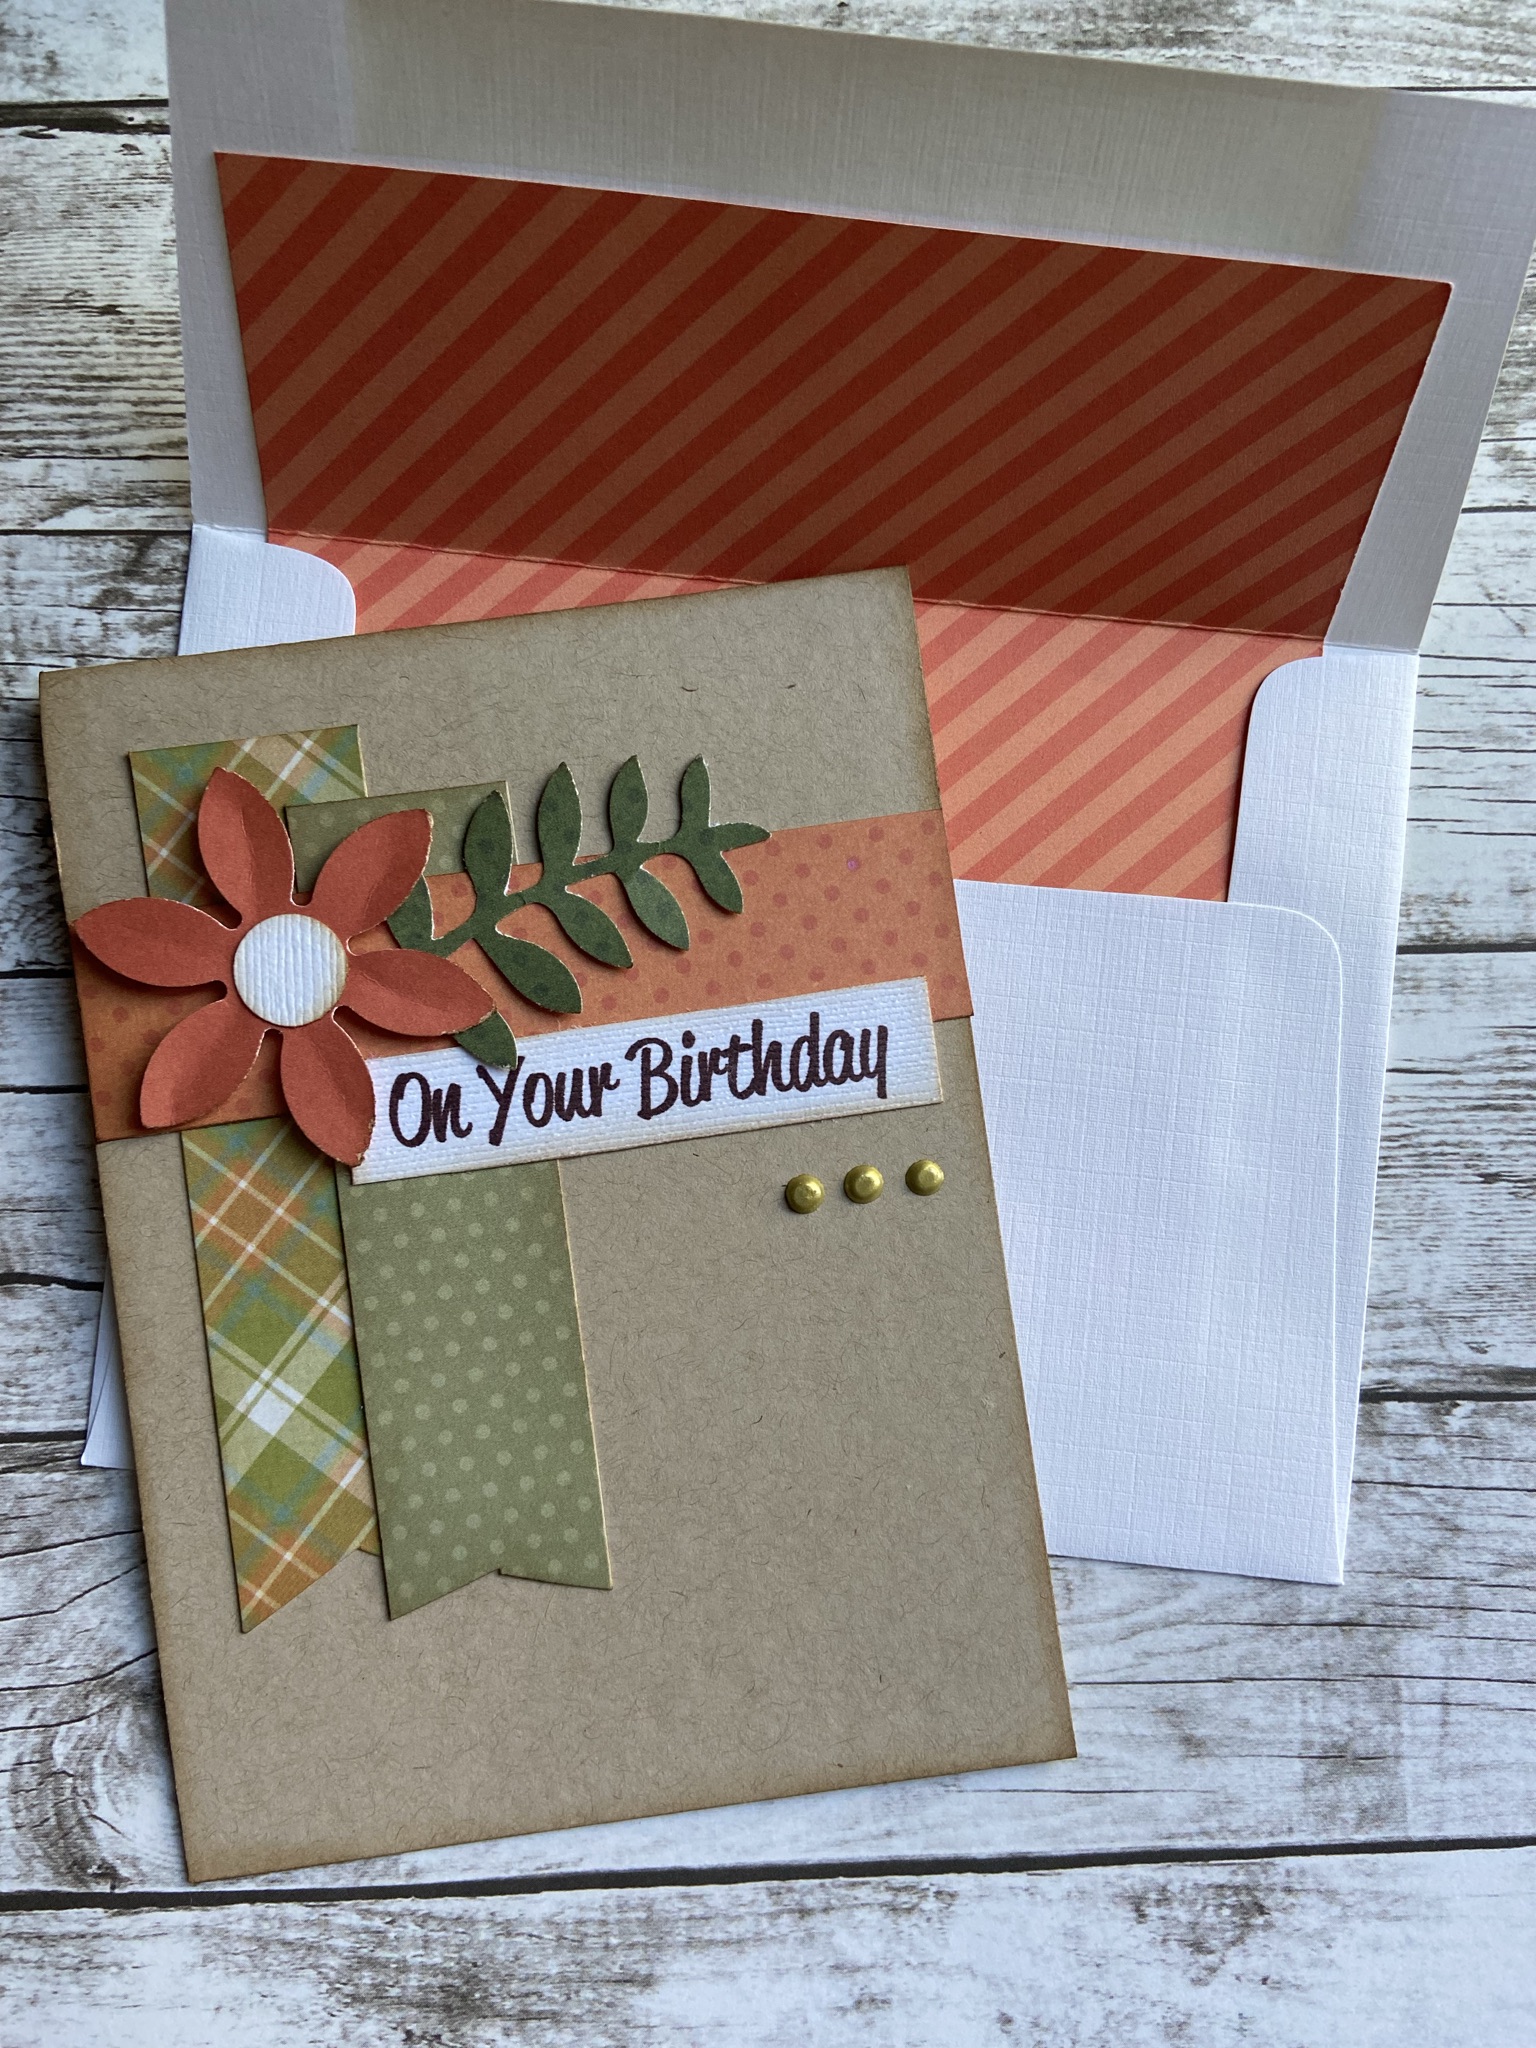
This birthday card also features an older paper from my stash and a few die cut hearts with a printed greeting. This is an easy way to use up some of those scraps you may have been hoarding! Just cut a panel of patterned paper and mat it with cardstock. Then die cut a few hearts and flowers in some colors derived from the paper. To finish the card, I embossed the yellow heart and added black Nuvo Crystal Drops to the flower centers.

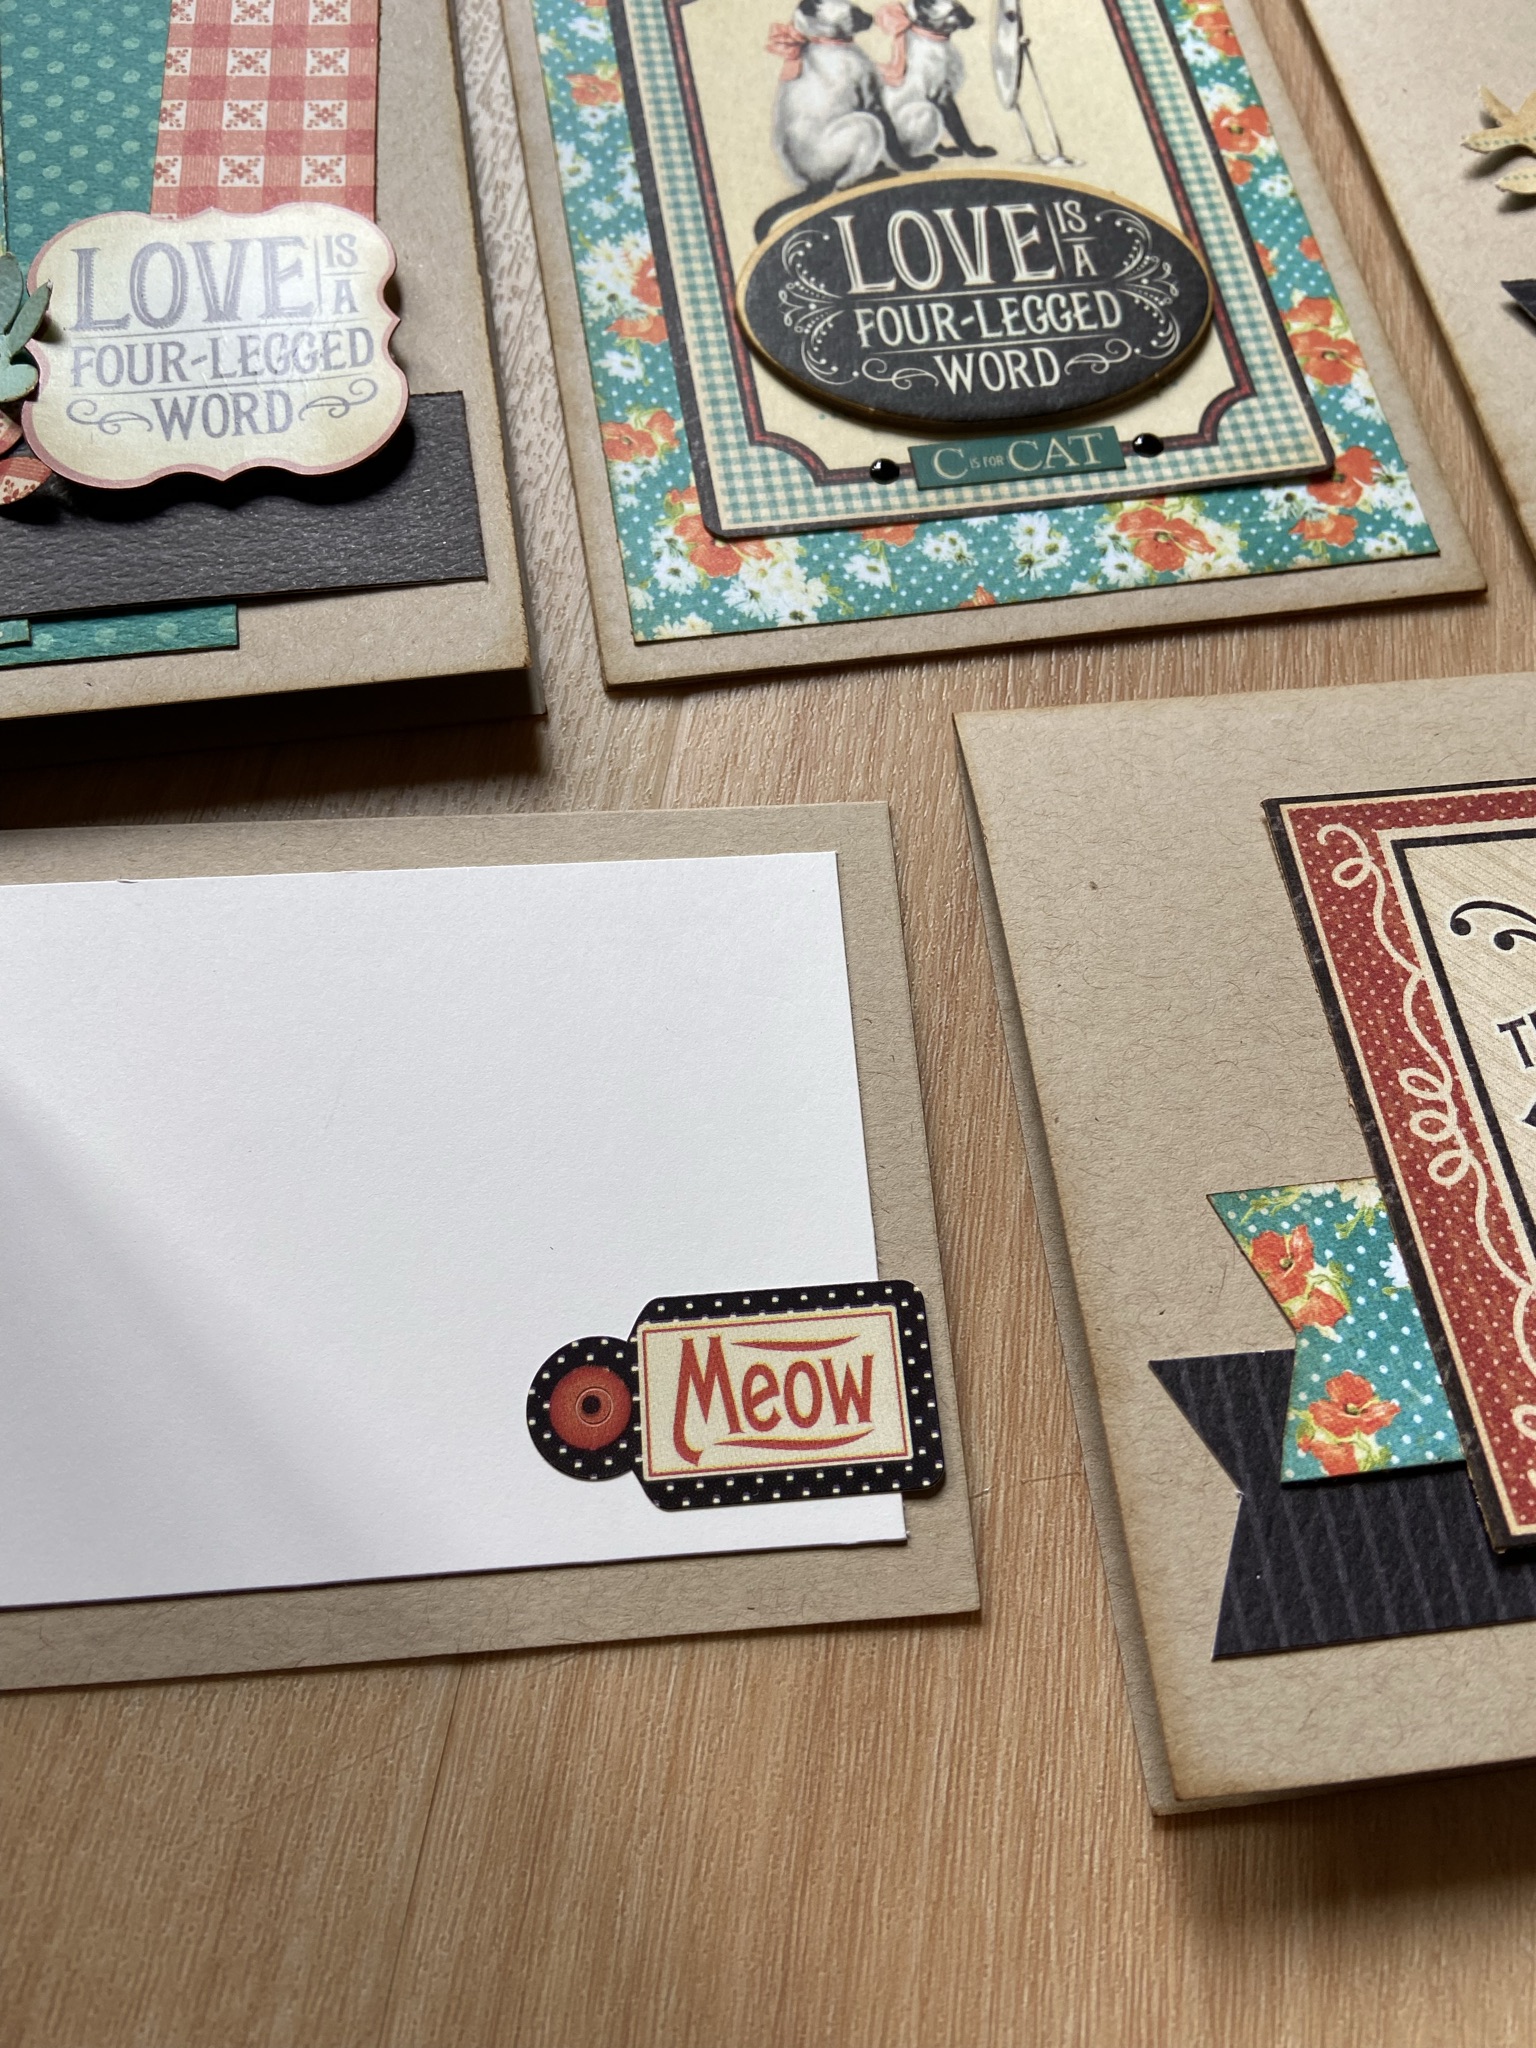
These cards and tags are part of a set of samples I made for Memory Bound. I used a 6x6 pad from Echo Park to create lots of different projects. I enjoy making grid cards like the two you see here. They are easy to make with 2x2 or any similar size elements. I also like to save some smaller bits to add to tags. If you're giving a gift, it's fun to include a matching card and tag to make the presentation a little more special!


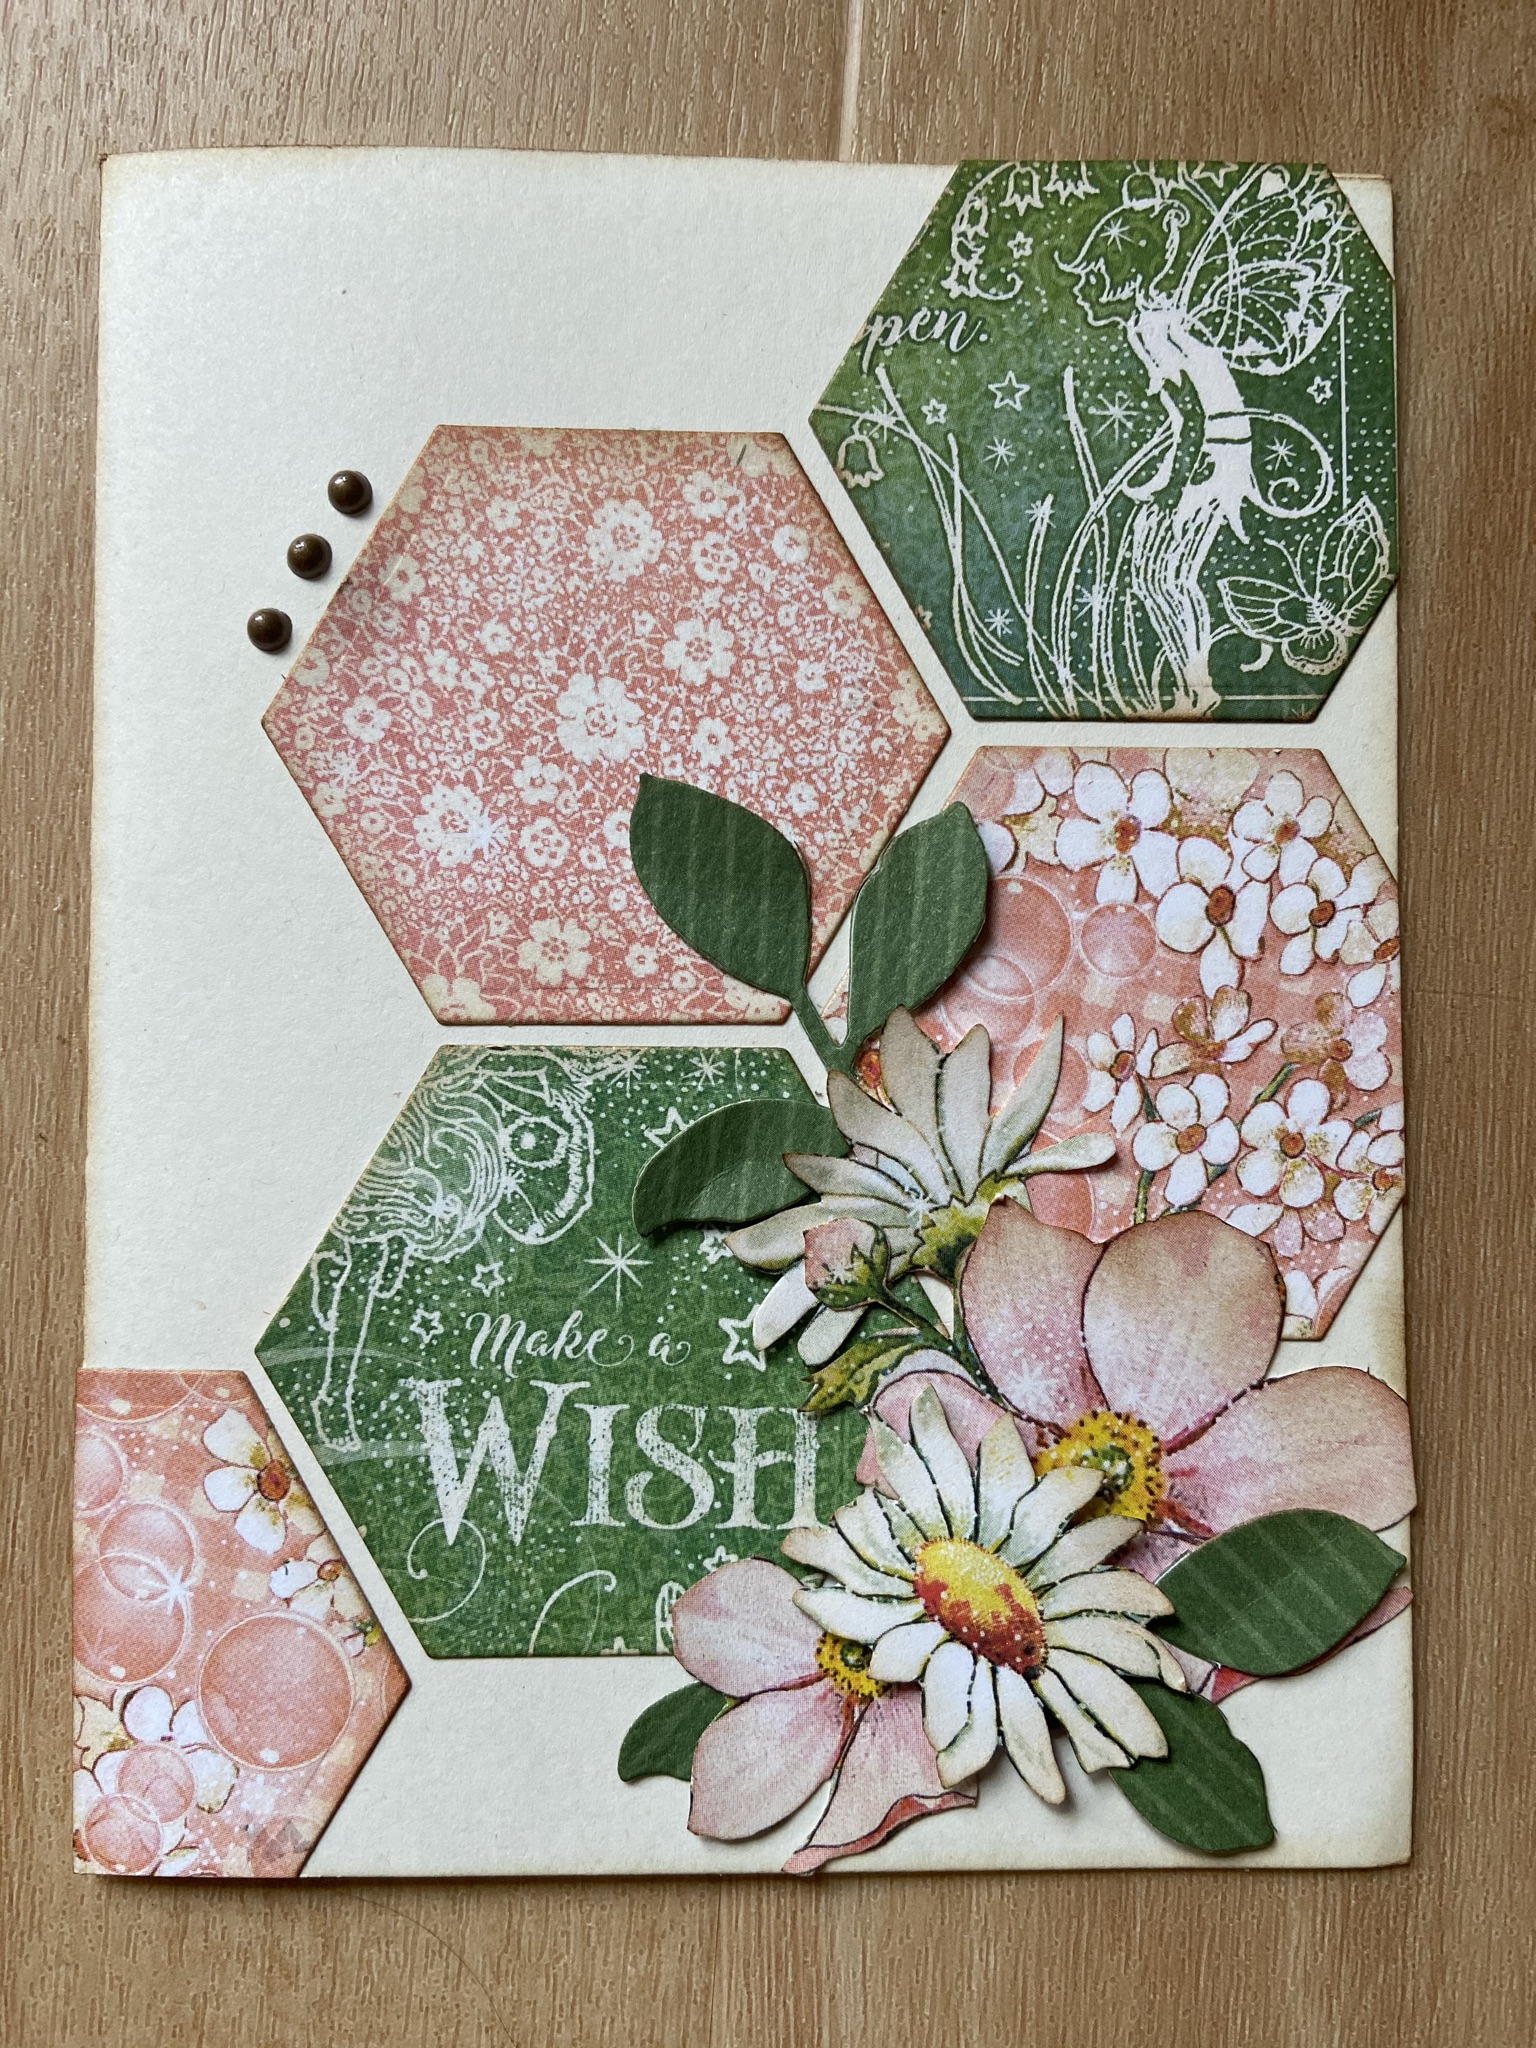
These next three cards were also made as samples for Memory Bound using the Graphic 45 fairy-themed line. This collection has a lot of different colors included but for these cards, I limited the color pallet to pinks and greens. This first card features fussy cut flowers from the paper.

 This next card features paper which I cut with a hexagon die. If you have busy paper that's hard to use, cutting it up like this is a good way to go. The card design also features a fair amount of "white space" (blank area) that balances out the busy papers and gives the eye a place to rest. The bottom corner also features a few fussy-cut flowers which is another good way to use Graphic 45 papers.
This is a simple design I've used often with many different papers and is a good way to use border strips and smaller cut-apart elements. This time I pulled in a blue border to tie together with the blue in the fairy piece.There was room for a small fussy-cut flower cluster at the left.
These two cards follow the same design. I'm never afraid to "borrow" an idea from a previously made card! As you can see, the cards look different even though they are made with the same basic idea. I had enough pieces to make several versions of the card at the left and I've used them this fall for many occasions.

This is a "book binding" style card which is designed to look like the cover of a book. To achieve this effect, you simply score the card front at 4.25" and 5.25" which creates a 1-inch "spine". You'll adhere this part shut with Scor-Tape. I really enjoyed making this card and will definitely be creating more from this design in the future. Since I was giving this card in person, I also took the opportunity to decorate the outside of the envelope, something I always enjoy doing.

This was a fun card I recently made to celebrate the 20th anniversary of Memory Bound, the store where I teach. It's hard to believe that the store owners invited me to teach over 20 years ago and I'm still at it! 😀 For this card, I used colors to match their logo. I embossed a white panel for the front of the card and die cut it with a stitched rectangle. Keeping the background neutral allowed me to focus attention on the items in front. I die cut flowers and greenery and layered them in a "spray" across the top. In this case, I had the opportunity to again decorate the front of an envelope which always adds to the presentation!

I just made this last set of cards as a little gift for a co-worker whose husband has been hospitalized. The call went out that she was in need of thank you cards to send to the many people who have helped them during this challenging time. I went to my stash and found a 6x6 pad with masculine plaid paper. I simply cut the paper into 3" strips and added them to the front of each card. Then I added a strip of cardstock and some die cut leaves to each, along with a printed sentiment.

To give the cards, I stacked them along with 4 envelopes and wrapped them with a piece of tulle. I added a die cut tag and included a note on the back. This is an easy but nice way to present a bundle of cards.

I know that many of my friends love making cards but don't have all that many people to send them to these days. Bundles of cards make a wonderful gift, perfect for the holidays or to take along to a party as a hostess gift. Or drop off a few at your local nursing home. This is a great way to put your card-making skills (and stash!) to use and spread a bit of cheer at the same time!


 Okay, I've done it. I've shared just a bit more of what I've been up to lately and it wasn't so hard. Stay tuned!

Thanks so much for stopping by today!

Janet


04 April 2018

Easter Card

This past week I made a quick Easter card for Bailey using some really old paper that I've had in my stash for a very long time! I even had the chocolate bunny die cut in my vast collection of extra die cut pieces.

I'm always excited to use up bits of this and that from my craft room! I just need to do that a bit more often! :)

22 March 2017

The Cobbler's Children...

 
Have you heard the saying about the cobbler? The cobbler's children have no shoes. Presumably that's because the cobbler gave all of his or her time and energy to the business.

Similarly, we could say that the card instructor's card basket has no cards. SERIOUSLY, no cards, other than a few weird cards that I will probably never send. True confession!
 

 Now envelopes? I've got you covered! :)
 
This is a very strange situation. I make LOTS of cards for classes. I'm ALWAYS making cards, and that's no exaggeration. If I'm not making cards for class projects, I'm making kits for card-making classes.

But take time to make cards for myself? I rarely do that these days. If I need a card, I rush around and make it at the last minute (something I tell my students never to do!) or...wait for it...I sometimes buy a card at the grocery store. *gasp* Now that, folks, is a shame, when I have enough card-making supplies to last for 100 years!
 
  Well, I recently rectified this unfortunate situation and made 12 cards in one evening! I started out with a sheet of cut-apart paper which is made for cards and gives you a 3x4 piece for each card front in a variety of themes. Then I added more paper and do-dads, and that was that! These cards were quick and easy to make and, while they're nothing to write home about, they'll do in a pinch and I won't be running around trying to make one at the last minute.

My trusty helper, Tinsel, was on duty for this card-making event. Whenever I'm working in the craft room, she's almost always with me. Bless her little heart.

When I was done with the cards, Tinsel and I put them into my basket. It was a good feeling filling that basket up. Well, it's actually filled with envelopes, but adding a few cards makes it LOOK a little fuller.

So yay for my sweet craft room helper. And yay for card baskets with actual cards!
 jp