PURR Tinsel's request, click to enlarge, then print and post EVERYWHERE!
29 April 2011
27 April 2011
26 April 2011
May Page Kit
I love the colors of this patterned paper (Grandma's Kitchen by WRMK). They're a little bit retro but still rich and vibrant. And to top it off, the paper has a grid foundation! Could life possibly get any better? I think not!
The flowers on the right page were made with our Accu Cut dies and then embossed with Cuttlebug folders. My new favorite embossing folder is Seeing Dots, which I used on the brown flower.
The font used on this layout is another one of my recent favorites, Sunshine Poppy. Download it for free at Dafont.com.
21 April 2011
Feline Friday: An Easter REPEAT
A few years ago, I got the bright idea that it would be cute for The Girls to do an Easter Photo Shoot. With bunny ears. I mean, what could possibly be more fun than strapping bunny ears on your kitty?
Long story short: There will never, ever be another Easter Photo Shoot at our house. Unless one of us (meaning Lily, Tinsel, or ME) is sedated.
THEREFORE each year I have to RE-POST some version of these Easter photos because, gentle blog readers, THERE WILL NEVER, EVER BE NEW ONES.

Long story short: There will never, ever be another Easter Photo Shoot at our house. Unless one of us (meaning Lily, Tinsel, or ME) is sedated.
THEREFORE each year I have to RE-POST some version of these Easter photos because, gentle blog readers, THERE WILL NEVER, EVER BE NEW ONES.

First, we have a blurry shot of Lily wearing the ears. Admittedly, this is not the most flattering camera angle. You can see that Daughter (much younger in these photos) has Lily in a death grip. Perhaps the Easter Photo Shoot should have stopped right there...
Next, we have Lily playing the role of the very rare and incredibly surly
UNICORN BUNNY.
UNICORN BUNNY.
Next, we have Tinsel as the slightly cross-eyed I'm-Going-To-Kill-You-While-You-Sleep Bunny.
And finally, we have Tinsel doing her best imitation of the evil, green-eyed Bunnicula.
In spite of these photos, we send our Easter greetings from our house to yours!
In spite of these photos, we send our Easter greetings from our house to yours!
A few Easter projects
This is a little basket I made using the Martha Stewart Scoring Board and a sheet of 8.5x11 cardstock. Super easy and fun to decorate.
Here's a single-page layout using WRMK product. I was pretty excited that I recognized the font on the paper, so I downloaded it to make a matching journaling block.
And here's a two-page layout using featuring a ginormous chocolate bunny and some of that same line.
As you can see, I sort of glommed on to the chocolate bunnies (cut with the Cricut) and used them on every single project. :) One can never have too much chocolate...and this kind of chocolate is calorie-free!
20 April 2011
18 April 2011
15 April 2011
Feline Friday: I can haz stringz?
 I sit an wate pashuntly for mi tyme to halp her. I halp wifout even being askt! Becuz dat is what gud kitties do!
13 April 2011
Tabby Thursday
 Then check out a CAT Scale!
These devices are sturdy enough to weigh even the stoutest of felines. And the nice driver might even come to your house for a private weighing!
12 April 2011
Tabby Tuesday: Monorailing 101
Today's post is intended to educate kitties (and their humans) in proper monorailing technique.
Never heard of monorailing? Read on! Perhaps your kitty is already a Monorail Cat and you don't even realize it.
The term monorailing is commonly used in lolcat circles to describe a cat resting on a railing with paws tucked. Such a kitty is called a Monorail Cat. See Exhibit A below, one of the earliest documented sightings of Monorail Cat:
Of course, not every home has a railing, so monorailing has expanded to include more accessible surfaces like the backs of overstuffed chairs and couches.
Yet even with the availability of monorailing surfaces, it's clear that not every kitty has perfected his or her monorailing skills. Let's take a look at some examples of IMPROPER monorailing technique:
Yet even with the availability of monorailing surfaces, it's clear that not every kitty has perfected his or her monorailing skills. Let's take a look at some examples of IMPROPER monorailing technique:
As you can see in Exhibit B, back in 2007 Lily had not mastered monorailing, as evidenced by her SLOPPY BACK-END technique. While this is quite cute, proper monorailing requires the back paws to be tucked.
 Exhibit C: Impressive, but not monorailing!
Don't be swayed by Tinsel's amazing balance beam technique in Exhibit C. This is NOT monorailing. Monorailing kitties need to be in the reclined position.
Can you spot the issue in Exhibit D? Correct! Extending the back leg gives Lily an air of casual elegance, but this is not monorailing.
Those of you really on your paws no doubt caught the other issue in Exhibit D: A fireplace mantel is not an appropriate surface for monorailing. Monorailing MUST occur on a railing or back of a chair or couch.

Exhibit E: Monorail Cat, home version
While not absolutely perfect, Exhibit E is a reasonable representation of monorailing in the home setting. Of course, Lily could improve her technique by fully tucking her left paw, but she more than makes up for this slight imperfection with the cute factor.
I hope all kitties and their humans are now better equipped to identify proper monorailing technique when it occurs. Accept no substitutes, except for extreme cuteness!
I hope all kitties and their humans are now better equipped to identify proper monorailing technique when it occurs. Accept no substitutes, except for extreme cuteness!
11 April 2011
Mulch MANIA!
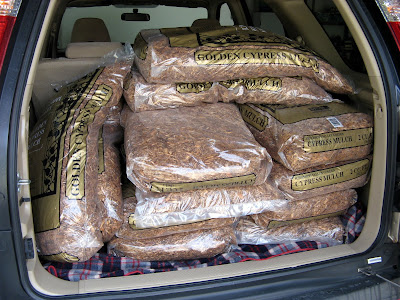
I love mulch. Mulch has the power to cover a multitude of gardening sins. It somehow transforms a pitifully random assortment of plants into an intentional garden design.
So yes, I need a LOT of mulch. The 12 bags you see above are just a start.
The warm weather this past weekend allowed me to get out in the yard and see just how many gardening challenges await me this spring. Did all of my new perennials winter over? What kinds of odd gaps have appeared in my gardens? Just how far have I fallen since last year's meager success?

I started by checking out the front perennial bed. You can't tell by looking at it in the above photo, but I did considerable work on this garden last year as described in this post. At this point, it appears that most everything I planted is coming up, albeit a bit slower than I'd like.
The most significant issue is the Japanese Maple, which has been limping along -- still alive, but not actually growing much in height -- for the past two years. (Look closely and you might see it, although the stake it's tied to is larger than the tree itself.) I'm a patient person but I've almost reached the end of my rope with this tree. If I don't see new growth on Mr. Maple this season, he will be replaced -- for the second time.
 I raked the leaves, pulled a few weeds, and covered the area with several bags of mulch. Hopefully by the first of May, this garden will be shaping up nicely.
Next I turned my attention to the new bed behind the garage. As you can read in this post, I completely tore this bed out last year and started with new plants. It appears that every new perennial I planted is coming back and some of the spreading plants are starting to do their thing. Good news for this novice gardener!

I raked this bed, pulled a few more weeds, then covered it with mulch.
Next step for these beds: Write on my metal garden tags. It should come as no surprise that I like my plants to be labeled! Let's keep our plants organized! :)
After this weekend's work on the two beds described here (and another long one bordering the side of our house), I still have three large gardens to tackle -- and none of them is in good shape. In fact, one is due for a major overhaul. After years of falling short of my garden "vision", I'm determined to fix the issues in that particular perennial bed once and for all this year.
Mulch can only disguise so much.
08 April 2011
Feline Friday: A trip to the OUTSIDE!
 We've had a few very nice days here lately, so you know what that means:
 It's time to take a trip to the OUTSIDE!
As soon as I dug out the collar, the girls came running. It's been a long winter and they could not WAIT to smell the fresh air!

This time, Lily got to go first. Tinsel waited patiently for her turn.

Ahhh, the sweet smell of...last year's mulch!
06 April 2011
A little bit of paint
I recently ran across my stash of acrylic paint. By most people's standards, I don't have a lot but for me and my little world, I have plenty. I'm not averse to using paint on projects but I just don't think about it that much. And -- truth be told -- paint does not always lend itself to the "clean and simple" style of scrapbooking to which I subscribe.
Determined to use up some of my paint, I pulled out the "right" kind of photo -- one without any emotional baggage which also happened to match my paint! -- and decided to create a quick mat. I've done this before and generally like the results.
I'm pretty sure everyone in the entire world has tried this technique, but in the off chance that the ONE person who has not is reading this post, here's the process I used:
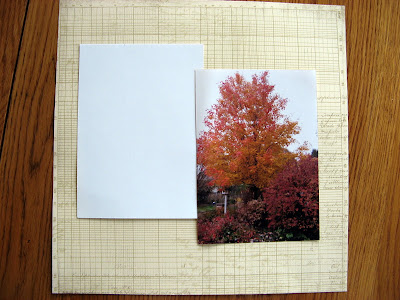
First, I selected my photo and paper (love this new Bo Bunny tone-on-tone paper!). Then I cut a piece of scrap cardstock in the same size as the photo -- in this case, 5x7.
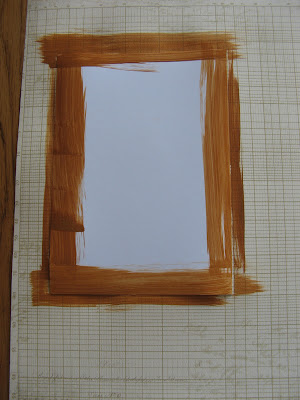
Next, I placed the cardstock on the background paper and lightly adhered it. Then I took a foam brush and painted along the edges of the cardstock mat, so that just a LITTLE bit of paint would show on the background.
Well, I could see IMMEDIATELY that I had screwed up! The painted border was way too wide. How's that for messing up the simplest of techniques! :)
I should have used the skinny edge of the foam brush, but instead, I used the wide edge across the top of the mat, as you can see in the above photo. This resulted in a line of paint which was way too thick for my liking. Perhaps if the paint and the background paper had been similar in color it would have been fine, but with this much contrast, it was NOT GOOD.
 But hey! I always tell students in my classes that there are NO MISTAKES in scrapbooking -- just opportunities for creativity -- so I flipped the paper over and started again. (Double-sided paper to the rescue!)
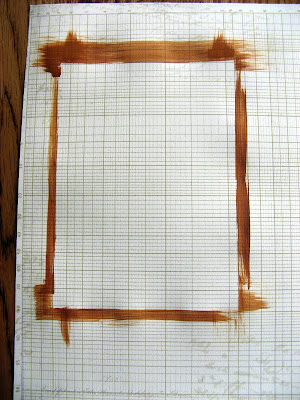
Not wanting to make the same mistake TWICE, I experimented on some scrap paper (DUH! Should have done that to begin with!) and then tried again. This time, I used the narrow side of the foam brush and painted 4 lines around the edges. This technique MUST be done quickly. You cannot go back and fix things or it just ends up looking like you tried too hard. In this case, imperfection is the goal!
You can see the results of my second try above.
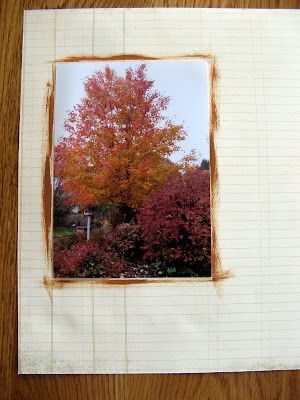
I placed my photo inside the painted mat and decided I was happy with the results. The skinny mat keeps the focus on the photo. The wide mat would have drawn the eye to the painted mat -- and not in a good way!
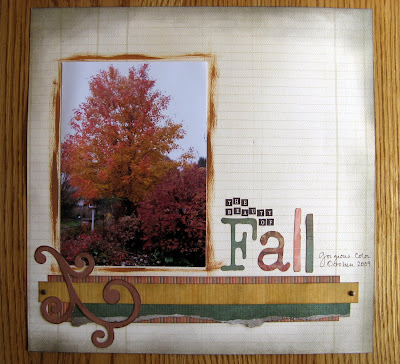
Next, since I was already "out of my box", I decided to really shake things up and do a little bit of tearing. (Anyone who knows me will tell you that I NEVER tear!) I figured I could handle one torn paper strip when it was accompanied by two straight cut strips, especially a STRIPED strip. Let the record reflect that I did not hyperventilate whilst tearing. Well, only a little bit...
Finally, since the background paper is lined, I decided to hand-write a bit of journaling, something else I don't do as often as I should. I don't mind my handwriting -- I just tend to prefer the "cleaner" look of computer journaling on my pages. But with this photo, hand journaling seemed appropriate.
Even with the painting, torn paper, and handwriting, this layout is still very linear (especially when you consider the GRID paper in the background), so I think I stayed fairly true to my normal style.
But I can see I'm going to have to do a LOT more of this kind of thing if I'm ever going to get through my stash of paint!
Determined to use up some of my paint, I pulled out the "right" kind of photo -- one without any emotional baggage which also happened to match my paint! -- and decided to create a quick mat. I've done this before and generally like the results.
I'm pretty sure everyone in the entire world has tried this technique, but in the off chance that the ONE person who has not is reading this post, here's the process I used:

First, I selected my photo and paper (love this new Bo Bunny tone-on-tone paper!). Then I cut a piece of scrap cardstock in the same size as the photo -- in this case, 5x7.

Next, I placed the cardstock on the background paper and lightly adhered it. Then I took a foam brush and painted along the edges of the cardstock mat, so that just a LITTLE bit of paint would show on the background.
Well, I could see IMMEDIATELY that I had screwed up! The painted border was way too wide. How's that for messing up the simplest of techniques! :)

I should have used the skinny edge of the foam brush, but instead, I used the wide edge across the top of the mat, as you can see in the above photo. This resulted in a line of paint which was way too thick for my liking. Perhaps if the paint and the background paper had been similar in color it would have been fine, but with this much contrast, it was NOT GOOD.
 But hey! I always tell students in my classes that there are NO MISTAKES in scrapbooking -- just opportunities for creativity -- so I flipped the paper over and started again. (Double-sided paper to the rescue!)
Not wanting to make the same mistake TWICE, I experimented on some scrap paper (DUH! Should have done that to begin with!) and then tried again. This time, I used the narrow side of the foam brush and painted 4 lines around the edges. This technique MUST be done quickly. You cannot go back and fix things or it just ends up looking like you tried too hard. In this case, imperfection is the goal!
You can see the results of my second try above.

I placed my photo inside the painted mat and decided I was happy with the results. The skinny mat keeps the focus on the photo. The wide mat would have drawn the eye to the painted mat -- and not in a good way!

Next, since I was already "out of my box", I decided to really shake things up and do a little bit of tearing. (Anyone who knows me will tell you that I NEVER tear!) I figured I could handle one torn paper strip when it was accompanied by two straight cut strips, especially a STRIPED strip. Let the record reflect that I did not hyperventilate whilst tearing. Well, only a little bit...
Finally, since the background paper is lined, I decided to hand-write a bit of journaling, something else I don't do as often as I should. I don't mind my handwriting -- I just tend to prefer the "cleaner" look of computer journaling on my pages. But with this photo, hand journaling seemed appropriate.
Even with the painting, torn paper, and handwriting, this layout is still very linear (especially when you consider the GRID paper in the background), so I think I stayed fairly true to my normal style.
But I can see I'm going to have to do a LOT more of this kind of thing if I'm ever going to get through my stash of paint!
05 April 2011
How far would YOU go for ice cream?

Ahhh...da smell of ice creem wif karmul soss!

Mi mommie letted me haf just a little taiste after she eated her ice creem!

U can see how far i will go for a small sampul!
04 April 2011
01 April 2011
Subscribe to:
Posts (Atom)


