31 December 2015

Bathroom Remodel: Mirrors, Hardware, & Window Shades

Our bathroom project is almost done! 
I know I've been saying that for awhile now, but we put the wallpapering on hold while our daughter was home for Christmas. There are just a few more strips to be hung, but it's a tedious process and each piece takes quite a bit of time to hang. In the meantime, I'll share some pictures of other parts of the project that are finished!

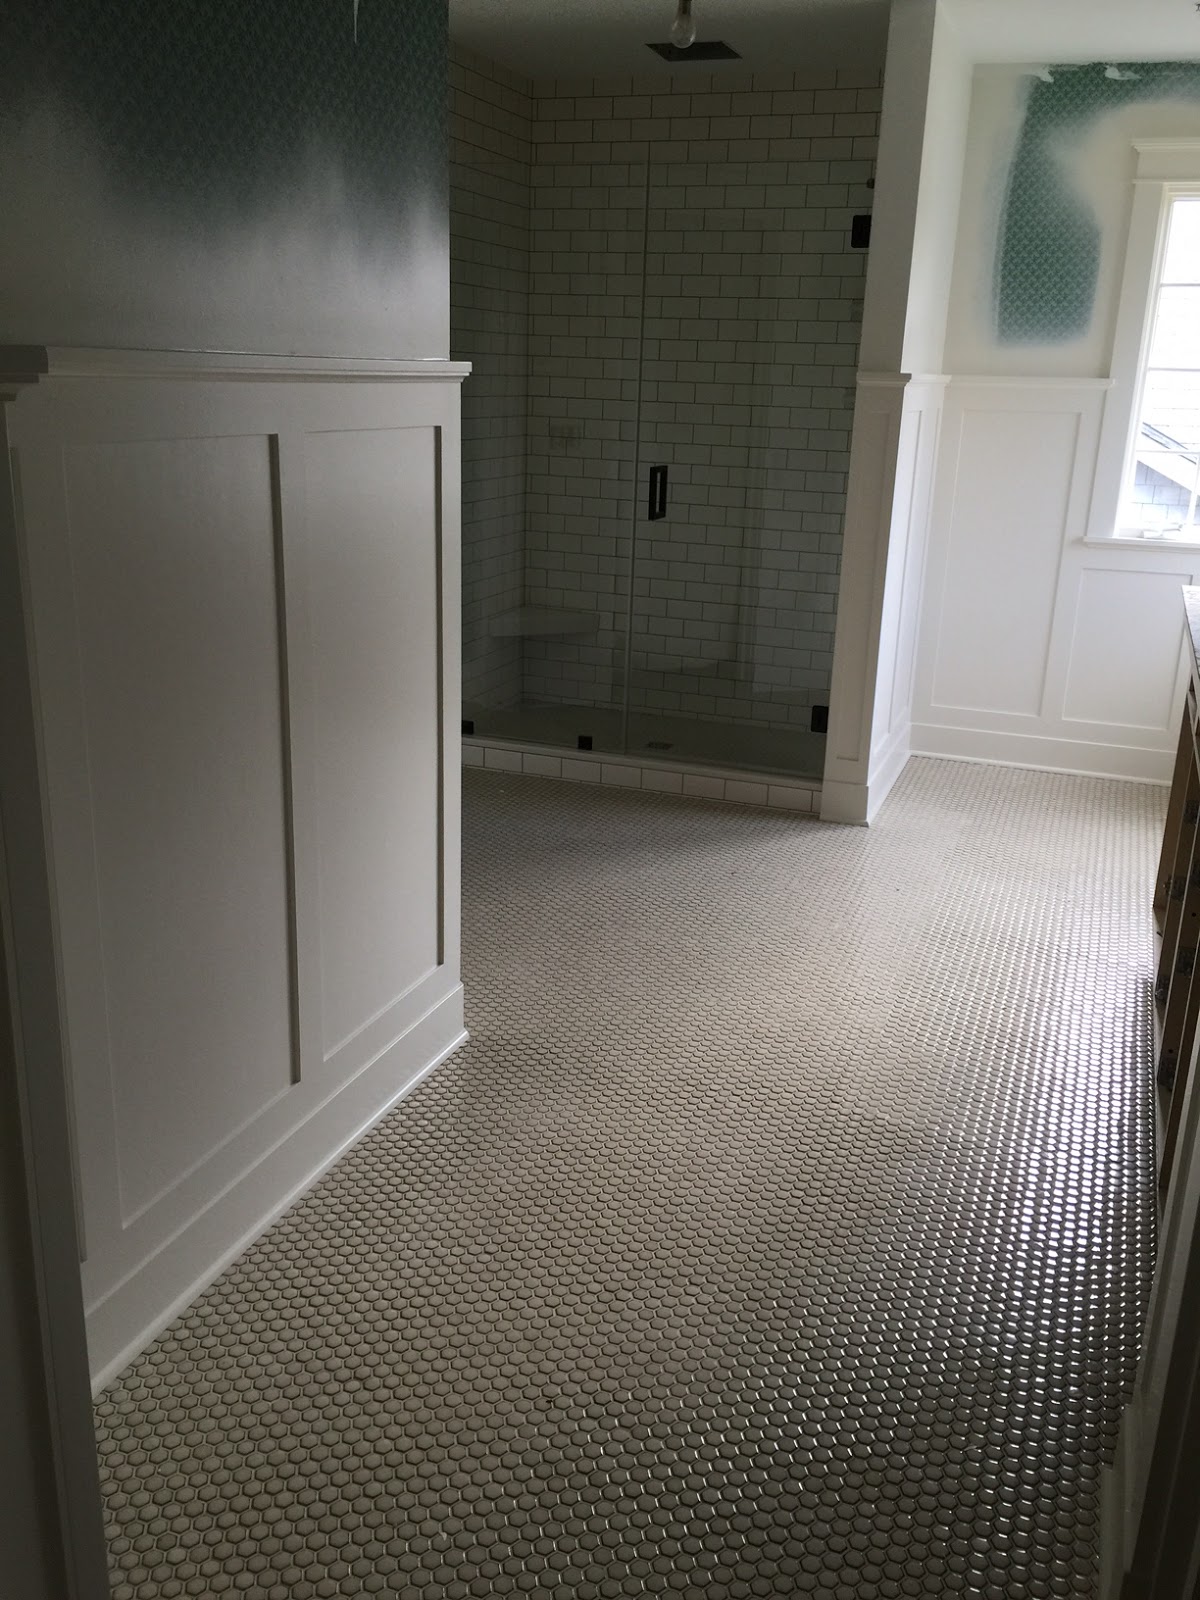
The shower has been complete for awhile (this is an old picture below), but we just started using it a few days ago. Before using the shower, the glass guys suggested spraying the doors with Rain-X water repellent and purchasing a squeegee to wipe them down after each use. So far, it's been working great and the doors still look very clean!

 Both Lily and Tinsel are curious about the new shower situation. Lily is sort of terrified of the drain. :)

 While Bailey was home, we picked out towel bars and hooks for the bathroom. We tried to think about where we needed such items without having to drill too many holes in the beautiful wainscoting. We'll have to live with the space for awhile to see if we have all the towel bars we need.  
 

 I looked on Pinterest and noticed that a lot of folks with wainscoting use hooks. I really liked the look and practicality of hooks, so we had to contractor attach three to the wall behind the shower. So far, the hooks are getting the most use!
 
  
I've been slowly evaluating, cleaning, and bringing items back into the bathroom. It's sort of amazing how much stuff (JUNK) was in this closet and stashed in the previous cabinet. I'm only bringing back what we need and use. I put shelf-liner in the drawers and cupboards of the new cabinets and am working slowly on the closet. When I'm done with the closet, I want it to be organized and pleasing to see when we open the door -- not like the mess it was before the remodel!
Note for anyone doing a remodeling project: MOVE EVERYTHING OUT OF THE ROOM. I left most of the items in the closet, thinking the door would be closed most of the time. That was a bad decision, because EVERYTHING BECAME COATED IN DUST. When I finally decided to completely unload the closet, I found myself moving dusty stuff into other areas of the house for temporary storage. Not good!

The mirrors were one of the final pieces to be installed. The contractor and I worked together to design them in a style that would match the cabinet. I love how they turned out!

As you can see, there is a contrast between the wood and the wallpaper. I obviously knew that would be the case and chose the wallpaper because I like how it looks with the wood but I'm sure some people would say that the two do not match. I think the two browns work well together -- it's like milk chocolate and dark chocolate -- and I definitely did not want the decor to feel too "matchy matchy". I hope to bring a print (fabric or artwork) into the room somewhere to bring the two shades of brown together.

 We also decided to get rid of the old mini-blinds (so hard to keep clean!) and replace them with traditional roller shades. I am thrilled with how easy they are to use, and I love how they look! You can see how they look rolled up in the photo below. Don't mind the construction mess!

 The shades coordinate really nicely with the browns in the room. When the light shines through (as in this picture), they do turn a very slight purplish color which I don't mind but hadn't anticipated. For the most part, the shades will be up during the day, so this is not a concern. We purchased "reverse roll" shades so that you only see the brown shade color, not the rolled up white back-side of the shades. I didn't even know such a thing existed, but it was definitely the right choice!

 Thanks for following along with this project! Time permitting, we'll finish up the wallpaper in the next few days and officially move back into the bathroom! I'm anxious to put our house back together! :)
jp
 

27 December 2015

Bathroom Remodel: Wallpaper, Lighting, & More

 Our bathroom project is almost complete, and in the next few posts I will share the "final" pictures of this process. I'm completely happy with how everything has turned out...so much that I think I will be moving into the bathroom! :)

After the painting was done, the protective kraft paper was removed from the floor. This was the first time I was able to really see how the tile and the wainscoting would work together. WHEW...I really do love it! At one point I was concerned that the tile and wainscoting would be too close to the same color, but that's not the case. There's a nice contrast between the two, and now that the dark wallpaper is in place, I'm even happier with the colors.

 Here you can see a good expanse of the tile against the wainscoting. I am really amazed at how much warmth and character wainscoting adds to a room.

Another exciting step in the process was when the doors and drawers were added to the cabinet. YAY! Next came the handles and drawer pulls that I picked out a few weeks ago.

We chose a walnut cabinet to match our bedroom furniture. While the wood is more traditional, the design of the cabinet is more modern, which I guess makes this a "transitional" piece. Transitional design incorporates some traditional and some modern elements.

The mirror frames were made to match the cabinet. Here you can see them being installed.

   We had some of our existing doors repainted because they had become scuffed up over the years. As we put the doors back up, we changed out the hardware to oil-rubbed bronze.

One of the hardest parts of this project was finding light fixtures to match the faucets. Turns out there are many different definitions of "oil-rubbed bronze". When I finally found a product line to match the Delta faucets, there were only two or three sconce design options available. The other hard part was finding shades in a shape I liked which would also match our color scheme. The sconces I chose came with white shades which obviously did not match. I brought home several different options before setting on these shades from Lowe's.

Now that everything has been installed, I do like the sconces. It just took awhile to get used to a different design than I'd envisioned in my head!

 Spouse is continuing on his wallpaper journey, nearing the finish line. It's been a slow and tedious process!

This wallpaper has a slight texture and it seems to be like a magnet for wallpaper paste! After it dries, the glue has to be painstakingly rubbed away. Here you can see the texture -- and some of the glue! 

 Thanks for following along with this process! I hope you'll check back in the coming days for more installments in this remodeling adventure!
jp

26 December 2015

Bathroom Remodel: Paint, Fixtures, and Wallpaper

The bathroom project is wrapping up, and I've got lots of exciting progress to report! Other than finishing the wallpaper (go, Spouse, go!), we are nearly done with this project!

First, we had a few days of painting woodwork and wainscoting.The contractor did a fantastic job with the woodwork and the painters were incredibly meticulous. We are so pleased with all of their work.
 

Remember that corner light fixture from Lowe's? I decided to keep it! Looks even better with light bulbs in it! :)

 The counter was outfitted with boards to create another work surface. I think I'll hang onto those boards so I can do some crafting in the bathroom!


After the painting was finished, the faucets were installed. Yay!
 

Finally we were ready for wallpaper. Here's Spouse just getting started. "A journey of a thousand miles begins with a single step." :)

I loved the wallpaper from the minute he put up the first piece! Spouse is a very good wallpaper-putter-upper and has been doing a great job.
Thanks for following along on this project with me. Watch for final "after" pictures in the coming days. :)
jp


18 December 2015

Feline Friday: Elf in Training

When visiting our daughter in Texas, we stopped by a discount store. I can't even remember what we were looking for, but Bailey found a cute little "Elf in Training" dog t-shirt and decided to buy it for Rory. We were hoping she would keep it on long enough for a quick photo shoot.

To our surprise, Rory LOVES her t-shirt! She has worn it DAY and NIGHT since then! Interestingly, the t-shirt has sort of a calming effect on her, almost like a Thundershirt. Although Bailey doesn't allow her to wear it unattended, she reports that Rory often sleeps in it...just like jammies!

Having dressed a LOT of cats in my lifetime (not sure what that says about me...), this came as a complete surprise to me. Most cats either struggle to remove the clothes or just flop on the floor as if they're paralyzed. Not this girl! She ran and played and did all of her normal Rory things while stylishly dressed!

Cutest. Thing. Ever.

She even posed on her scratcher with her little elbows out. My head nearly exploded from the cuteness!

So we grabbed a rug and put it behind her, so she could have a "First Day of School" type picture!

Since the t-shirt is seasonal, Bailey also picked up an adorable motorcycle sweater for Rory which she wears for variety. :)

We love our little Elf in Training!
jp

12 December 2015

Bathroom Remodel: Ready for Paint

This is a milestone week in the bathroom remodeling project: The woodwork is DONE and the painters are getting started! In this part of the project, the wainscoting, doors, and trim woodwork will be painted a cream color, and the ceiling will also be repainted.

  What's that in the corner? Rolls of kraft paper! I had no idea that painters use kraft paper, one of my very favorite things!

As you can see, the painters are covering the floor with that beautiful kraft paper to protect it from spray. (Of course, I'm thinking of all the other wonderful things I could do with it in the craft room!) I've learned that there's a LOT of prep that goes into painting. It will probably take longer to do the prep than to do the actual painting! 
 

 Here you can see how the wainscoting looks now that it is completely done. The contractor did a fantastic job with the design, and his workmanship is truly top-notch.
  
I gave the contractor this Pinterest picture which served as the inspiration for the wainscoting and the window/door trim. After it is painted, it will look nearly identical to this photo! 

  In addition to the wainscoting, the trim around the doors and windows was removed and re-worked to match. At first I thought we could keep the original trim but it did not work with the design or scale of the wainscoting. Now all the windows and doors have a bit more "chunky" trim.

 Here's what we started with:

Here's what it looks like now:

 Here are the corner windows before we started:

Here's what it looks like now, without the big tub. The space feels much more open now. You can see how the window trim had to be re-worked to fit "into" the wainscoting.

When the painting is done, we'll be ready to start covering the green wallpaper with the new textured brown wallpaper. We'll be starting that part of the process next week. Then we'll be on the home stretch!

Will we get done in time for Christmas? I sure hope so!
Thanks for following along with me!
jp

11 December 2015

Feline Friday: Lily's Guide to Fitting Behind Things

A few days ago when I was working on a project at my desk, Lily was busy trying to get my attention. If you're a cat person, you know that there is no ignoring a hungry kitty. (And Lily is ALWAYS hungry!) She tried various tricks to get me to stop my work but to her disappointment, I did not get up to tend to her vast (*ahem*) needs.

So she tried a trick she rarely pulls out of her tiny toolkit: FITTING BEHIND THINGS.

There's a 4" or so gap between my printer and the wall, so Lily decided she'd fit herself in that space. Makes sense, doesn't it? A (FILL-IN-THE-BLANK)-pound cat squeezing her ample figure in there, like a pair of too-tight jeans. 

When I saw this going down, I did get up -- but only to document this crazy feat! 

 For a moment, Lily stopped to reconsider what she was about to attempt...

...then onward she went!

This is what it looked like on the back end!

Then, buoyed by her success in fitting behind the printer, she fit herself behind the computer monitor. 

Oh, you're too busy working to feed me? Don't mind me, Mom! Just passing through! :)


07 December 2015

Recipe: Skinny Baked Potato Soup

Hello and happy Monday! 
 It seems that lately I've been making a LOT of soup in the crock pot. I do like soup, but I mainly make it because I like not having to worry about dinner at the last minute. I always feel so organized (ha!) on days when dinner is simmering away in the crock pot!

For the past couple of years, I've also been working to change how I cook, using far fewer "processed" foods, fewer carbs, and more fresh ingredients. This recipe from Baked Potato Soup is a great example of the type of recipes I've been trying to make. It's full of veggies, lower in fat than regular baked potato soup, and once it's mixed up, you can put it in the crock pot and forget about it.  Then when you come home, your house will smell great and dinner is already made!

Baked Potato Soup
Recipe from Skinnytaste
Note: We skipped the bacon (*sniff*sniff*). Of course, this yummy soup would be even better with bacon! I also skipped the cheese (not a fan of cheddar!) and didn't miss it one bit.
 

Here are a couple of pictures I took as I made this recipe. In retrospect, I probably should have cut up the potatoes and cauliflower a bit more. I asked a LOT of my immersion blender!

 But low and behold, it delivered! This handy tool blended the entire pot of cooked potatoes and cauliflower with ease.

  Take a look at that! In the olden days before I got my immersion blender, I would attempt to pour hot liquid into my blender to puree it. As you can imagine, that did not always end well!

This soup is so delicious! I happen to love cauliflower but the taste is subtle enough that you'd almost never guess it was in there. And it makes a good amount: We had enough soup for two suppers and were sorry when it was gone! 
Hope you'll give this yummy -- and healthful -- recipe a try!
jp