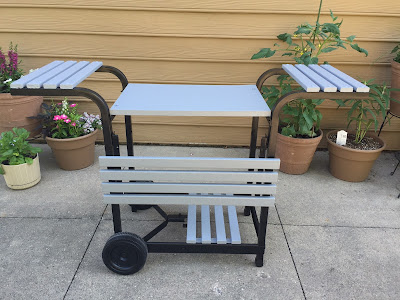
Well, it has been an interesting and somewhat labor-intensive project, but I'm happy to report that the garden cart is done! This old grill cart had been stored in the basement of Spouse's parents' house until his mom got the idea that it might make a nice cart for plants on our patio.
Spouse ended up helping with the final coat of gray paint. I guess I have a way of pulling him into my projects (I think his exact term is "roping"!) but in this case, I really needed his help. I was getting very discouraged with the project and he stepped in to save the day. Thanks, Spouse!
After he finished painting, Spouse put the cart back together. It looked very nice and tidy. Of course, he thought the project was done. So did I, until I stepped back to really look at it.
The cart looked very nice with plants on it, but in my mind it still looked like a grill cart. So I started contemplating what I could add to it to make it look more garden-y. I scoured Pinterest for pictures of potting benches and similar tables, hoping to spark an idea or two.
I noticed that potting benches have something along the back side that gives them height and often include signs and other garden art. With that general idea in mind, I stopped at a few garden stores to see what I could come up with for either the back or the front of the cart. Of course, I brought home and returned a couple of different things. This is what happens when you're not sure what you're looking for but know that you'll recognize it when you see it! :)
After checking at all the local garden stores and coming up empty, I remembered one nursery I'd forgotten about completely. Lo and behold, there it was...the perfect piece for the front of the cart! It was the perfect width -- TO THE INCH! -- AND the perfect color, a great blend of functional and cute! Then I picked up a short piece of wire fencing (which also happened to be the perfect width!) to provide a bit of height at the back of the cart.
I carefully broke the news to Spouse that this project was not QUITE done and luckily, he took it pretty well! After attaching the planter piece with screws to the front edge of the cart, he drilled two small holes for the fencing and poked it down into the main shelf. The wide front shelf pictured in the top photo is now at the back against the house, right behind the wire fencing. Turning the cart around this way allows me to put larger pots on that shelf without the risk of them falling off and breaking.
My three small herb pots fit perfectly into the tin buckets without repotting them. That left plenty of space for the rest of my herbs and a couple of flowers as well.


My dill plant is not doing well at all, but the cilantro and sage are thriving! I've been harvesting my herbs almost daily! :)
I've found that it's really nice having the smaller pots up off the patio away from critters and easily accessible for cooking. Now that they're on the cart, I actually remember to use them! :)
Many thanks to my mother-in-law for the cart and to Spouse for helping with this project! Although it took some time, I'm glad I tinkered with the cart design until I was happy with it. I'm really pleased with how it turned out and look forward to using it throughout the summer!
jp


No comments:
Post a Comment