14 July 2016

Violet Farm


My grandma was an expert at growing violets. I wish I had a photo of all the lush plants she kept on her windowsills. Grandma took cuttings and seemingly propagated violets at will, and they grew profusely in the slivers of light that came in to her otherwise dark house.

I've grown violets from time to time over the years but hadn't put much thought into it until our daughter Bailey started tinkering with them. She had immediate success with her plants, some of which even made the move with her from Indiana to Texas. 

I purchased a white violet at that time, and Bailey subsequently gave me a cutting from her lavender violet. Neither plant bloomed much until I moved them to a north-ish facing window, and since then they have flowered almost continuously. I recently purchased a third small violet for $2 on clearance at the grocery store, and the three plants have been doing very well. In fact, I seem to be having much more consistent success with my violets than my succulents which are supposed to be nearly maintenance-free!. Go figure!
 

When Bailey came home for a visit last week, I asked her to help me divide the largest plant since I'd never done that before. Since she had done it once, that made her an expert in my mind! :)

First she took the plant out of the pot and shook away most of the dirt. By separating the leaves with her fingers, it was easy to see where new "crowns" were growing. She sliced off the new crowns with a sharp knife.

Using African violet potting mix, we placed the new plants in small plastic containers (the ones they come in at the grocery store) with holes in the bottom. These make great little "nursery" containers for violets which must be watered from the bottom.

Once the new plants were potted, I placed the plastic pots inside small terra cotta pots with saucers to catch any drips. I read that violets should not be planted directly into terra cotta pots because they can promote mold and other issues. When a violet grows too large for its pot, look for a slightly larger plastic pot with holes at the bottom and a saucer to catch leaks.

Before situating the plants in the window, I gave them a good watering by placing them in bowls of water (with liquid violet food mixed in) for about 30 minutes. This allows the water to be soaked up from the bottom into the soil.

Now instead of three plants, I have five! I think that surely constitutes a violet farm. :)

After a few days, all of the plants are still alive and seem to be doing well. One of the new babies has even sprouted a tiny leaf in the center. Squint and you might be able to see it. :)

I wish I had a better spot for the violets than the bench in the dining room bay window, but they seem to be blooming well there so they shall not be moved.

The down side is that the violets are now are cramping Tinsel's style just a little bit, as that bench is one of her prime outdoor viewing seats. As you can see, she is not too pleased!

Sorry, Tinsel, you'll have to move over! Make room for the violet farm!
jp

09 July 2016

On the Treadmill

This week I hit the 7 week mark on my C25K running app. This must be some kind of psychological touchstone for me because when preparing this post, I discovered that the last time I posted about running was the LAST time I hit that same 7 week mark back in October! And I took almost the same pictures this time. How weird is that?

For those not familiar with it, C25K (Couch to 5K) is a running program for novices (those of us who have been on the couch!) in which you practice walk-run intervals for eight weeks. You gradually reduce the "walk" intervals and increase the "run" intervals until you work yourself up to running 30 minutes straight without walking, the length of time it would normally take to run a 5K (3 miles). While there are many phone apps available, I've been pretty happy with the free app C25K by Zen Labs. You just plug in your headphones, set the app, and walk/run until the nice lady tells you to stop. It's a good idea to have a video or three to watch while you run. I've found that the more distracted I am, the better I run!

Anyway, it's sort of telling that here it is JULY and I'm back at the same point where I was in October. What does that mean? Well, it means that while I was headed toward my goal last fall, I didn't make it. It means that at once again, I had to back off on my running and re-group due to injury, discouragement, or the host of psychological barriers that I impose on myself. You know the negative self-talk: I'm not a runner, I'm a wimp, I'm too tired, I'll do it tomorrow...In short, I've let myself off the hook far too often. That's why I didn't meet my goal last fall.

So I gave myself a stern lecture and have been back at it with renewed dedication for some time now, repeating days of running until I can do that particular day's run without feeling like I'm going to keel over. After all, the only person I'm competing with is myself, so it doesn't matter how long it takes me to get to the 5K level.

At this point, I'm up to running 25 minutes comfortably with no stopping. I feel like this time I've made a big improvement because I'm no longer getting the side stitches and cramps that have hampered me on this journey. I can feel that my stamina has improved. I can honestly say that I'm enjoying each run, and that's something I haven't been able to say on past attempts.

With all of this, I've decided that I'll never be able to run an actual outdoor 5K with other people. I'm OK with that. I really don't want to compete with anyone else. First of all, I'm pretty sure I couldn't socialize and run at the same time. But more importantly, I don't want to deal with bugs, rough terrain, extreme hot or cold weather, or any of the other perils of outdoor running. On the treadmill, I can run in comfort, watch HGTV, and not worry too much about falling down. Treadmill running is really the perfect sport for an introvert like me!
Long story short: To reach my goal, I only have 5 more minutes to add to my run time. At this point, I'm feeling really good about my odds of achieving it at some point, SOONER than later this time!
jp


08 July 2016

Feline Friday


We are excited that our daughter is coming to visit! Rory will be staying behind in Texas at her boyfriend's apartment. (Bailey's boyfriend, not Rory's!) Rory packed her bags and off she went for a few days of (hopefully) spa treatment...or at least a different bird and squirrel viewing venue! :)
I hope at some point we can have Rory visit us in Iowa, but for now we will love having her meowmy with us for a few days!
jp

06 July 2016

Bedroom Update: Painting Done

Awhile back, I posted that we were starting to update our master bedroom. This space adjoins the bathroom which we just remodeled, and we needed to update it so that the two spaces match. The bedroom is not done yet by any means, but finishing the painting is a big step in that direction.

The painting has taken a long time due to the presence of a floral wallpaper border around the room. Spouse elected to lightly sand it and paint over it heavily and I'm happy to report that his idea worked great. You'd never guess there was a border hiding under the paint!

Here you can see the color pretty well. It's the same color we used in the hallway outside the bedroom door. (The shadow you see on the wall in the photo below is the headboard of our bed.)

We have two corner windows which we will have re-framed to match the windows in the bathroom. Having a wider/deeper frame will allow us to change the metal mini-blinds to the same kind of roller shades we used in the bathroom.

Now the two spaces flow together in one neutral color scheme. Obviously, it's a lot of tan right now because I have yet to do any "decorating" in either space!

To finish off this room, we'll be getting new carpet (the carpet is original to the house, making it 22+ years old...yikes!), changing the window frames, installing roller shades, and getting new bedding. Compared to the painting, those will all be easier tasks! 

It's amazing how different the space looks now. Although I'm anxious to finish it, I'm already enjoying it very much! 
jp


05 July 2016

Mid-Summer Patio Plant Update

Since it's now July, I thought I would do a quick review of how my patio pots are doing. I'm mainly writing this post for myself so I can go back and look at what I've planted from year to year and remember which plants have done best. But I hope my fellow gardeners will enjoy it as well and offer any suggestions! :)

This year, I bought a plant which was new to me, Mexican sage. It started out doing well but by the time June rolled around, the bottom leaves were yellow and falling off. This usually means over-watering and sure enough, that was the problem. I stopped watering it so frequently and it has flourished! I'm still waiting for the blooms but in the meantime the foliage now looks great!

 I discovered that I was also over-watering my pincushion flower (in the small pot) as you can see from the yellow leaves around the bottom. Now that I'm letting it dry out, it has bloomed very nicely! It's handy to have a few plants that thrive on neglect! :)

Another new-to-me plant this season was this double vinca. It was not blooming at all until I started fertilizing it regularly with Miracle Grow, and now it looks great!  

 Unfortunately, I had a deer incident a few weeks ago in which some of my pots were nearly eaten to the dirt. I was so upset! All of my sweet potato vines were nibbled down to nothing, as were the petunias which I had bought on clearance. 

The deer ate all but a couple of the petunias in that pot, so I added a few new plants in a slightly different color. I don't really like petunias but at least they provide a bit of color now that the chewed-up planter has filled back in!

 I have two catnip plants tucked into the old green planter in the photo below. This planter is special to me as it sat on my grandparents' front porch for many years. It has a hairline crack so I'm very careful with it  and usually don't even take it out of the garage. But I'm on a mission to start using things I love (rather than hide them away in boxes) so this year I just placed a pot down inside the planter and put it in a protected location. I'm enjoying it very much, as is Neighbor Kitty!

I have two planters like this one that had to be almost completely re-replanted after the deer incident. Unfortunately at that point in the greenhouse season, pickins were slim. That silver plant is very stringy and borderline ugly but at least the deer are leaving it alone!

The worst part of the deer incident was that they ate all of my green tomatoes right off of my tomato plant! After a few weeks, I now have new tomatoes growing and am guarding them with my life!

To keep the deer away, I have a few strategies which appear to be working. First is a bar of strongly-scented soap stuck into the pot on a long skewer. :) I also have a plastic owl that belonged to my dad which I position ominously in front of the pot at night. And I've been spraying the most tasty plants with Liquid Fence which smells dreadful but seems to be doing the trick. 


 The plants on the garden cart (mainly herbs) are doing well, probably because they're out of rabbit reach! I've got rosemary, basil, oregano, mint, lavender, sage, and cilantro to use in my meager culinary adventures. I've really enjoyed having a place to corral these small pots!
 

The pot on the patio table has done really well this year, although I do think I overdid it with the white vinca. I love vinca but the white ones have taken over many of my patio pots. Next year I need to mix up the colors a bit.

 Speaking of white -- and petunias -- this is the second year I've bought double petunia hanging baskets for the front of the house. They don't look like petunias to me -- they're more like little roses -- and they've done extremely well.

For local friends, I bought these hanging baskets at Goode Greenhouse and have been very pleased with them. This year I was late going to the greenhouse and got the last two white ones, so next year I'll have to be sure to go a bit earlier.

All in all, other than the deer incident, it's been a very good year for my patio pots. We've had high humidity and a decent amount of rain, plus I've been paying more attention to my watering/fertilizing habits. As with all gardening, it's always a work in progress but I hope with documenting my progress in posts like this one, I can learn from my mistakes and do better next year!
jp

04 July 2016

More Painting Fun

 Lately I've been on a mission to finish up a few projects that have been on my list for a very long time. These projects were all so quick and easy that I'm not sure why I didn't finish them long ago!

I bought this metal Eiffel tower at Target a few years back for around $40. I don't have a "before" picture but it started out bronze and had lost some of its paint from being out in the garden. I decided to spray paint it black.
 

After two or three coats, it looked better than new. Later I saw the same Eiffel tower at Hobby Lobby in a black finish for $69! That made me feel even better about this quick little project!
 

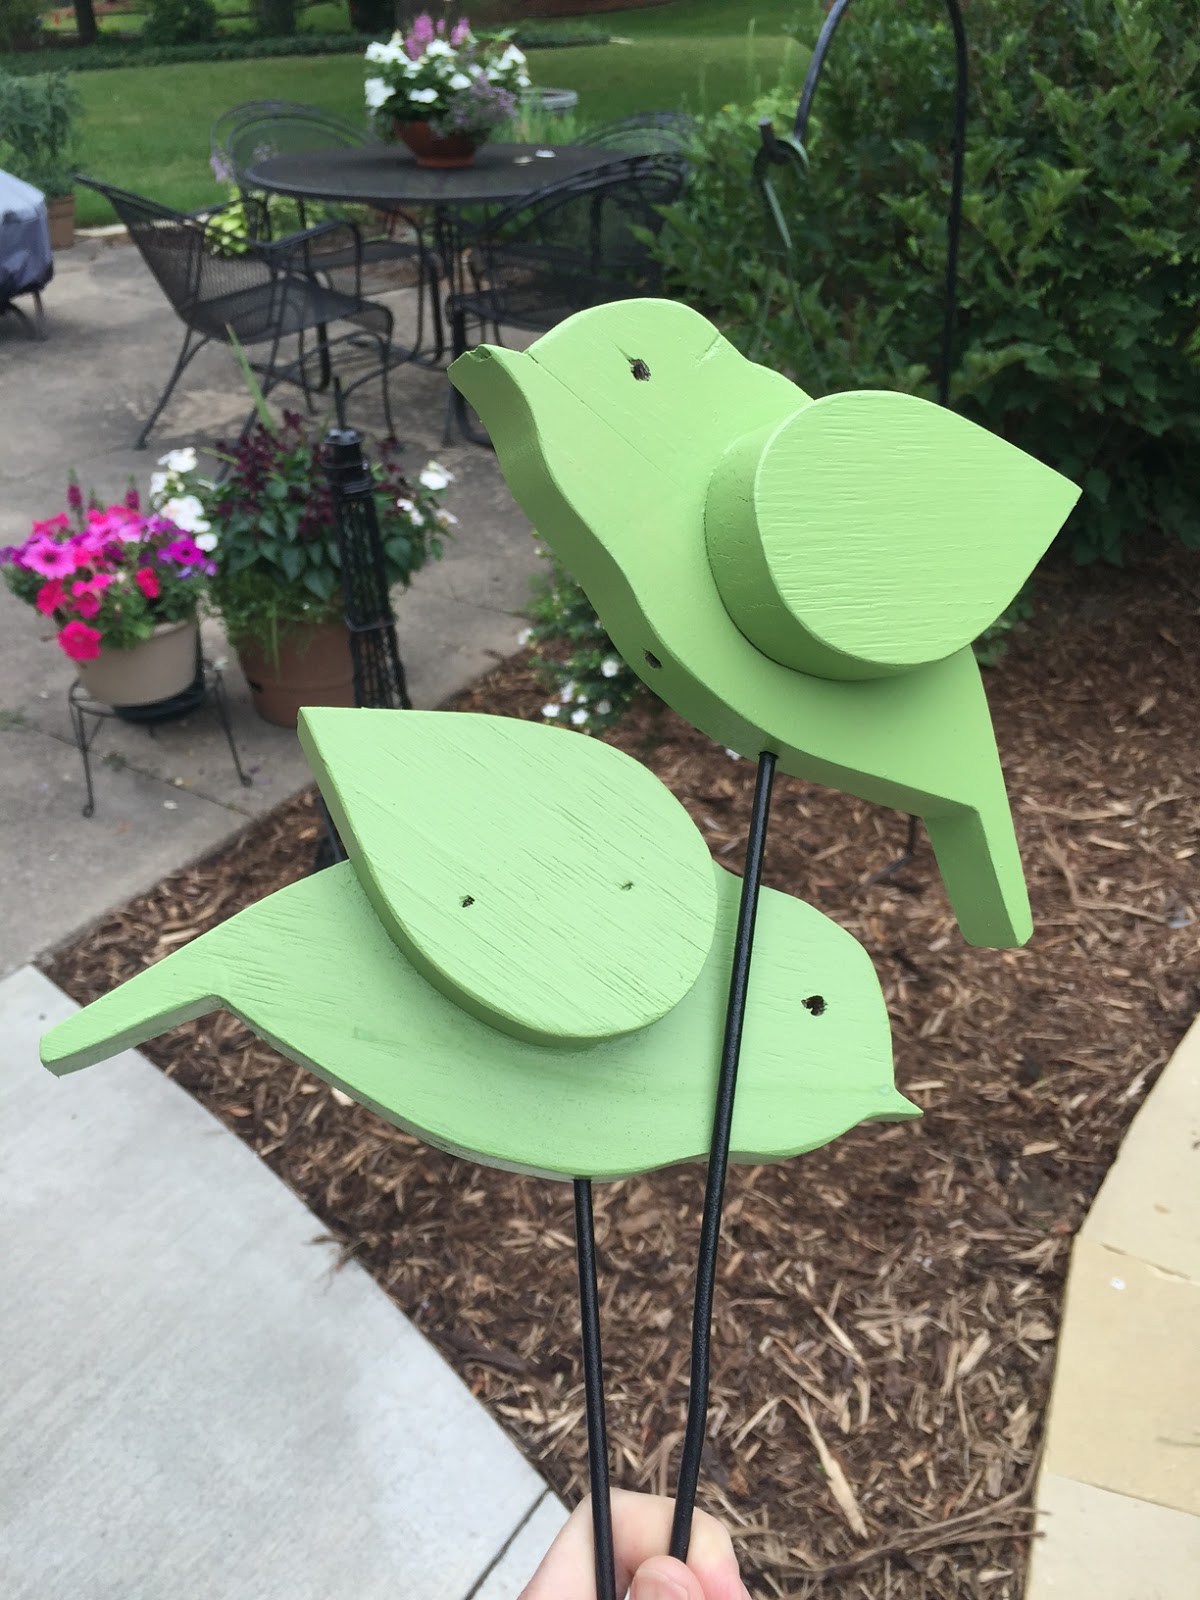
 These brown wooden birds were next on my list. They belonged to my parents and are two of many items given to them by a neighbor who enjoyed woodworking. The birds were painted brown to match their house, but I found that brown birds didn't show up very well in my garden.
 

 So I bought some green outdoor paint at Hobby Lobby and brightened them up. Since they are wooden, I found that using a foam brush worked much better than spray painting them.
 

I spray painted the metal rods black to freshen them up. Now the birds are much more cheerful...
 

...and they show up very nicely in the garden!
 

Last on this short list was this black metal butterfly given to me by my mom many years ago. I always liked the shape but a black butterfly tends to get lost in a garden or patio pot. I've hesitated to paint it since Mom gave it to me, but I finally decided to go for it.
 

 I spray painted the butterfly lime green. (Can you tell I like that color? I was also trying to use spray paint I already had on hand!) I taped off the antennae and the metal rod so that I could re-paint them black.

 Now the butterfly looks very cute in a patio pot -- and you can actually see it!

I'm glad to finish up these easy projects. Doesn't it feel great to check things off your to-do list? :)
jp


01 July 2016

Feline Friday: Lily's New Path

   
This week, I took Lily outside for a walk. It was the first time she'd been out since the new edging was installed. 

 Lily, who hates the feel of grass on her feet, could not be happier with the new stone! She made a beeline for it and off she went with me in tow! She was trotting so quickly that she pulled the leash taut.

 Occasionally she glanced to the grass as if to say, YAY! I do not haz to walk in dis scrachie grass naow!

When we came to a patch of iris overhanging the edging, she stopped in her tracks and looked back to me for assistance. I lifted her over the iris and on she went!

  For the first time, Lily traveled all the way around the house!
 
 Who knew the edging would make such a nice kitty path? :-)