I recently ran across my stash of acrylic paint. By most people's standards, I don't have a lot but for me and my little world, I have plenty. I'm not averse to using paint on projects but I just don't think about it that much. And -- truth be told -- paint does not always lend itself to the "clean and simple" style of scrapbooking to which I subscribe.
Determined to use up some of my paint, I pulled out the "right" kind of photo -- one without any emotional baggage which also happened to match my paint! -- and decided to create a quick mat. I've done this before and generally like the results.
I'm pretty sure everyone in the entire world has tried this technique, but in the off chance that the ONE person who has not is reading this post, here's the process I used:
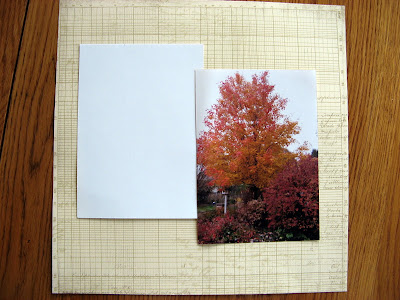
First, I selected my photo and paper (love this new Bo Bunny tone-on-tone paper!). Then I cut a piece of scrap cardstock in the same size as the photo -- in this case, 5x7.

Next, I placed the cardstock on the background paper and lightly adhered it. Then I took a foam brush and painted along the edges of the cardstock mat, so that just a LITTLE bit of paint would show on the background.
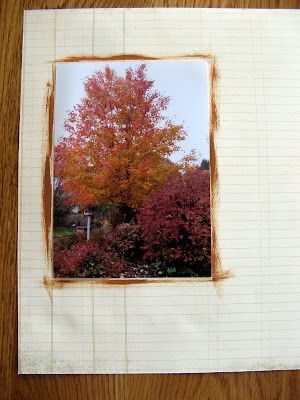
Well, I could see IMMEDIATELY that I had screwed up! The painted border was way too wide. How's that for messing up the simplest of techniques! :)

I should have used the skinny edge of the foam brush, but instead, I used the wide edge across the top of the mat, as you can see in the above photo. This resulted in a line of paint which was way too thick for my liking. Perhaps if the paint and the background paper had been similar in color it would have been fine, but with this much contrast, it was NOT GOOD.
 But hey! I always tell students in my classes that there are NO MISTAKES in scrapbooking -- just opportunities for creativity -- so I flipped the paper over and started again. (Double-sided paper to the rescue!)
Not wanting to make the same mistake TWICE, I experimented on some scrap paper (DUH! Should have done that to begin with!) and then tried again. This time, I used the narrow side of the foam brush and painted 4 lines around the edges. This technique MUST be done quickly. You cannot go back and fix things or it just ends up looking like you tried too hard. In this case, imperfection is the goal!
You can see the results of my second try above.
I placed my photo inside the painted mat and decided I was happy with the results. The skinny mat keeps the focus on the photo. The wide mat would have drawn the eye to the painted mat -- and not in a good way!
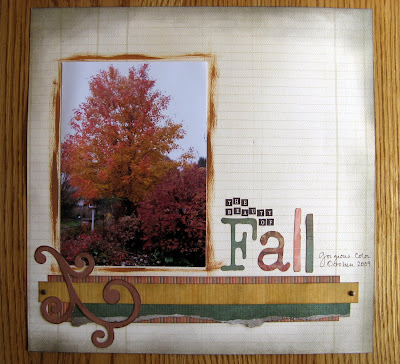
Next, since I was already "out of my box", I decided to really shake things up and do a little bit of tearing. (Anyone who knows me will tell you that I NEVER tear!) I figured I could handle one torn paper strip when it was accompanied by two straight cut strips, especially a STRIPED strip. Let the record reflect that I did not hyperventilate whilst tearing. Well, only a little bit...
Finally, since the background paper is lined, I decided to hand-write a bit of journaling, something else I don't do as often as I should. I don't mind my handwriting -- I just tend to prefer the "cleaner" look of computer journaling on my pages. But with this photo, hand journaling seemed appropriate.
Even with the painting, torn paper, and handwriting, this layout is still very linear (especially when you consider the GRID paper in the background), so I think I stayed fairly true to my normal style.
But I can see I'm going to have to do a LOT more of this kind of thing if I'm ever going to get through my stash of paint!
Determined to use up some of my paint, I pulled out the "right" kind of photo -- one without any emotional baggage which also happened to match my paint! -- and decided to create a quick mat. I've done this before and generally like the results.
I'm pretty sure everyone in the entire world has tried this technique, but in the off chance that the ONE person who has not is reading this post, here's the process I used:

First, I selected my photo and paper (love this new Bo Bunny tone-on-tone paper!). Then I cut a piece of scrap cardstock in the same size as the photo -- in this case, 5x7.

Next, I placed the cardstock on the background paper and lightly adhered it. Then I took a foam brush and painted along the edges of the cardstock mat, so that just a LITTLE bit of paint would show on the background.
Well, I could see IMMEDIATELY that I had screwed up! The painted border was way too wide. How's that for messing up the simplest of techniques! :)

I should have used the skinny edge of the foam brush, but instead, I used the wide edge across the top of the mat, as you can see in the above photo. This resulted in a line of paint which was way too thick for my liking. Perhaps if the paint and the background paper had been similar in color it would have been fine, but with this much contrast, it was NOT GOOD.
 But hey! I always tell students in my classes that there are NO MISTAKES in scrapbooking -- just opportunities for creativity -- so I flipped the paper over and started again. (Double-sided paper to the rescue!)
Not wanting to make the same mistake TWICE, I experimented on some scrap paper (DUH! Should have done that to begin with!) and then tried again. This time, I used the narrow side of the foam brush and painted 4 lines around the edges. This technique MUST be done quickly. You cannot go back and fix things or it just ends up looking like you tried too hard. In this case, imperfection is the goal!
You can see the results of my second try above.

I placed my photo inside the painted mat and decided I was happy with the results. The skinny mat keeps the focus on the photo. The wide mat would have drawn the eye to the painted mat -- and not in a good way!

Next, since I was already "out of my box", I decided to really shake things up and do a little bit of tearing. (Anyone who knows me will tell you that I NEVER tear!) I figured I could handle one torn paper strip when it was accompanied by two straight cut strips, especially a STRIPED strip. Let the record reflect that I did not hyperventilate whilst tearing. Well, only a little bit...
Finally, since the background paper is lined, I decided to hand-write a bit of journaling, something else I don't do as often as I should. I don't mind my handwriting -- I just tend to prefer the "cleaner" look of computer journaling on my pages. But with this photo, hand journaling seemed appropriate.
Even with the painting, torn paper, and handwriting, this layout is still very linear (especially when you consider the GRID paper in the background), so I think I stayed fairly true to my normal style.
But I can see I'm going to have to do a LOT more of this kind of thing if I'm ever going to get through my stash of paint!
2 comments:
I love it....what a great idea! I may just have to scraplift it, if I ever get a chance to scrap again :)
Thank you, Benita! :) I hope you can scrapbook again SOON!
Post a Comment