26 November 2021

Feline Friday


Just for fun, I put Tinsel's old collar and engraved heart on Lily. Gosh, I miss our sweet sissy. She was such good company for the both of us.

I think Lily looks especially cute with a collar. If she would just agree to it, she could absolutely have her own but sadly, she's not a fan!

24 November 2021

Tulip Time!


For Mother's Day, Bailey sent me a gift card to a local garden center. I decided to use it to purchase tulip bulbs. It's been YEARS since I've planted tulips, and I've never planted them at this house. Give Jay's Dutch heritage and our connection to Pella, Iowa where we met, it seems that we should have a few tulips in the yard!

A few months ago, we had the landscaping in front of our house re-done, leaving a few open areas which are perfect for tulips. With that location in mind, I went off to the garden store earlier this fall.

As it turned out, they were running a sale on tulip bulbs so I used the gift card to purchase not one but TWO bags (that's 50 tulip bulbs...yikes!) and a bag of bulb fertilizer. I already had a bulb digger so I was ready to go!


It took a few days but I finally got all the tulip bulbs planted! I used metal garden tags to mark the spots where I put the clumps so I will know where to expect some activity in the spring.


 Here's hoping that I planted them correctly AND they make it through the long, cold winter!


 I'm already excited for spring! Thanks, Bailey!😊


21 November 2021

More Christmas Card Stash-Buster Cards

As I've come to the end of some of my (hoarded) Christmas stash, I've made a few "one-off" cards. That means there is only one of them! 

In years past, ALL of my Christmas cards were one-off cards but that is just crazy-making. Nowadays, I'll repeat designs even if some of the materials are different. I'll do that until I reach the end of a collection, then I'll make a "one-off" card. Such cards are also great stash-busters.

Here are some examples from this fall's Christmas card lollapalooza, which is just a fancy word for the mess happening right now in my craft room:

 This first card is not a new design but it worked well to use up the tiny (and I do mean TINY!) bits from this paper collection. And believe it or not, I think I MIGHT be able to eke out another notecard or two from what I now have left. At some point, I'm going to have to quit with these leftovers but I just love them so much!

This card used up an October Afternoon elf and two strips of my hoarded Authentique papers. Sadly, this is another company that I think is now out of business, so I can hardly stand to use these papers! I will probably have to keep a small stash just to look at from time to time. *sigh*

My long-time scrapbooking friends will remember Ki Memories, one of my all-time favorite companies, also long out of business. Somehow I still have stashes of Ki paper which occasionally work for cards. The inspiration for this card was the snowman. When cleaning out some embellishments, I ran across his hat, body, and scarf separately. I glued them together, vowing that he'd find his way to a card this year!


At the bottom of my die cut bin I found several large circular pieces (I think they are also hoarded October Afternoon bits). I arranged three coordinating bits in a zig-zag formation on my card front, then added in Santa, a greeting, and some glittered greenery. This zig-zag design is one I know I'll use again for different themes.

The red and green chipboard stockings were the inspiration for this card. I don't even remember where they came from, but they've waited a very long time to be used on a card! As I dug through my stash, I found a grinch-style die cut tree that matched perfectly. After that, it was just a matter of finding some paper to coordinate, and this card pretty much made itself.


Having made these and several other "one-off" cards, I'd suggest starting with the focal point and not the paper -- in this case, the stockings, Santa, snowman, elf, etc. For me, it seems easier to find paper to coordinate with those items than it is to find focal point pieces to match papers. And keep in mind, the paper you use does not even need to be Christmas themed, as long as the colors and patterns coordinate. Many of the papers I used, especially for envelope liners, are not designed for holidays. 

Here's to more stash-busters...so we can make room for new and beautiful goodies!

Thanks for stopping by today!
Janet

19 November 2021

Feline Friday

 With the colder weather, Lily is spending more time swaddled in old baby blankets. When she hears me come down to the kitchen, she saunters over to greet me and hopefully get a snack -- often still sporting the blanket!


 Her tail swings side to side, the blanket sweeping with it and sometimes dropping off. But in this case, the blanket held fast!

And Lily enjoyed her snack, still cozy from her nap!

 Once again, I think Lily has things figured out!

Happy Feline Friday!
Stay cozy, my friends!

17 November 2021

Handmade Christmas Cards: Use That Stash!

 I freely admit that I'm usually quite late to start my personal Christmas cards. A lot of that has to do with the Christmas card classes and kits I design for Memory Bound. Those big projects tend to occupy a lot of my time during the fall months when one would normally work on Christmas cards.


Instead of rushing around at the last minute, this year I decided to try something different. I've been working on my cards for several months now off and on as the mood strikes. This has turned out to be a very good process for me and now I have 45+ cards already done. Since I'm still on a roll I'll just keep going, and any extra cards I don't need will be saved for next year.

 One thing that has helped me be more productive this fall is setting up a little "station" with my Christmas card stash. I bought a new line from Stamperia this year (like I needed more Christmas stuff...HA!) and filled one of my mom's old glass fridge containers with the chunky die cuts. In the other one I placed some larger pieces I've had for years. I love some of them so much that I don't know if I'll every be able to use them, but step one is having them handy! In the small bowls I placed text pieces I've made and cut apart and smaller die cut pieces. My glitter, Nuvo Drops, and sparkle brush also fit nicely on the tray.


 I have a small enamelware tin which came from Mom's kitchen filled with extra die cuts and punched pieces. I will often make a few of these from scraps of cardstock to have on hand for cards. It's really nice to be able to dig around and find just what you need.


So with this set-up, whenever I feel like making a card I have everything I need to get started.

I started putting the completed cards and lined envelopes into one of my many Longaberger baskets. As the year has progressed, I had to break out a bigger basket to hold them all! It's nice to have a visual reminder of my progress.

In addition to making cards with newer products, I'm really making a concerted effort this year to use up some older stash. One of my favorite companies (now sadly out of business) was October Afternoon. I have a lot of their products that I just can't bring myself to use...especially for cards that will be given away. But I finally decided I COULD use some of the papers in this old 8x8 pad.

In looking through my stash of die cuts, I found a lot of kraft tags, so I decided to come up with a design to use a few of them up. I started with a panel of patterned paper from the pad, then added a cream die cut stitched rectangle and tag. Beyond that foundation, each of these cards varies a bit based on the cut-apart artwork I used on the front.

I still have plenty of these papers left so I may make a few more October Afternoon cards from my stash. I also have a lots of kraft tags left so I know I'll be using this design again! It's a good foundation for any card for any occasion.


Here's to finally using up that stash!
Thanks for stopping by!
Janet


15 November 2021

Cat Cards from Scraps

I've been going through my paper stash and pulling out the bits and pieces that would make good cards. I recently ran across what was left of the older Graphic 45 collection, "Raining Cats and Dogs". I had just a few paper strips, chipboard pieces, stickers, and cut-aparts and decided to make up a few cards to have on hand for my cat-loving friends. I love the colors in this collection! 

Now that I think of it, the floral paper was the only one original to this paper line. I added in the orange check and blue dot from my stash. Even though pickin's were slim, it doesn't take much to make a perfectly acceptable card!


For two of the cards I used the same "strip card" design I posted previously, supplementing it with punched flowers and greenery. 

 I used 3x4 cut-aparts on two cards and finished up a sheet of stickers with a notecard. When I get down to just a few small pieces, I switch to a smaller card base. Works great!


I added stickers to the insides of some cards. This is a practical way to use up little bits of this and that.


 It's always a fun challenge to see how many cards I can make from scraps. Now on to the next batch of odds and ends from my stash!

Thanks for stopping by today!
jp


13 November 2021

Guest Bathroom Makeover

 As I mentioned in last week's post, we've been doing some updating to our house. Since this past spring, we've refreshed the laundry room, kitchen, and upstairs bath. 

The upstairs guest bathroom was a smaller project that, I think, resulted in a big improvement! While we had painted the walls, and updated the faucets, hardware, and light fixture a few years ago, (10 years ago, to be exact) the bathroom now felt dark and out-of-date. The oak cabinet, laminate countertop, and builder-grade sinks were the main culprits. 

 Guest bathroom: BEFORE


 Ideally, we would have torn out and replaced the old square tile floor but that would have added quite a bit of time and cost to the project. Instead, we opted to have the oak cabinet, walls, and woodwork repainted. To save money and simplify things, we used the same color on the cabinet as the kitchen island and same wall and woodwork colors, too. In addition, we replaced the countertop and sinks but kept the light fixture, hardware, and faucets. We used the same countertop as in the laundry room which simplified the project and probably saved money.


  The first update was replacing the countertop and sinks. Changing to an undermounted rectangular sink was an instant update. I'm really glad we decided to do that instead of keep the old sinks, which I considered for about one minute before I regained my senses. (They went on to a new life at the Habitat for Humanity ReStore.)

Inspector Lily approved! I love this new countertop. It's easy to keep clean and looks so much fresher than the old laminate.


Next came the cabinet painting. Since we were also having our kitchen cabinets painted, the guys took the doors for both rooms to their shop for painting and sprayed the cabinet bases in place. 
 
I have learned that the prep for in-house spraying takes longer than the painting itself! It's important to cover everything in plastic and/or paper and tape it carefully. Here you can see the set-up and painting in progress. Inspector Lily took a quick peek to be sure everyone was on task!

 There was a delay of a few days while we waited for the doors to come back from the shop but already I could see a huge difference! The oak cabinet took the paint beautifully.

  Initially, I thought we could paint the cabinet ourselves -- and we probably could have -- but since we had already engaged the painters for the other projects, this seemed like an easy add-on. I'm so glad we just had them do everything because they definitely did a much better job than we could have!


 When the doors arrived, I was even happier! 

Here you can see how the old wall color clashed with the cabinets. If you'd been on the fence about painting the walls, this would have changed your mind!


We had the painters paint the bathroom walls and woodwork in the same colors as the kitchen. When you're doing a project like this, you can save money by limiting the number of paint colors. Whenever the painters have to clean out their sprayer to change colors, it costs money. We worked from one paint strip to keep it simple and cut costs as much as possible.

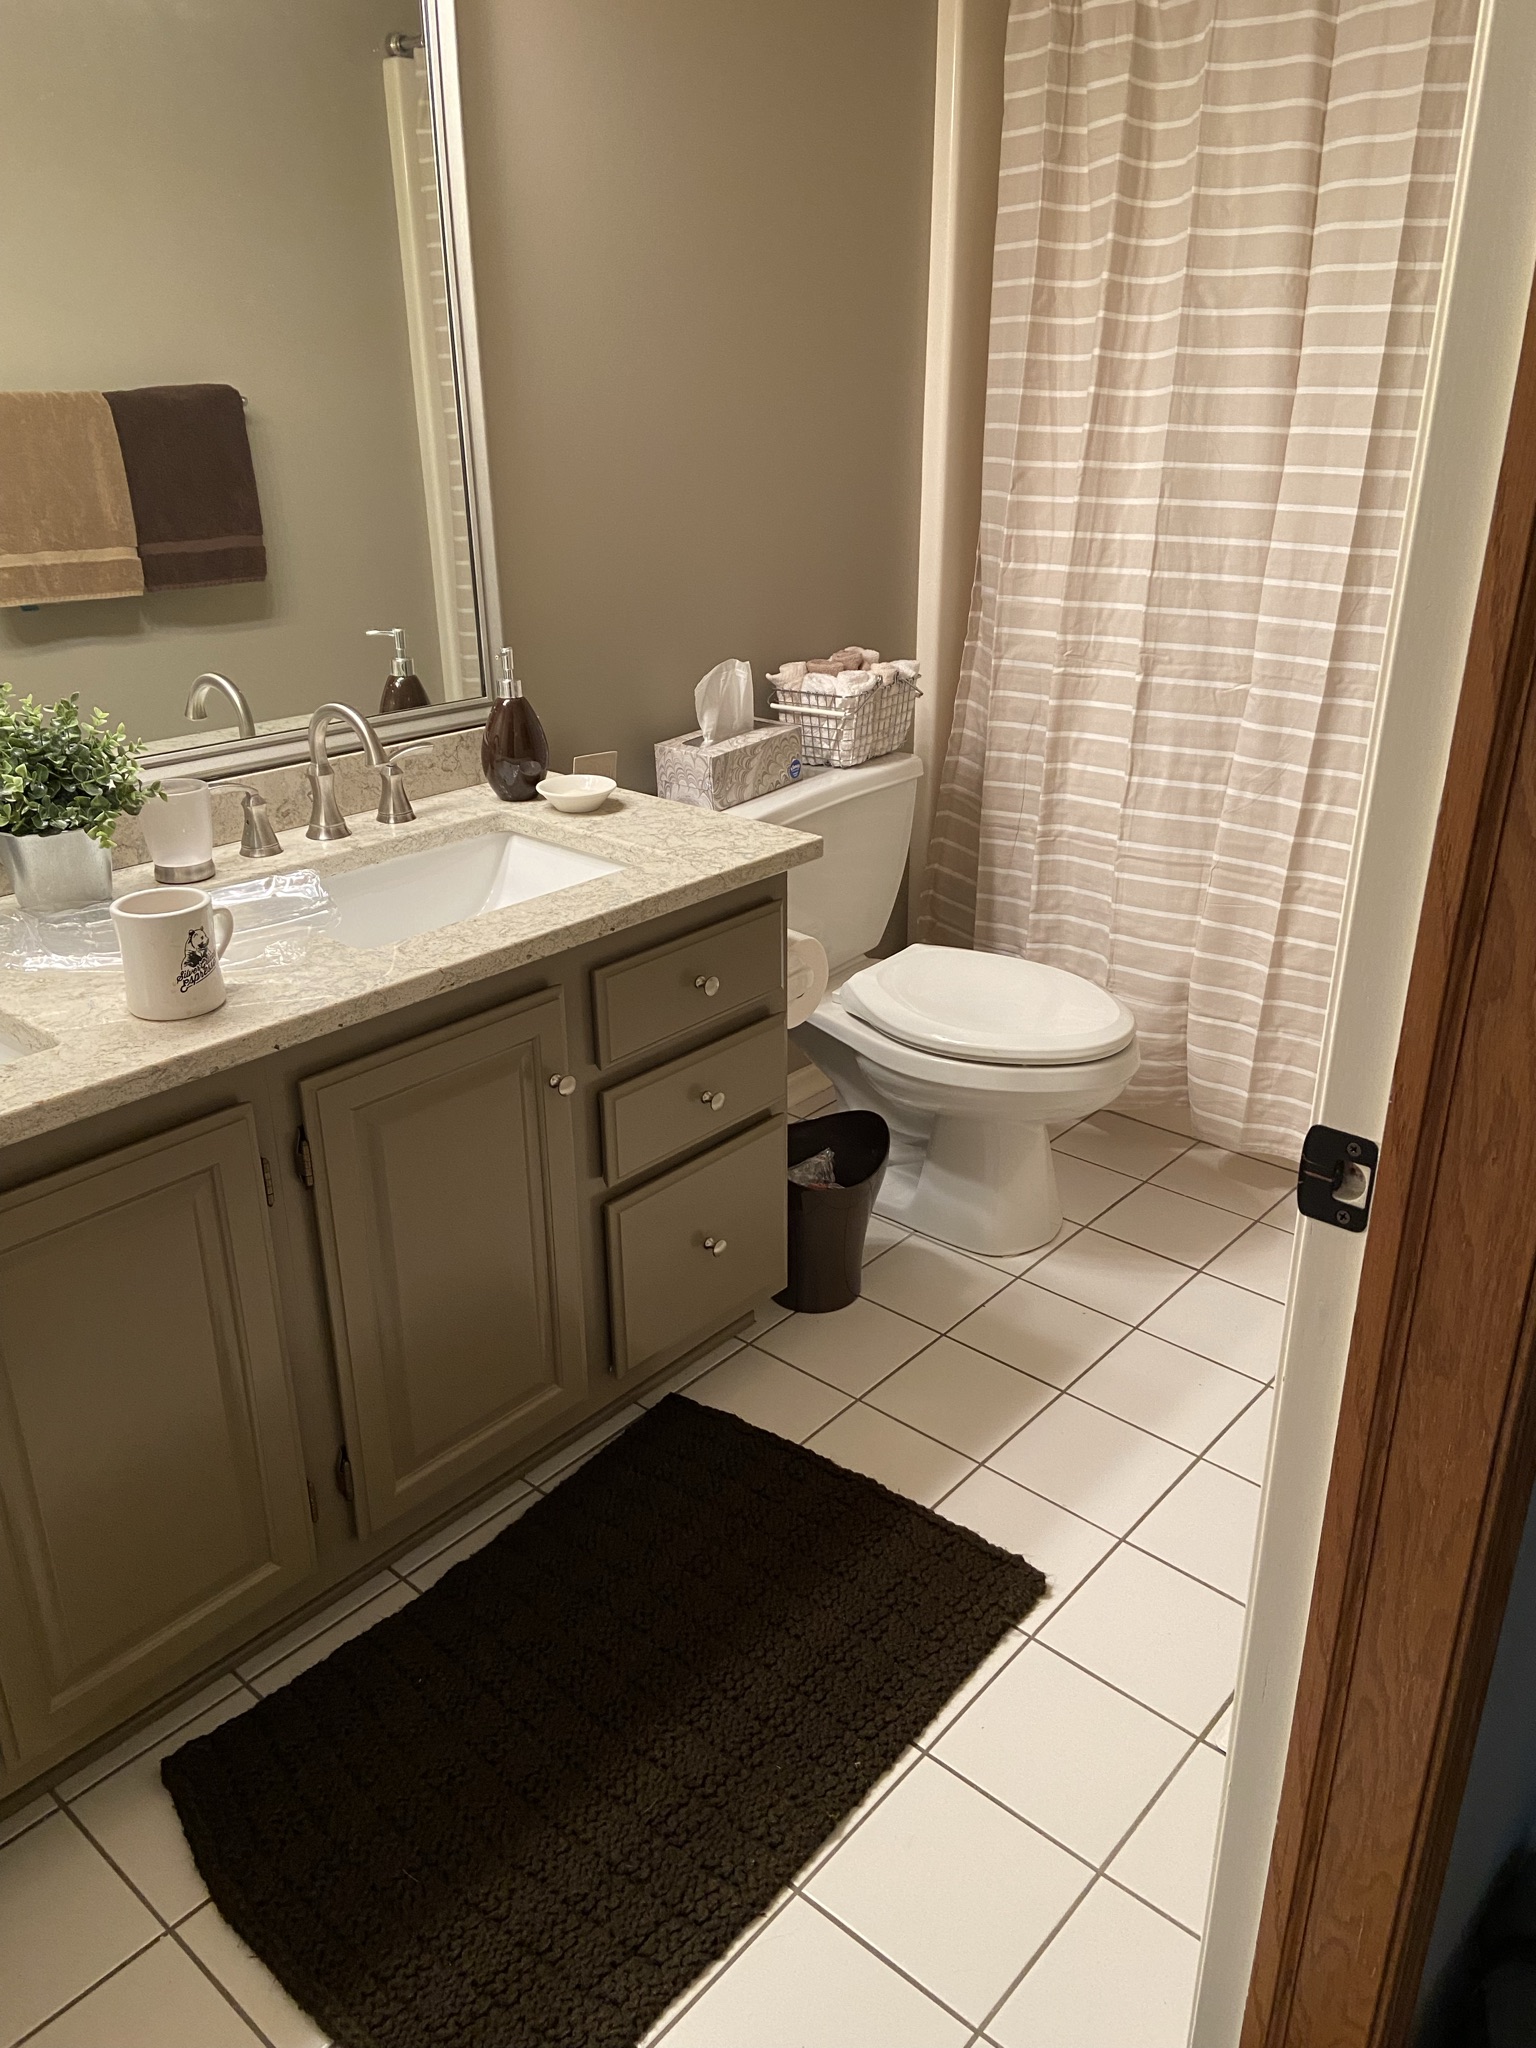
  Guest bathroom: AFTER

 I absolutely love how the bathroom turned out! Sure, it would have been better to replace the floor, but it's in good shape and doesn't look all that bad now that the rest of the room has been updated.

Once the painting was done, I found a new shower curtain at Target to replace the old darker one.

I was suprised at what a big difference it made to replace it. Lighter and brighter is the trend now, and I guess I can see why!


Here you can see the darker towels and rug...

...which I replaced with lighter ones.

At my daughter's recommendation, I also picked out a new wall hanging from iCanvas to bring in a little green. My mom's old milk glass planter with an IKEA plant finished the space.

It's kind of amazing to me how much fresher this room looks now. It's a much nicer space for guests now and when we eventually sell the house, hopefully the bathroom will be an asset instead of a liability!


Thanks for stopping by! If you're planning a home update, I hope you will be encouraged by these project photos to just get started. In an upcoming post, I'll share pictures of our kitchen update. I'm so happy with the changes we've made!


12 November 2021

Feline Friday

 Lily's got that "Is it Friday yet?" look about her!


The good news is that YES, Lily...It's Friday!

FELINE FRIDAY, that is!

05 November 2021

Feline Friday

 One of the Memory Bound gals made "Elves on the Shelves" using photos of all of the staff. These adorable elves are posed all around the store!


 Yours truly failed to provide a selfie for this project, opting to send a picture of Lily instead. 😸

Now Lily has shown up as an Elf on the Shelf!
How purr-fect!


03 November 2021

Christmas Cards from Scraps


After Christmas last year, since we were still on lock-down, I decided to continue making Christmas cards. Every time I had a few minutes, I tried to make at least two or three. I continued doing this through the spring and before I knew it, I had a 24 or so cards ready to go for this year. The fact that I'm making my own Christmas cards before December 1 is quite remarkable. And I'll admit that it's a good feeling!

Before starting on my Christmas cards again this fall, I decided to clean out my box of holiday papers. It is quite amazing the amount of stuff I've accumulated over the years. Considering how I enjoy making cards from scraps, I have the potential in this box to make several hundred Christmas cards...way more than I'd ever need!

It doesn't take much product to make a nice card, especially if you supplement your paper with die cut pieces. For instance, I had just a small baggie of my favorite 6x6" (hoarded!) Authentique papers left and decided to see if I could use it all up (I still haven't!).  I've made Christmas cards with this pad for at least two years so you know I'm coming to the end of my stash! Along with the few pieces of Authentique, I also had a few scraps of coordinating papers.


I started by sorting the papers into piles by pattern. At that point, I realized that I had four Santa pieces which would make nice card fronts. The challenge was that this Santa piece was long and skinny, and none of my paper scraps were very large.


With my papers sorted, I came up with a design that would enable me to make four nearly identical cards. Since I had a lot of 1" strips, I started with one at the left. Next came the Santa piece. I also had a few 2x3" pieces so used one on each card at the right, followed by a horizontal 1x4" strip across the bottom. The pieces were arranged in a stair-step fashion which worked great for the narrow Santa. When adhering them, I started with the right-hand piece, overlapping each one slightly so that Santa appears to be looking out from behind the strip at the left.


The strip across the bottom covers the cut edges and provides a "ledge" for the text piece and embellishments to come.


I added a text piece made with MS Word text boxes, then finished each card with some glittered greenery, a die cut poinsettia, and punched circles. I really like the pop of black which ties into Santa's buckle, so I repeated it three times in the punched circles, Nuvo Crystal Drops, and text piece.

After making Card #1, I created the remaining cards in assembly line fashion which made the whole process quite fast!


For the past few years, I've been lining the envelopes for all of my cards. This is a great way to step up your card presentation. So after making these cards, I found a coordinating green paper and cut liners for each envelope. 
 
In addition, I also like to run my envelopes through the printer with the addresses formatted in a pretty font. Along with the liner, the printed address makes the card presentation a little more special. After the envelope is printed, I adhere the liner. In the meantime, I'll store the cards, envelopes, and liners together so that everything is ready when I sit down to print on my envelopes.
 

In addition to these cards, I had a couple of small pieces of Authentique artwork left to use on my favorite "strip cards". This is a design I tend to use when I'm coming to the end of a paper collection and just have small strips. It works for any occasion. I made graduation cards with this design back in May, as well as on several occasions since then!


This is such a handy design and one that you can make with almost nothing! While I was at it, I cut liners for the envelopes so they are ready to go.

Another time-saving measure is printing directly on the insides of my cards. I have formatted a MS Word document with a text box that prints on the upper right of each card base. For me, this is definitely faster than stamping and much more efficient than printing my card inserts separately and gluing them inside each card.


As I sorted through my scraps, I found enough to make 10 Christmas cards for the Cards for Kindness program. If you enjoy making cards but perhaps (like me) don't have a ton of people to send them to, I'd encourage you to check it out! It's a wonderful way to use your card-making skills and stash to spread a little kindness in the world. And it's not just for Christmas cards! They need cards in a variety of themes all year long. In addition to making 10 Christmas cards, I also made 10 "hello" cards, all using scraps in similar designs to the ones shown above. It was a great feeling boxing them up and sending them off this week!

Thanks for stopping by the blog today! My goal is to post more frequently and so far, so good!

jp