30 November 2018

Feline Friday: Thankful for Rory!

 For Thanksgiving, we traveled to Texas to enjoy the holiday with Bailey and her boyfriend. We had a wonderful time and enjoyed the best meal you can imagine! 

As a bonus, we got to spend time with Miss Rory, who has turned out to be a spunky, quirky, and very sweet kitty. She's even turning into a bit of a lap cat! (THAT TUMMY!)

Naturally, I enjoyed seeing her sporting her winter sweater -- even though the temperature was in the 70s!

 Rory also willingly put on her Halloween costume so I could see it in purr-son. In case I haven't mentioned it 100 times yet, Rory won the costume contest at her vet's office this year, beating out several dogs! :)

  She's just about the cutest unicorn you've ever seen!

I count Rory among the many blessings in my life. It's hard to imagine that a (not-so-) little striped kitty could bring so much joy to those around her. 

 I'm so happy Bailey and Rory found each other!
 jp

21 November 2018

Found Treasure: Doll Clothes Trunk

For the past couple of years, I've had a case at a local antique mall. Anyone in that business will tell you that it's not an easy road -- most young people aren't interested in antiques, and the old people who WOULD be interested are often in the process of downsizing their own collections. As such, my case is far from a money-making endeavor. But it has given me a way to find new homes for some of my own items as well as small pieces from my parents' estate.

From time to time, I pick up a treasure or two at a garage sale or thrift store to sell in my case. I try to keep that to a minimum because the whole point of the case is to sell my OWN stuff...not somebody else's! But recently I made a quick stop at a local thrift store and found something I could not resist: An old vintage trunk filled with doll clothes. I was in a hurry and didn't have time to look at the clothing closely but for the low price, it was worth taking a chance.

Back home, I hoped I hadn't made a mistake with my hasty purchase. The trunk itself had some rust and scuff marks. The clothing was heaped in a messy pile. What was once a child's treasure had somehow lost a lot of its dignity, relegated to the back corner of a thrift store.

 But with a little bit of elbow grease, the trunk cleaned up nicely and the remaining scuff marks just added to its charm. What's more, the clothing was actually in wonderful condition. Once ironed, every piece looked delightful, the vintage colors evoking an era long past. Every piece was handmade, and not a single button or snap was missing. 

In addition to the clothing, there were several pairs of shoes, moccasins, and even a fur wrap. In the drawer were three small bars of hotel soap and yellow pin box full of pretty buttons. I could imagine that a little girl would use those items when playing with her dolls -- because I once did the same thing with MY dolls. So I left everything in the drawers just as she had done. I could tell that this little girl must have loved her trunk and clothing very much. It made me feel good to help restore its dignity.
 
  
Although I was tempted to keep it, I have many dolls of my own so I decided that I would prepare the trunk as best I could for a new owner. After cleaning the case, I fashioned a festive holiday bow for the top and hung the clothing up for display. With a little TLC, this vintage trunk and clothing set is now as sweet as can be.

This little trunk is now in my case at the antique mall, awaiting a new owner. I'm hoping that it will find a spot under a Christmas tree this holiday season and some little girl -- or mama of a certain age! -- will be just as delighted with it as I'm sure the original owner was.

jp

UPDATE: The trunk has gone to a new home! I hope it brings a smile this holiday season!


16 November 2018

Feline Friday: New Feeder!

Something new and exciting arrived at our house this week: 
A new LILY-PROOF automatic feeder!

If you've been reading my blog for awhile, you may recall that we've been using a very basic two-part feeder when we go out of town. The cat sitter divides Lily's daily dry food into the two sections, and the lids pop up on a timer. Unfortunately, this feeder design has become quite a problem. On our last trip Lily learned to pry BOTH LIDS open immediately -- in spite of the packing tape we've placed around the edges. This means she gulps all of her food and that never ends well. You can read more about our feeder troubles HERE! 😍

So after years of dealing with this, I finally decided to invest in a better feeder with a lid that a crafty kitty cannot open. I looked into several options and settled on the one that would accommodate the 1/8 cup she gets at each feeding. (Most feeders have a minimum of 1/4 cup.) It also holds a huge amount of dry food, so a cat-sitter won't need to touch it at all when we're gone.

As soon as it was set up, Lily got to work trying to break into the lid. Luckily, it hooks shut in a way that (according to the reviews) should be cat-proof. She clearly knows that the food is stored in there but for now she has given up on this endeavor. WHEW!
 
 
After Spouse figured out how to program the feedings, we set it to dispense half of her food at 3pm and the other half at 10pm.

Right before the food dispenses, the feeder makes a rather loud sound which Lily has already learned means "DINNER!". At first, she approached the feeder very cautiously when the food noisily clanked into the metal bowl, but she soon overcame her fear and enjoyed a tasty afternoon snack.

I'm planning to use this feeder daily to help with portion control and get her on a better schedule with less begging throughout the day. She'll get her wet food in the morning and then dry food in two meals later in the day. So far, so good!
jp


15 November 2018

Washington D.C. Album - Part 2

As I reported a few days ago, I recently finished the scrapbooking for my daughter's 7th grade school trip to Washington, D.C. To put this in perspective, she has been TEACHING 7th graders for 4 years now! This is an illustration of how far behind I am with my scrapbooking...and it's actually even worse than that.

But there's no sense dwelling on it. There's only one way to rectify it: Make time to get it done! So I didn't even put away my D.C. scrapbooking materials because I also have a family D.C. trip to scrapbook...while all of those monuments and memorials are fresh in my mind!

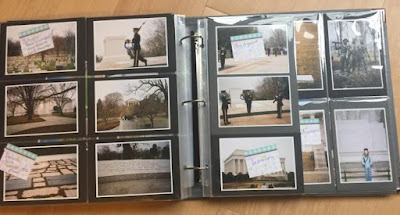
The photos from our family trip were printed many moons ago so I started by sorting them into date order. The good news is that they're all printed in 4x6 size, which means they can be slipped into pockets with no matting. This is a very big deal, folks! It makes that part of the process VERY SPEEDY and the completed pocket pages are far less bulky. YIPPEE!

Next, I sorted through all of the memorabilia I had saved from this trip. Unfortunately, I didn't write on any of the photos at the time I printed them, nor did I write out an itinerary of what we did each day. Luckily, the memorabilia helped me figure all of that out.

To set up this album, I used the same process I used for the previous D.C. trip. I put most of the photos into pocket pages of various configurations, reserving a few for traditional 12x12 pages. I just slipped those photos into full sleeves for now.

I LOVE these Project Life dividers! They have space for a label at the top which sticks up slightly above the pages. They've been awesome in my family history albums to divide up the family sections. In this album, the divider will separate the two trips to D.C.

After filling all of the pocket pages and finding a "home" for all of the photos, I could verify that all of the pages will fit into the same album with the 7th grade trip. YAY!

Because the 4x6 photos fit readily into the pockets, it saved a ton of time. I had all the photos into the album after just one evening's work.

I interspersed the memorabilia very roughly in place so I'll be sure to remember to add it in some way.

Now that everything is in the album, I'll go back and make the 12x12 pages and do the journaling which will largely consist of photo captions. These pages should be quick and easy to finish up!
After I finish this D.C. trip, I am planning to work on a vacation we took to Seattle and Vancouver in 2005 (!!) then return to my chronological and family history albums. 

To those of you who are behind like me: Be encouraged!
 Let's GIT-R-DONE!
jp

11 November 2018

Catching Up on Scrapbooking: DC Album Finished!

 Hey, kids! I recently posted about the super-fast DC album project I had started, and I'm happy to report that after just a few more hours of work this weekend...it's finished! Any scrapbooker knows that a finished album is something to celebrate!😃

As scrapbooking projects go, this one was not greatly important to me but STILL, I wanted the trip to be documented and the photos safely tucked away in an album. So I didn't spend a lot of time on adding details to the pages because -- realistically -- it's not going to see the light of day very often. I kept everything very simple with minimal embellishments and journaling. I made ample use of pocket pages with just a few traditional 12x12 pages so I was able to work through the project very quickly.

 For this trip, I made around 24 full-size pages (including traditional and pocket pages) plus a few 8.5x11 and 6x12 pages. The pages for this trip do not fill an entire album, so I'm planning to put at least part of our family D.C. trip in the same book.

 I found a couple of patterned papers at Memory Bound which I used on a few pages, as well as some layered die cut titles. I can't emphasize how awesome these layered die cuts are for adding just that little "something" to a page with no effort at all! We have these die cuts custom made for us in tons of different themes.

 They are all laser-cut and assembled by hand, and the detail is amazing! If you've never looked at them when shopping at Memory Bound, be sure to check them out! (If you live out of the area, we happily ship anything you might need!)
 

In addition to pocket pages, I used a very simple page design that I borrowed from my recent Disney album and repeated it whenever I needed a 12x12 page. This design will easily accommodate 3-4 pictures or postcards with a little tweaking. 
 

Here it is again with 4 photos.

 I also used a second design which worked great for 5 photos.
 

 With Veterans' Day upon us, it was really interesting to take a closer look at all the photos of Washington, D.C. memorials. This was a whirlwind 4-day school trip, but the organizers somehow managed to take the kids to tons of different memorials and statues. To finish up this album, I read more about them and learned/re-learned a few things myself!
 

In addition to the D.C. part of the trip, the kids also toured Mount Vernon, Jamestown Settlement, and Williamsburg. 

Jamestown is one of my favorite places to visit! We had visited that area a few years prior to this trip...and thankfully, that trip is already scrapbooked!
 

This 7th grade school trip sparked Bailey's interest in learning more about the history of our country, so we planned a family trip the following summer. I'm glad this trip is now scrapbooked and can be enjoyed for years to come.

Thanks for stopping by! If you're a scrapbooker, I hope you'll find a little bit of encouragement in these posts. It IS possible to go back and finish that backlog of scrapbooking!
jp


09 November 2018

Feline Friday: Scrapbooking Buddy

 I don't normally scrapbook on the bed, but occasionally if I have something to sort or some mindless task to do, I'll spread out there. That's what I did recently when I was putting some photos into pocket pages for a super-fast DC album project.

It was a Friday night. I was upstairs and Lily was downstairs in her basket, so I fetched her -- basket and all -- and plopped her on the bed with me. She's not much of a scrapbooker, so I wondered how long she would stay.

 As it turned out, she hung out with me for quite some time!

 She occasionally struggled to keep her eyes open, but after a brief Cat Nap, she perked up a bit.

Out of her Expensive Cat Basket, she even offered some advice on a few pages.
 
 "Put dis pikture HEER, Mommie!" she offered helpfully. Thanks, Lily!

 Then it was back to the basket to finish up that nap!
 As we all know, scrapbooking can be very hard work. But as they say, it's always more fun with a (furry) friend!
Happy Feline Friday!
jp & Lily


08 November 2018

Speeding Through a DC Scrapbooking Project

Hello, friends! It's been a bit since I posted. Still catching up on some projects for the store where I teach, but I have been able to sneak in a few hours of scrapbooking here and there! The key to making progress is this (shocking, I know...): You actually have to work on it! Those photos aren't going to scrapbook themselves!

So when we last talked about this, I was about to embark on a couple of Washington, D.C. projects. The first of those two projects is underway, so I thought I'd share a little bit about my process. This was my daughter's 7th grade social studies trip from 2005, and Spouse went along with her. I have a good number of photos, but not a crazy number, and not a lot of journaling other than photo captions. So I'm really trying to speed through this trip so I can move on to our family trip to D.C., which took place the following summer.

I started by gathering all of my materials. Even back then, you could tell that Bailey lived a "scrapbooking life" -- she knew to save memorabilia from school trips. She purchased postcards as souvenirs, knowing that they'd be nice additions to a scrapbook someday. It's really great to open up a folder and find all of this stuff ready to add to the album! I raised her well! LOL

Even better, she wrote on the backs of all of the photos as soon as we got them back from the developer! This has made things SO MUCH EASIER, as I can just use that information for my photo captions.

I used a trip itinerary to sort the photos into order by Day 1, Day 2, etc. Then I pulled out a few representative pictures and took them, along with some postcards, to Memory Bound where I teach. I picked out a few colors of coordinating cardstock and some pre-made die cut titles.

Next I settled in on a Friday night with my little buddy to start organizing the album. She was good company! (More on that later...)

This album will include lots of pocket pages, so I started by slipping the photos into the appropriately sized slots. Since these are smaller photos -- printed at 3.5x5 many moons ago -- I had to mat them all on 4x6 cardstock. Still, that's a pretty easy proposition...and relatively mindless work!

I used a variety of sizes and configurations of pocket pages throughout the album. As I adhered the photos to the 4x6 cardstock, I wrote the captions onto sticky notes so I could type them up later.

If, for instance, I had a few leftover vertical photos that didn't fit in my horizontal slots, I reserved them for traditional pages. I just shoved everything for those pages down into a 12x12 sheet protector to work on later.

 I continued along like this until all the photos had a "home" in the album. All of this was accomplished in one long evening while watching TV with my furry friend.

The next time I worked on the album, I moved back into my crafting area where I could actually start putting it together. That meant adding color to some pages, typing up the journaling, and finishing up the traditional pages.

While I was working on the pages, I remembered that Spouse and Bailey had EACH received one of those ginormous group photos after the trip. I found both of them in the back of the guest room closet...go figure! Then I got really crazy and decided that if I could make it work, I would actually put one giant photo in the album and recycle the other one. I first made sure that cutting it in half would not interfere with the image of either Spouse or Bailey, then I got really brave and just did it. Seriously...why not? The photo is not doing anyone any good hidden away in the back of the closet! Now I'm really happy that it's in the album!

As I went through the folder of memorabilia, I found a couple of small bags filled with postcards. The bags were nice so I decided to use them as pockets for brochures and itineraries. Are they acid-free? Probably not, but they're not holding photos so I'm willing to risk slight deterioration. The clear bag at the left holds the trip itinerary...

...and the brown paper bag holds my daughter's notes from the trip.

I just have a few more pages to finish up and this album will be done. I'll be sure to share more of it then!

Back to work...no time to waste! :)
jp