30 May 2018

TLC for the Grill/Garden Cart

 After a couple of summers in the intense patio heat, the "grill cart turned garden cart" was in need of some TLC this spring. The paint had chipped and the galvanized elements had not weathered well.

It took a bit of effort but, thanks to Spouse, the gray paint now looks much better. I spray painted the black elements again to touch them up and they now look fresher.

I found some galvanized tin-like spray paint and gave the birds a new coat. (Strangely, they had turned a chalky tan color in the sun.) While they're a little brighter than they were originally, I'm happy with how they turned out!
 

But the little buckets were in sorry shape, almost rusted through. Honestly, I don't think they were meant for outdoor use. OOPS!

I managed to scrape off some of the rust and tried spray painting one of them. It sort of worked but the buckets themselves were so worn that I decided to replace them. 
Luckily, I found the exact size online and, while they have a shiny instead of dull finish, they're much sturdier than the original buckets. They even have liners which will help protect the metal.

Once all the touch-ups were done, I loaded up the refurbished grill cart with a few herbs and flowers and we are off and running for another season!
 jp


28 May 2018

"New" Gardens in May

 Those of you who follow my blog may remember the big garden overhaul from last summer. I had all of my perennials dug up, split, and moved, and added lots of new plants to my existing beds. Long story short, the work ended up being done in the hottest part of summer (not the best time to be planting perennials) and even though I watered like crazy, I didn't know how things would look this spring.
I'm happy to report that about 95% of the new plants returned! We had a late start to spring here so it took a long time for the plants to emerge, but most of them did finally come back. I lost the new rose and several smaller plants, and unfortunately some of my old perennials did not survive in their new spots. But overall I am happy with how everything is shaping up. Now that the weather seems like the tropics (!!!), the plants are really taking off.

So let's take a quick walk around the yard! :)
 I am still a little skeptical about the design of this skinny bed (I'm not too keen on how the lilies are all in a straight line), but I think it will be OK. The lilies have spread a little and are less lined up than they were when they were planted, so we'll see how it looks as things fill out. The peony on the right has budded but not bloomed yet. The hydrangea at the far left was slow to start but is finally filling out. Once the tropically-colored lilies bloom, it should be quite pretty.
 

  This is one of the large beds we re-worked. Even in the short time since I took this photo, the plants have grown much larger. The few that didn't make it will be replaced.

 We split and moved my very old purple iris to several new spots. They bloomed quite beautifully this spring, and it was nice to see pops of purple throughout both gardens! I shared these iris with many friends and I hear everyone is enjoying the color! We brought these iris from our old house 24 years ago, so they are very special to me. I'm glad I could share so many of them!
 

 This photo shows several empty spots along the front of the garden. The coral bells which didn't make it will be replaced.

 We planted five new clumps of Japanese iris, a new perennial for me. They are so tall and elegant! Two of the clumps bloomed well this year. I'm hopeful the others come around in time.

 As you round the corner to the side of the house, you can see a large empty spot. This is where we had moved my existing rose bush, but unfortunately it didn't survive. It was attacked last year by those dreaded Japanese beetles, so maybe that had something to do with it. I will put something different in that spot.

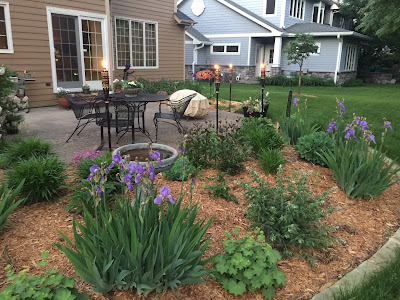
   This is a picture of the other bed which, as you can see, has filled in pretty nicely. In fact, some plants are quite close to each other which was not evident last summer! I have several clumps of the old purple iris in this bed, and I'm really pleased with how they look.

 The landscape designer helped me select plants to stagger the bloom time throughout the season, and so far I've been pleased with the color. After the iris bloomed, the lilac bush came on in full force, and now we have a variety of other plants blooming, including this salvia.
 

 I'm really happy so far with how things are shaping up! Since everything has either been moved or newly planted, I truly feel like the spaces are all brand new...yet still have the familiarity of my favorite plants from years past. I know I still have a few issues to deal with in these gardens, but that's just the nature of perennial gardening!

 I'm enjoying my garden spaces more than ever! I'll share more pictures in the coming weeks as new flowers bloom. :)
jp

25 May 2018

Feline Friday: The Great Outdoors

 With the nice weather upon us, Lily enjoys going outside on the patio! OPEN DA DOOR, MOMMIE!!

 HURRY UP!

 Ahhh, the great outdoors/cement patio! Lily will NOT go in the grass, thank you very much! (Seriously, what kind of kitty will not let the grass touch her feet???)

She was excited to find the pot of catnip planted just for her and the neighbor kitty.
 

But she had to go inside to eat it! No outdoor picnics for this city girl!

Happy Feline Friday, everybody!
jp


18 May 2018

Feline Friday

 It's probably not a good sign when you need a little something to prop up your tummy!

Just kidding (kind of).... 😎

Happy Feline Friday, everyone! 
jp

14 May 2018

Learning About East Texas Oil!

 When I visited Daughter in Texas last month, I had time while she was teaching to check out some local points of interest. I've been curious to learn more about the vast oil fields of East Texas so I decided to visit the nearby town of Kilgore, where the depression-era oil boom began.

I spent a few hours visiting the super-interesting East Texas Oil Museum, and I'll share those photos in a separate post. I also stopped by downtown Kilgore which still has a few oil derricks for visitors to see. A derrick sits atop an oil well and supports the drilling apparatus. At Christmas, these oil derricks are lit like Christmas trees!

This is a scale model of how closely the derricks were erected during the oil boom...on the main street of downtown Kilgore! Nowadays, safety regulations prevent derricks from being set up so close to each other. But back then, it was "anything goes"!
 

 Because of the amount of money generated by the Kilgore oil wells, this area was dubbed the World's Richest Acre. This is what sleepy Kilgore looked like before oil was discovered there.

After drilling, Kilgore was filled with oil derricks -- and all the developers and workers to operate them and the related businesses. The town was forever changed. At one point there were 1,000+ wells within Kilgore, making it the most densely drilled area in the world.

 When you drive through parts of Texas and other oil-producing states, you'll often see pump-jacks which mechanically lift oil from some wells. They bob up and down like little ducks! If you're lucky enough to find oil on your property, you're entitled to the revenue it generates. So you'll see pump jacks in parking lots, front yards, ditches, and fields...wherever oil is found. In downtown Kilgore, you can see a pump jack up close!

Oil production continues to be big business in East Texas, and it was very interesting for this Iowa girl to learn more about it!
jp


11 May 2018

Feline Friday

Today's post features the antics of Cousin Rory in Texas. I recently visited Rory and her meowmy. We had way too much fun!

Rory loves going into cupboards and drawers (be sure to check out the post from her visit to the vet). She's fast, sneaky, and amazingly handy with her giant paws. If you can't find Rory, just check the cupboards and drawers!
 

Cousin Rory is also a great jumper! To get to these kitchen cupboards, she jumps from the counter to the top of the fridge, then it's an easy hop to her favorite kitchen perch. On the other side of the kitchen, she has to jump straight up from the counter to the top of the cupboards, an even more daring feat which she performs with ease!

For the life of me, I don't know how she jumps up there without hitting her head on that popcorn ceiling! 
haha DIS BE MI SPESHUL TRICK!

This is perfect vantage spot for surveying her kingdom!
 

 On another note, this week marks one year since we had to say goodbye to our sweet Tinsel. I miss my crafting buddy terribly. Be sure to give some extra love to your kitties today! They bring so much joy to our lives.

Thanks so much for stopping by!
jp

04 May 2018

Feline Friday

 In case anybody has been wondering, Lily has been busy being her quirky, cute self! Here are a few of the places she was spotted this week:

 Atop the cat tree, surveying her kingdom...
 

  Stalking her daddy's dinner...
  

 "Do you ever get that feeling that someone is watching you?"
 (She realized making her mooove would involve actual physical activity so opted for a nap instead. 😺)


Midway through a tummie baf...
 
  Lily, you make me smile every day!


27 April 2018

Feline Friday

 Rory's stylish new sweater is done! Bailey did a great job on it and I'm sure Rory will enjoy sporting it! Unlike most kitties, she doesn't mind wearing t-shirts, dresses, or sweaters. Wearing clothing has a calming effect on her, almost like a Thundershirt!

Bailey made Rory's new sweater using some yarn she received in a grab bag. It was just the right amount of yarn to make a cat sweater.

 Any cat person will understand why there's packing paper all over Bailey's living room. Rory gets pretty excited whenever an Amazon box arrives!
 

Awwww!

It fits her PURR-fectly!

23 April 2018

Hidden in Plain Sight

 You have to know the past to understand the present.
Carl Sagan


Over the weekend, I attended a funeral visitation in a part of town I don't go to often. After I finished at the church, I took some time to drive around the area. It is filled with large and stately old homes, some in need of repair, but the neighborhood has good bones. You can just feel the history around you.


Maybe that wasn't a random observation. As I sat in the church parking lot, it occurred to me that a branch or two of my family once lived in this area, something I've picked up from looking at old census records. I decided that someday it might be interesting to map out a drive to see if any of their old homes are still standing.

 Then I remembered that several ancestors are buried in what I thought was a small cemetery nearby. My GPS indicated it was only a few minutes away, so I thought I'd make a quick visit.

Now it may sound like a terrible thing to say, but I really don't like cemeteries -- or at least the ones where I've had to go on the worst days of my life.  I find it extremely difficult to visit my parents' graves so I hardly ever go, and I feel very guilty about that. My mom and dad were so full of life that a cemetery is the very last place I want to associate with them. 

So given my strong feelings on the subject, it might seem hypocritical that I actually wanted to visit a cemetery where my ancestors are buried. But people who research their family history routinely visit cemeteries as part of gathering information and paying respect. And since I didn't know any of these people, I don't feel the emotional kick-in-the-gut I get when I go to my parents' cemetery. I know that my mom and dad (and especially my grandma, who was the family genealogist) would appreciate that I'm trying to learn more about our family history, so I put aside my guilty feelings and off I went.

When I arrived at the cemetery, I discovered that it wasn't a small place at all. In fact, it stretched across the highway into two large areas. Since it was so much bigger than I expected and I was there mostly on a whim, I just took a quick drive through to see if i could spot any family plots.

Before arriving, I had checked a website called Find A Grave which I learned about through Ancestry. If you're interested in knowing where someone is buried, you can almost certainly find it on this website. Volunteers go out and take pictures of headstones, so if your family's stone has not been photographed, you can request a photo. It's really quite a wonderful resource, and it's free for anyone to use.

Through this website, I've found graves for many relatives all around the United States. Headstones are quite useful to locate because they often give basic facts that you'll need for research.

 This is the page for my second great grandmother which includes links to other family members buried in the same cemetery. So if you wanted to plan a visit to a particular cemetery, you could arrive with a list in hand to find all of your family's plots.

 I knew from research that some members of my maternal grandma's family are buried there, so I drove around looking for the McClelland plot. I headed to what looked like an older part of the cemetery and found it readily.
 

 I located a couple of graves for which I needed better pictures for my family tree.

 Up in the distance you can see the tall pointed stones which belong to the Harvey branch of my family. Until recently I didn't even know I had Harveys in my family. Heck, a year ago I could have walked around this cemetery not recognizing the names on my most of my family's stones.
 

 I didn't stay long, but this quick little stop proved to me that if I ventured out with complete information about which relatives are buried where, I could do a little tour of the few cemeteries around the area and pay my respects as part of my family history project.

It's amazing to me that so many members of my family lived so close to where I live today, yet I'm only just now discovering it. It's almost like they've been hidden in plain sight.
jp


22 April 2018

Catching Up on Scrapbooking: Process

Over the years as I've worked on different sorts of projects, I've learned that I'm very much a PROCESS person. This is especially evident when I plan classes. I think about the best way to do things to ensure a successful outcome, then I try to either continue or improve upon those steps each time.

But I'm still trying to determine the best PROCESS for this massive scrapbooking project I've been working on. It's so easy to get bogged down and not make progress. That can lead to discouragement and NO PROGRESS, which is where things sat for far too long.

My typical process is to finish a page before moving on to the next one. That means planning it out, adhering all the photos, and adding embellishments and journaling before turning to the next set of photos. But this way forces you to switch between various types of tasks and (I think) can slow a person down.

So this time, I decided to try something different. Rather than finish each page before moving on, I decided to fill all the sleeves loosely with photos (basically to plan out the album), then go back and finish each page in a second step. I find that I work most efficiently if I do one type of task at once rather than switch back and forth between different kinds of tasks. So theoretically, this way should be faster. We shall see!

So I emptied the box of photos and filled the pocket pages and sleeves with them. The good thing is that this allows you to see where all the photos will fit and in which size/style of page.
It's nice (but misleading!) to see this empty box. By no means is the album done!

If you've used pocket pages, you understand that it can be almost ridiculously complicated to figure out how to fit your horizontal and vertical photos into various configurations of sleeves. It sounds easy but it sometimes strains your brain as you try to fit same size photos front to back in the proper order! For this reason, it was helpful to just focus on this task until all the pages were very roughly planned out.

But obviously just shoving photos into page protectors doesn't finish the job. This pile of pictures just tells me that I'll be making couple of traditional scrapbook pages for this event.

So I started back at the beginning of the album and added titles, embellishments, and a little bit of journaling, going page by page. Some photos ended up on a traditional 12x12 page...

...while others ended up on 8.5x11 pages. I added a few embellishments here and there.

Some pages have very little journaling.

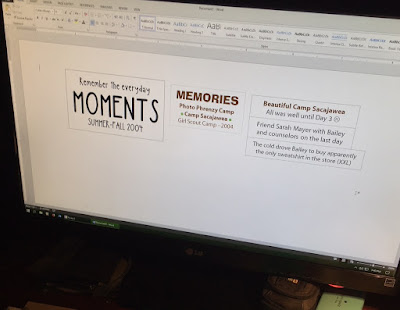
Some have more. To speed up this part of the process, I formatted text for several pages at once...

...then printed and cut apart the pieces. I definitely think it's more efficient to handle journaling this way, rather than a single page at a time!

Once the embellishments and journaling were added, I called these pages done and slipped them into the album sleeves, then moved on to the next unfinished page. Things were going along pretty well...

...until I remembered the big file of memorabilia I still need to add to this album. YIKES!

I'm not sure if this method is going to work for me. But if it will make things move more quickly then I'm willing to give it a try. We'll see how long it takes to wrap up this album. Time is ticking away and many more photos await!
jp