Showing posts with label Bathroom Remodel. Show all posts

24 April 2016

New/Old Ottoman

During our recent bathroom remodeling project, I collected quite a lot of items to donate to our local Habitat for Humanity ReStore. From switch plates to drawer pulls, from old light fixtures to doorknobs, I had amassed a bit of everything.

On one of Spouse's recent days off, I asked if he wanted to ride along to the ReStore to make the donation. If you've never been to a ReStore, it's a fun place to wander around. For someone who loves to re-purpose, it's a treasure trove! Still, I didn't expect to find anything that day since I'd been there not that long ago when I was looking for glass sconces.

Imagine my surprise when, in the lighting section, we looked down and saw this chocolate brown ottoman on casters, beautifully upholstered, in nearly perfect condition! 

 You may remember that I have been on the lookout for an ottoman for the corner of the bathroom which once housed the large tub. I have not been pleased with what's currently on the market -- way too expensive, poor quality, and limited fabric choices.
 
Here was this amazing ottoman, the perfect size, and on casters, just like we wanted! And only $19? This was a deal we could not pass up!

Since bringing it home, it has proven to be perfect for the space. Spouse replaced the old casters with new ones which are smoother on the tile. I think I can sell the old casters for around $20, which would make the ottoman FREE! :)
 

  And of course, Tinsel has claimed it as one of her private napping spaces.


This ottoman was a great find, once again proving that most anything old can be made new again! :)
jp


27 January 2016

Bathroom Remodel: We are Done!

Warning: Long post! :)
I'm super excited to report that we are officially DONE with the bathroom project! Of course, I haven't hung anything on the walls or added many personal touches, but I'm in no rush for that. All the hard stuff is done and we couldn't be happier with how things turned out!
 
It's amazing to me how we didn't add any space to the bathroom but by using different materials and colors, it feels so much larger now.

In this post, I'd like to share a bit about what I learned through this process as well as a few before and after pictures. If you'd like to see more photos, just click on the "Bathroom Remodel" tag at the bottom of this post which will link you to all the posts I've done in this series.

I learned a lot in working on this project. Here are just a few points that come to mind, which I hope will help anyone who might be embarking on a remodeling project!
  • Scour Pinterest for ideas you love. Know what you like and what you don't like.
  • Consider both functionality and style. A remodel that looks great but doesn't function well is not a good investment, in my opinion!
  • It's not easy to find light fixtures and plumbing fixtures that match. Try to pick them out at the same time.
  • "Oil-rubbed bronze" means different things to different companies. If matching metals is important to you, carry a sample with you to the store.
  • Be prepared for a lot of dust in your house!
  • Know your budget before you start.
  • Take EVERYTHING out of the space before you begin.
  • Things can take longer than expected. It's OK. It's better to proceed slowly than to rush and not be pleased with the results.
  • Quality workmanship shows and is worth the extra expense.
  • ALWAYS test colors. ALWAYS get a sample and bring it home before making a decision. That goes for flooring, grout, wall-covering, paint, stain, window coverings...ANYTHING with a color.
  • Proceed slowly in your decision-making. You don't have to have everything picked out at the beginning of your project. Colors and materials look much different after they are installed so allow yourself the chance to tweak your design as you go. 

 ****************************

  The first step (and most defining, from a design standpoint) in the process was to choose a new cabinet. The color and style of the cabinet set the tone for the rest of the bathroom. The new cabinet is walnut with a counter made of Livingstone. It's quite a bit taller than our old cabinet (we love that feature!) but otherwise it's almost exactly the same width. We also replaced the large mirror with two smaller mirrors to match the vanity.

Cabinet area BEFORE:

Cabinet area AFTER:

Once the cabinet was ordered, we could move on to flooring and other decisions. Everyone (with the possible exception of Tinsel!) was very happy to see the old carpet go! These days, most people opt for a hard surface in their bathroom. Carpet is very difficult to keep clean in that type of space! We chose a 1" hexagon tile from The Tile Shop. I am very happy with the tile and surprisingly, it hasn't been cold this winter!

Floor BEFORE:

Floor AFTER:

One of the biggest changes in the bathroom was the removal of the corner tub. I'm so happy we made that decision! Opening up that space allowed us to expand the shower and just makes the entire area feel more open. Eventually I'll probably put some type of large ottoman in the space (bigger than the tiny one that is pictured below).

Corner space BEFORE:

Corner space AFTER with the tub removed:

Our old shower was one of those plastic pre-formed shower stalls with sliding doors. The doors have been really hard to keep clean over the years, so we were happy to try something new. The new shower is about one foot wider than the old one (although it feels bigger than that because of the materials) with subway tile on the walls and glass doors. We were concerned about keeping the glass doors streak-free, but a good coat of Rain-X and a trusty squeegee after every use seem to be doing the trick!

Shower BEFORE:

Shower AFTER:

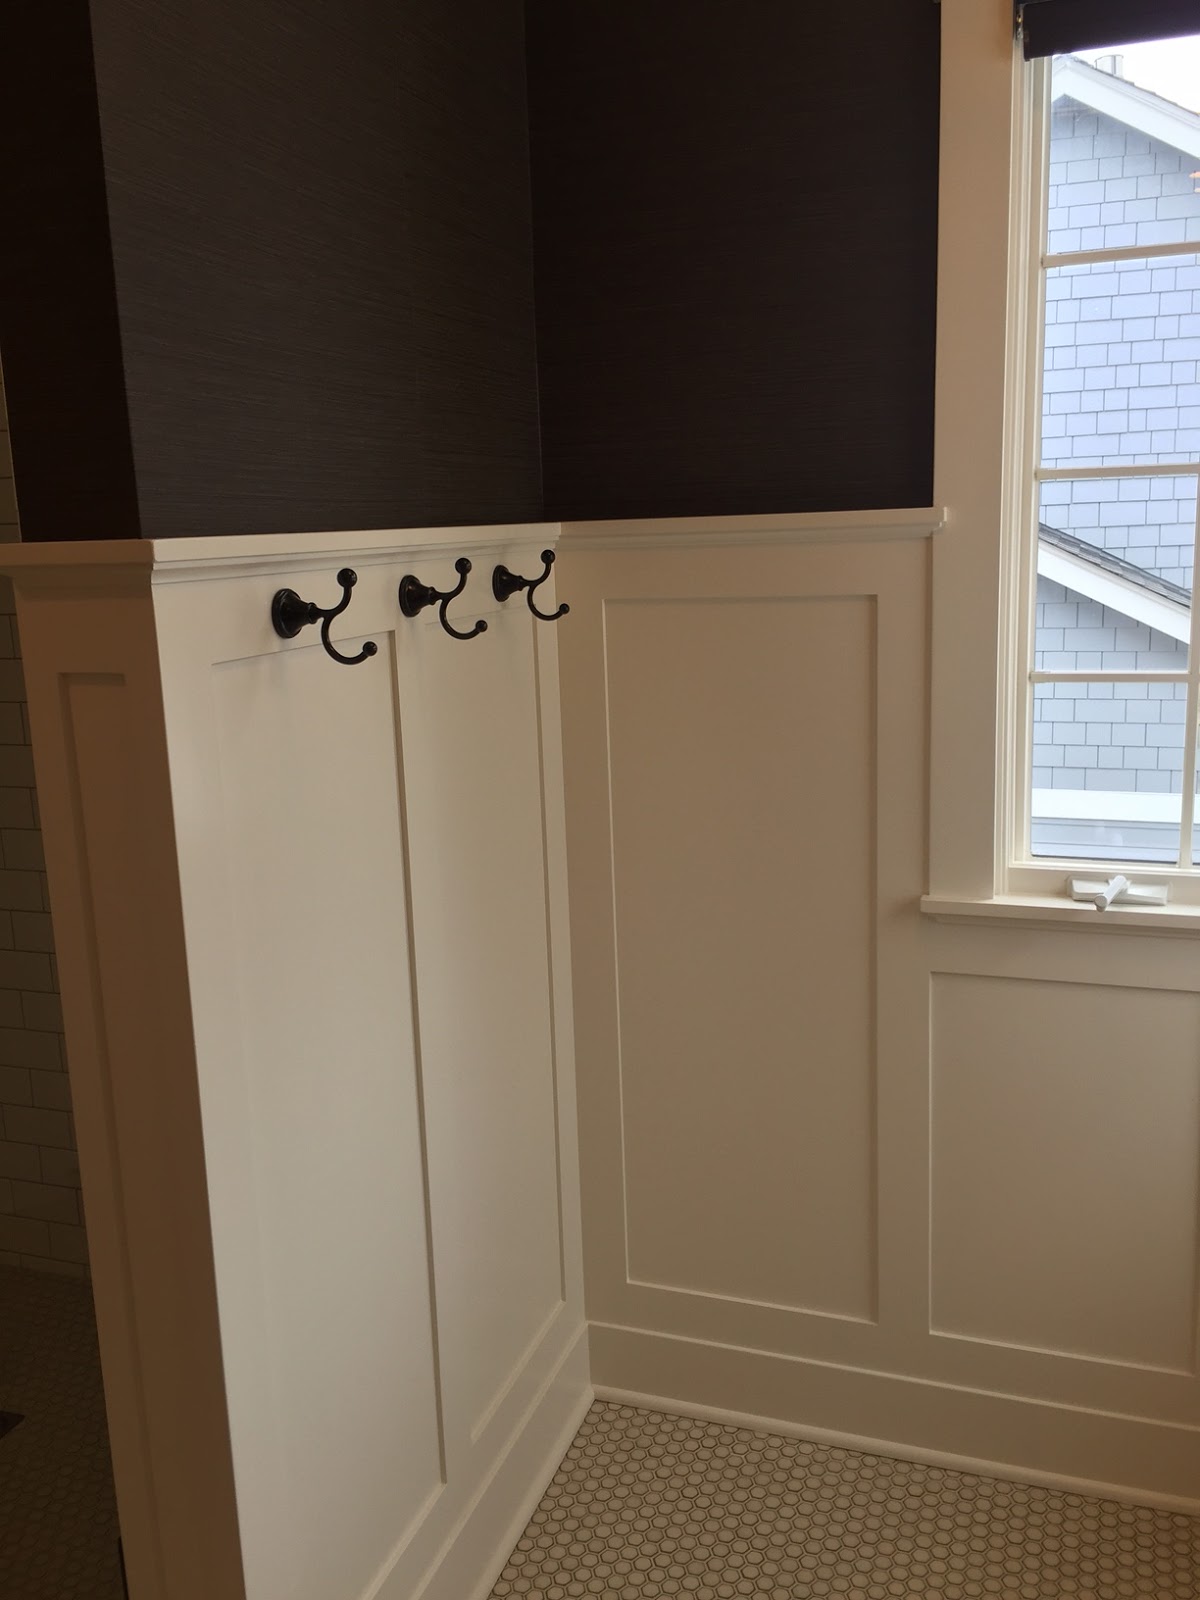
Another big change involved the wall-covering. Because of the difficulty in removing all the green wallpaper, we opted to cover it over. I love the look of wainscoting, so we decided to put that around the main area of the bathroom with a textured brown wallpaper above it. We (SPOUSE!) just wallpapered right over the top of the green paper with no issues. Much better than stripping it and taking chunks of drywall with it in the process!

Mega-credit goes to our great contractor for re-creating the wainscoting I found on Pinterest in this inspiration photo!

Wall-covering BEFORE:

Wall-covering AFTER:
 

By the way, we LOVE the hooks! I found the idea for hooks on Pinterest. Super handy for wet towels!

  Another big change involved the window coverings. The curtains were in place when we moved to the house 22 years ago, but we added the mini-blinds shortly after arriving. As much as I loved them at the time, I came to really dislike how difficult they are to clean. So we removed the curtains and replaced the mini-blinds with simple window shades. I love them!

Window coverings BEFORE:

Window coverings AFTER:
 
 Lighting was an area that ended up being more difficult that I would have predicted. In addition to changing the sconces above the cabinet, we added a corner light which is primarily decorative but does add a nice ambiance. Our old "Hollywood" type light fixture over the cabinet put out so much light you could practically do surgery, so we replaced some of that brightness with can lights in the ceiling.

 Lighting BEFORE:
 

 Lighting AFTER:

Spouse did a great job of figuring out which switches should govern which lights, all of which now have dimmers.

Other than replacing the hardware, our old linen-type closet didn't change, but I completely cleaned it out and only brought back in the items we truly need. I also took the opportunity to re-organize and label the contents. This is a little thing, but it makes a big difference! We will update our clothes closet in the next phase of this project. (Get ready, Spouse!)

There are no BEFORE pictures of the inside of the linen closet. It was way too scary to show you! But you can see the door at the right of this photo.

Linen closet AFTER:

Thanks to all who have followed along on this remodeling adventure with me! If anyone has any questions about the process or products we used, please feel free to leave me a note in the comments!
Stay tuned (as soon as Spouse recovers!) for the next phase in this process, when we will be updating our adjoining bedroom and closet! Can't wait! And this time, we WILL be stripping wallpaper! :)
 jp


05 January 2016

Bathroom Remodel: Closet & Drawer Re-Org

 While we're finishing up the wallpaper in our bathroom, I've finally moved everything back into the new cabinet and closet. This took way longer than it should have because:
1) We had WAY too much stuff crammed into the old bathroom AND
2) Everything was coated in dust! This was totally my fault for not completely unloading the bathroom closet at the beginning of the project.

Now I can say that we're actually using the new bathroom, instead of running back and forth between the other bathroom and guest room, where everything had been stashed!

So rather than just bring all of that stuff back into the bathroom, I took the opportunity to really sort through and re-organize everything, only taking back what we actually need and use. While Daughter was home over Christmas break, we started a similar process with her bathroom (i.e., the guest bathroom, if we ever had a guest!), so I finished that up at the same time.

As a side note, a friend recently told me about two missions supported by her church, and I was excited two deliver two full bags (soaps, lotions, hairbands, etc.) to support their work. I always, ALWAYS try to donate before throwing things away!

Unfortunately, I failed to take any "before" pictures of the drawers and closet, but you'll have to trust me when I say they were BAD. We had stuff in the bathroom which dated back to our daughter's pre-school years. I am not kidding! Obviously, this process was WAY overdue!

--- CABINET ---
The biggest change with the vanity/cabinet is now we have six drawers instead of three and two side cabinets instead of four. The overall space is probably about the same, but it's just configured differently. When planning the new cabinet, we chose more drawers instead of cabinet space because with drawers, the space is used more efficiently. With cabinets, unless you have a shelf midway up, you can lose a lot of functionality.

Now I have one set drawers and Spouse has the other. I placed small baskets inside the drawers for the items we use each time we're in the bathroom. After paring things down, everything fit nicely into these drawers, with room to spare.

I applied new shelf liner and put back only the items we actually need in the bathroom. I wish you could have seen the cabinet areas before! DISASTER AREA!

--- CLOSET ---
 I've spent most of my time on the re-organization of the closet. I truly believe a closet can be both functional and enjoyable each time you open it, and that was my goal for the bathroom closet. It was previously an eyesore and far from functional due to the fact that I had ignored it for so long! You may remember when I re-organized my craft space a few years ago that I spent a lot of time on the closet, and it still remains my favorite (and the most functional) part of that space!

So back to the bathroom! The wire shelving makes it a little hard to set things directly on the shelves without tipping, so most everything is now contained in a basket or box of some sort.

For the most part, I used containers we already had on hand, picking up just a few white baskets at the dollar store. I wanted to be sure that every container was white or tan, unlike the mismatched containers which were previously in the closet. When the containers match in color, it can give even mismatched contents a more pulled-together look!

A few years ago, I bought these white boxes at the dollar store. They're still very functional but I found that I wasn't using them very efficiently. Two or three of them contained medicine and first-aid items, and we were constantly having to dump out the entire container to find what we needed. Now I'm using the boxes for items we don't need quite as often, or items that might leak if stored horizontally.

I moved the medicine, first aid items, and soap (we have enough soap for the next century, even after donating a LOT!) to a large stacking drawer system. Now you can just pull out the drawers and easily see what you need!

I ended up putting this container on the floor of the closet, which you obviously WOULD NOT DO if you have children in the house! It may not stay there long-term but right now I don't have any other use for the floor of the closet, so we'll give it a try.

 I had been keeping this set of drawers since we cleaned out my dad's sister's house. I'm glad I was able to find a use for it. Now I think of my late aunt each time I use it.
 

I also went through all of our towels and bagged up a LOT to take to our local animal shelter. Towels are badly needed for kitty cages and comfort and I am only too happy to support the work they do. Thanks to a lovely gift from our daughter, we now have completely matching towels and washcloths for the first time since we've lived in this house (that would be 22 years)! We actually have a few more than this, except that they were in the laundry when I took this photo! :)
 

I also made a few quick labels for those white storage containers which is another way you can make even inexpensive containers look a bit more custom. But labels mainly make it easy to find what we need and put things back where they belong, which is not my strong suit. I kept myself under control and did not label everything in the closet, but I can't promise you that I'm done labeling!

So far I think the newly organized bathroom closet and drawers are a breath of fresh air! When we tackle our bedroom (next on the list), we'll also be tackling our clothes closet which is actually part of the bathroom space and was left untouched with this project. Now THAT will be a major test of my organization skills!


jp

04 January 2016

Bathroom Remodel: Don't Give Up on Us!

 If you've been following our bathroom remodel project, you're probably wondering:  
WHEN WILL IT EVER END?

I'm kind of wondering that, too! :) The process has taken longer than anticipated, but we weren't in any sort of a hurry when we started. We now need to wait for another roll of wallpaper to arrive before we can finish this final step in the process. Although I'm anxious to be done with the bathroom, waiting a bit longer really isn't a big deal!

 Meanwhile, here's a better picture of the shades we ordered from Home Depot. We'll definitely be ordering them for our bedroom, too. Spouse even has the wild idea that he'd like to put them in our kitchen. We have very few window coverings on our first floor (I love natural light) so that seems kind of radical to me, but we'll see!

 Last week, I bought an inexpensive light fixture for the small room where the toilet is and Spouse installed it over the weekend. I'm glad to have that done!

Here's a better picture of the shower. It's about one foot wider than our old shower, although the glass doors make it feel much larger than that. We probably didn't need to make it this big but since we took out the tub, we had room to expand it. Should we ever decide to sell the house, I think a larger shower will appeal to buyers.
So, long story short, it's going to be a bit before we can finish up this project. Meanwhile, I'm working on organizing the closet and the new vanity cabinet, so I'll share photos as I complete those tasks. I'm anxious to share final pictures of the entire space when we wrap this up!
jp

31 December 2015

Bathroom Remodel: Mirrors, Hardware, & Window Shades

Our bathroom project is almost done! 
I know I've been saying that for awhile now, but we put the wallpapering on hold while our daughter was home for Christmas. There are just a few more strips to be hung, but it's a tedious process and each piece takes quite a bit of time to hang. In the meantime, I'll share some pictures of other parts of the project that are finished!

The shower has been complete for awhile (this is an old picture below), but we just started using it a few days ago. Before using the shower, the glass guys suggested spraying the doors with Rain-X water repellent and purchasing a squeegee to wipe them down after each use. So far, it's been working great and the doors still look very clean!

 Both Lily and Tinsel are curious about the new shower situation. Lily is sort of terrified of the drain. :)

 While Bailey was home, we picked out towel bars and hooks for the bathroom. We tried to think about where we needed such items without having to drill too many holes in the beautiful wainscoting. We'll have to live with the space for awhile to see if we have all the towel bars we need.  
 

 I looked on Pinterest and noticed that a lot of folks with wainscoting use hooks. I really liked the look and practicality of hooks, so we had to contractor attach three to the wall behind the shower. So far, the hooks are getting the most use!
 
  
I've been slowly evaluating, cleaning, and bringing items back into the bathroom. It's sort of amazing how much stuff (JUNK) was in this closet and stashed in the previous cabinet. I'm only bringing back what we need and use. I put shelf-liner in the drawers and cupboards of the new cabinets and am working slowly on the closet. When I'm done with the closet, I want it to be organized and pleasing to see when we open the door -- not like the mess it was before the remodel!
Note for anyone doing a remodeling project: MOVE EVERYTHING OUT OF THE ROOM. I left most of the items in the closet, thinking the door would be closed most of the time. That was a bad decision, because EVERYTHING BECAME COATED IN DUST. When I finally decided to completely unload the closet, I found myself moving dusty stuff into other areas of the house for temporary storage. Not good!

The mirrors were one of the final pieces to be installed. The contractor and I worked together to design them in a style that would match the cabinet. I love how they turned out!

As you can see, there is a contrast between the wood and the wallpaper. I obviously knew that would be the case and chose the wallpaper because I like how it looks with the wood but I'm sure some people would say that the two do not match. I think the two browns work well together -- it's like milk chocolate and dark chocolate -- and I definitely did not want the decor to feel too "matchy matchy". I hope to bring a print (fabric or artwork) into the room somewhere to bring the two shades of brown together.

 We also decided to get rid of the old mini-blinds (so hard to keep clean!) and replace them with traditional roller shades. I am thrilled with how easy they are to use, and I love how they look! You can see how they look rolled up in the photo below. Don't mind the construction mess!

 The shades coordinate really nicely with the browns in the room. When the light shines through (as in this picture), they do turn a very slight purplish color which I don't mind but hadn't anticipated. For the most part, the shades will be up during the day, so this is not a concern. We purchased "reverse roll" shades so that you only see the brown shade color, not the rolled up white back-side of the shades. I didn't even know such a thing existed, but it was definitely the right choice!

 Thanks for following along with this project! Time permitting, we'll finish up the wallpaper in the next few days and officially move back into the bathroom! I'm anxious to put our house back together! :)
jp