30 October 2015

Feline Friday with Rory

We recently visited our daughter -- and her kitty -- in Texas. It was great to see Bailey, and I was excited to meet Rory for the first time! I'll admit I took more pictures of the kitty than the daughter!

I knew Rory was tiny, but she is much finer-boned than I envisioned. Her whole body is very narrow. She makes Tinsel and Lily look like sumo wrestlers!

Immediately after Bailey adopted Rory, she discovered that something was not quite right. After several trips to the vet, it turned out that this poor baby had a somewhat unusual intestinal parasite. EWWW! Thankfully, Miss Rory responded to the medication very quickly and is doing fine. Since coming to live with Bailey, Rory has gained weight each week but now that she is parasite-free, I'm guessing her weight will start to pick up a bit more quickly.
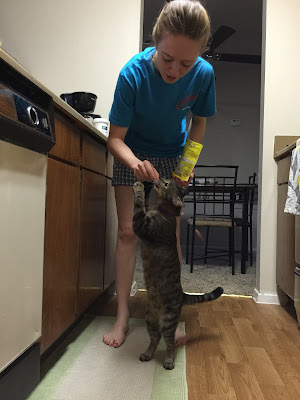
 Bailey is being very careful with her food so she doesn't develop bad habits. Can't imagine which of our kitties she might be referring to! HA! Still, Rory loves her treats!

YUM!

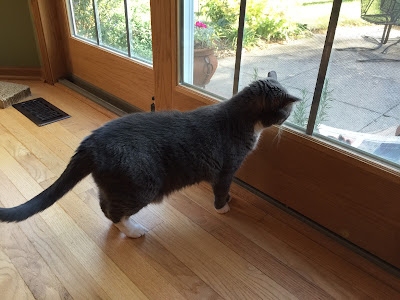
Rory has a keen interest in running water and while we were there, she had almost figured out how to drink from the sink. This is an important skill for an indoor kitty!
 

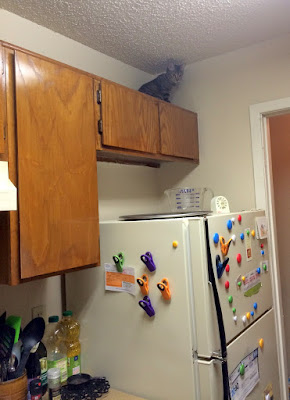
 And she loves to climb!
  

This girl already knows who is in charge and is clearly surveying her kingdom!

Happy Feline Friday!
jp

23 October 2015

Feline Friday

I swear, Lily contorts herself in the cutest ways possible!
I know I take too many pictures of her, but who could resist this extreme cuteness?

Hope your weekend is this relaxing!
Happy Feline Friday!


22 October 2015

Turkey TALES

  One of the workers helping with our bathroom project noticed I have a few old pheasant and turkey feathers lying around the house for the kitties. He's an avid hunter and offered to bring me a few feathers. I'm not at all in favor of hunting, mind you, but I agreed to take a few for the girls.

Imagine my surprise when he arrived a few days later with not just a few feathers, but TWO ENTIRE TURKEY TAILS. YIKES!

In my politeness, I seriously did not know what to say. Especially when he told me that there was still a little bit of turkey attached. EWWW!

The feathers are really soft and beautiful. After stressing about the fate of the poor turkey, my next thought was that we should use some of the extras for crafts. That was before I realized that they were firmly implanted in turkey body!

 The contractor guy offered to pull out the feathers with pliers but forgot to do it before he left for another job. So I put the turkey tails outside on the patio hoping the "body part" of the tail would dry out.

Finally I decided to work on the tails myself. The small feathers are pretty easy to pull out, but the long feathers are really stuck in tightly. I could only pull out a few before I was completely sickened by thoughts of what had happened to the poor turkey.

Note: These feathers are still in the garage. I will wash them with soap and water before letting the kitties play with them!

So I left the tails out on the patio. Each time the feathers flapped in the wind, poor Lily and Tinsel went into high alert!

 After a couple of days on the step, something very strange happened.

One of the tails disappeared! Did a person come by and take it? If so, that gives me the creeps. Did a predator take it? That also gives me the creeps! 

So now I'm down to one turkey tail. That's one more turkey tail than I ever expected to have!

17 October 2015

Bathroom Remodel: Finished Tile

 Hey, y'all!  
(I've decided to start saying that because I've been watching way too many episodes of Fixture Upper. And because our daughter is now a resident of Texas!) 

Anyway, the tile phase of our bathroom project is done! I could not be happier with how everything looks. Our contractor did an amazing job with the installation! 

In the shower, we have creamy white subway tile on the walls, with "natural" or cement-colored grout. The shower drain has been installed but we still need to add the bronze-colored fixtures. The glass shower doors should be here in a couple of weeks!

Here's a close-up of those wall tiles. I love this tile so much that I think I will set up shop in the shower! There's even a tiny corner shelf for my crafting tools! :)

 The floor of the shower has the same hexagon tiles as the rest of the bathroom. I absolutely love the shower drain! It has sort of an old-style industrial look. I had nothing whatsoever to do with choosing it. One day it just appeared, so I'm really glad that I love it so much!
 

The "curb" of the shower is topped with the same material which will be on our counter top.
 

 It has sort of a chunky look which I love.

Here is the completed floor with the cream-colored grout installed. I love how it turned out! I would say that the lighter grout makes the entire floor "read" a little lighter than I expected it to, but that's OK. And it looks more homogeneous now...a bit less "busy", if you will. But you can definitely see the geometry of the floor tiles, and that was our goal!

 The green wallpaper is still a huge visual distraction, so here's the floor with no wallpaper and only the bottom half of a cat!

 As part of the tile work, we had a heating/cooling vent relocated from the floor to the vertical area which will be under the cabinet. Lily loved sitting over that floor vent, so she's still getting used this little change. "Aire iz comeen out heere naow, mommie!"

This project will be on hold for a couple of weeks, then the contractors will start working on the walls. We'll be adding wainscoting around the perimeter of the main bathroom, then putting a dark brown-ish wallpaper above it. I'm excited for the next phase of this project to start!

Thanks for following along with our progress!
jp


16 October 2015

Feline Friday: Playtime with Tinsel

Even though she's 14 years old, Tinsel loves to play...up to a point. She runs, jumps, and chases -- until she remembers that she's playing or notices that Lily is watching her. Then she immediately stops. Her entire facial expression changes!

That's what happened recently. Tinsel was running and playing very actively until she noticed Lily observing her. (How did Lily get her elbow to do that, by the way? LOL)

When Tinsel realized she was being watched, she stopped playing and got a surly look on her face. Sweet Tinsel! I couldn't resist the chance to adorn her with a few toys!

Sorry, Tinsel! We're just playing! :)
Happy Feline Friday!
Hope you get the opportunity to play today!
jp


15 October 2015

Bathroom Remodel: Grout Colors

If you're installing tile, be aware that the color you choose for your grout can make your tile look wonderful...or DREADFUL. Grout color is terribly important, and I have learned that choosing the "right" color may not be as easy as you'd expect!

This is a photo I found online which shows how grout color can change the appearance of tile. This is not the tile we're using in our bathroom, but the shape is the same. Look how different this white hexagon tile appears with white grout, tan grout, black grout, and gray grout. From a color standpoint, grout is powerful stuff!
Having done my homework, I knew going into this project that I did not want the grout to blend in with the tile, as shown in the upper left corner of the above photo. When that happens, the hexagon shapes visually disappear. We wanted the tile shapes to be visible, so we planned to choose a darker grout color.

In the end, however, we chose a LIGHT color, and I love the results. What I had not considered (DUH!) was the fact that our tiles have a darker ring around the outside edges. You can see the outlines in this photo of the tile with no grout.

The tile designers created the tile in this way so that when used with a light/matching grout, the hexagon shapes are still visible. It's actually a very smart idea!

Unfortunately, the logic behind this feature was completely lost on me until we started mixing up batches of grout in different colors to create sample boards. (And by the way, if you're doing a tile project, it is IMPERATIVE that you have your installer create a sample board before grouting the entire floor. You really can't get a good feel for grout color until it's installed and dry, and if you don't like it, then it's too late. It's absolutely worth the money to test it first.)

So we picked out a couple of shades of dark grout, assuming it would be beautiful. UGH! Look what happened! The dark grout visually "absorbed" the lines around the edges of the tiles, making the grout lines appear to be extra wide and the tiles very tiny! NOT A GOOD LOOK!
 

 This completely threw me off kilter. If not a dark grout, then what color? Lighter grouts are also harder to keep clean, so we hesitated to go in that direction.

We really liked the appearance of the tile with NO GROUT, so we looked for a grout that would be the color of the cement used to adhere it to the floor. This is sort of a gray color, called "natural" in the grout world. UGH! This color did not make the tile look pretty at ALL.
 

 Finally, against every logical thought in my head, we tried a few different light grouts. BINGO! Sure enough, when we used grout to match the tiles, the "outline" feature really worked and the hexagon shapes were still visible. This is not at all what I expected we would choose, but it was the right choice and I'm really happy with the results! As a side note, we went with an epoxy grout which is resistant to dirt/discoloration over time. It's more expensive and takes longer to install but should wear very well.
 

We also had to choose grout for the shower tiles, but this process was much easier since those tiles are a solid cream color. Again, we wanted the shapes to be visible, so we planned to choose a darker grout. 

Unfortunately, the light grout we picked for the floors just didn't cut it with the shower tiles. You can see how light those lines are on the left in the photo below. Not enough contrast.

And the dark grout had way TOO MUCH contrast!

In the end, we went with the "natural" or cement color between the shower tiles, and I love how it looks! I wondered for a brief moment if we should be using two different colors of grout in the bathroom, but in the end we had to choose what worked with the tiles.


So I've learned that the stakes are high when choosing grout: If you pick the wrong color, the grout lines (not the tile) will be the first thing you notice. You really want the grout to play a supporting role and make your tile look great. It's not unlike choosing the "right" colors of cardstock to match a photo on a scrapbook page. You want your photo (not the cardstock) to be the star of the page!


If you're working on a tile project, I hope you'll find this information helpful. I knew grout color was important, but I definitely didn't anticipate how hard it would be to choose the right color. I love how the completed floor and shower turned out! I'll share photos in my next post.
jp

14 October 2015

Rory: Cute Overload

 Rory, Bailey's new kitty, is super busy adjusting to her new life! Actually, she settled in pretty much immediately and is super busy taking over Bailey's apartment. Because after all...
 

 As I have yet to meet Rory in purr-son, I love it when Bailey texts me pictures of her current status. You never know where she's going to be!

Bailey reports that she has a total fascination with water.
Refer to Exhibit A:

And Exhibit B:

And Exhibit C, if you can handle this much cuteness!

She has also started scaling new heights! YIKES!

But mainly she is busy just being sweet! AWWWW!

11 October 2015

Violets -- in a New Light!

Bailey's African violets traveled from Indiana to Texas (one even made the trip from Iowa) and they're all doing great! Since Rory came to live with her, she's had to move them around somewhat because New Kitty seems to have a keen interest in the foliage, yet her violets are still thriving!

But my violet (shown on the left) had not bloomed since I purchased it with her back in March. The clipping she gave me in August is doing great but isn't large enough to bloom quite yet.
 

According to Bailey, who clearly has a green thumb for violets and has read up on such things, violets need light from an east or north window. My violets had been in front of a south(ish) window. After I moved them to a north(ish) window and started feeding them more regularly, my original plant generated buds...

...and then this!

 My north window is in our dining room, not an ideal place for a violet nursery, but they're doing great so there they'll stay!