13 October 2016

Bedroom Update: New Window Trim

We are continuing on with the very slow update of our master bedroom. It's been quite awhile since I've had an update, so you might thought I abandoned ship! If you'd like to see where we started with this room, this post will give you an idea. :) I'm sure hoping we can be done by Christmas, but I'm not holding my breath.

The contractor came back this week to replace the trim on our bedroom windows so that it matches the trim in the bathroom. This was something we weren't sure we were going to do, and I have to say I am SO HAPPY that we decided to make the change. I honestly can't believe what a difference it makes! Here, I'll show you....

BEFORE: Very skinny window trim and mini blinds:
 

 AFTER: The skinny trim has been replaced with a chunkier trim to match the bathroom:

Here's a good picture of the bathroom window. The contractor matched the trim design he created in the bathroom on the two corner windows in the bedroom.
 

As you can see, the trim has not yet been painted, but I already love how it looks.

With the chunkier trim, the windows have much more visual weight. They are more in proportion to the scale of the room and the furniture. They are so beautiful that I would never consider covering them up with curtains! 

 The next step will be to have the trim painted, then we will be replacing the carpet and installing cream/natural color roller shades like the shades we have in the bathroom.

Then it will be time to hang some things on the walls and decorate both the bedroom and the bathroom, as I have been waiting to finish both spaces before doing any sort of decorating. I am looking forward to wrapping up BOTH of these projects!  
jp 

11 October 2016

Garden/Landscaping Project: More Progress

Many moons ago, I shared that we were starting on an update of our landscaping and gardens. I had garden plans drawn up awhile back and this spring engaged a landscaping company to implement them.

Long story short, we started this big project over the summer but didn't finish it as the landscape guy recommended we proceed in phases. I'll admit I was disappointed about the slow progress but in retrospect, that was actually the right move. We made good inroads on this project over the summer and now plan to have it finished next May.

This summer, we had edging installed, three new trees planted, bushes removed, and the gardens expanded (BEFORE post, AFTER post if you're interested).

A few days ago, the guys came back and removed all the plant material that I didn't want to keep as part of the "new" garden spaces. The landscape guy suggested that by removing all the plants I didn't need, we'd be better able to visualize the new spaces. While I was anxious to move faster on this project, I do think that was the right decision!

In addition to removing plants, we had a couple of new things added. The yarrow on this corner, which always flopped over and looked messy, was removed. This small hydrangea looks much tidier and will give a nice bit of color. I already like it so much better!

This rose bush was moved from a bad location to a better spot on the side of the house. I'm hoping it gets enough sun here to bloom, as I didn't get even a single bud this summer!

A new lilac bush was added to the side of this back garden to balance it out.

A lot of other plant material was removed from the gardens: heliopsis, coreopsis, and catmint. Catmint doesn't spread as badly as regular mint, but it flops over, splits, and generally looks messy most of the summer. I'm tired of dealing with it! The coreopsis spreads almost uncontrollably and after nearly 20 years, I'm also tired of fighting it. And while I do love the gold heliopsis for bouquets, they also flop over and cover the other plants. I just didn't have a good spot for them, so they had to go. :(

So now with all of this space cleared, we can better see which plants can be split and moved, and where we need to add new ones. The garden plans I had drawn up will help with that, with a big dose of reality thrown in by the landscape guy who is helping me.

Of course, everything looks pretty ragged right now, especially with those big gaps. I'm very much looking forward to finishing this project in the spring so I can enjoy the new garden spaces!


07 October 2016

Feline Friday: Glamour Shots!

 This wasn't intended to be a photo shoot. This was just Lily in her After Dinner Napping Spot. Then suddenly it turned into a Glamour Shot photo shoot!

Head tilt pose! And SERIOUSLY...those paws!

Yes, Lily, you are so sweet that you can have whatever you want! Unlimited treats! Canned food ALL THE TIME! A cat tree in every room!
Well, maybe we'd better re-think that one... :)


30 September 2016

Feline Friday: Lily's "Automatic" Feeder

 We recently went to Texas to visit our daughter. Whenever we leave, Lily has to stay in her basement "apartment" so that Tinsel will have full access to her own food upstairs without Lily stealing it. The cat sitter comes twice a day to feed and check on the girls plus Lily has ALL THE TOYS set up in her space, so she's not terribly deprived!

Still, this is the pitiful look I get! (NOTICE THOSE TWO SWEET TUFTS OF FUR ON HER HEAD, which seem to be connected to her eyebrows for effect!) And of course, I feel guilty for leaving them :(

For the first day before the cat sitter comes, I set up Lily's automatic feeder so that she gets her food on two separate occasions. If I leave it in one big bowl, she'll gulp it all before we pull out of the driveway. You think I'm kidding... 

  In fact, the feeder has packing tape all over the tray bases because once she pulled the trays forward and jammed them against the lids, preventing them from opening. I'm surprised the mechanisms still work!

This time, I set the timer so that one compartment would open in four hours and the other in ten. As soon as I closed the lids, our Lily went to work on breaking in...

She started sliding the feeder across the carpet and was hard at work trying to break into it when we left on our trip. Although it's naughty behavior, at least that will keep her busy, I thought.

We were barely out of our neighborhood when I realized we had forgotten to leave a nightlight on for her, so back we went. Spouse went inside to take care of the light and discovered that Lily HAD ALREADY PRYED OPEN Lid #1 and had eaten half of her food! I'm quite sure that by the time we hit the interstate, she had also opened Lid #2!

So much for the automatic feeder! Such a sweet, naughty, and smart girl!:)


29 September 2016

Mojo Helpers: Recent Papercrafting Projects

 
Do you ever feel kind of blah? I have lately, and my lack of blogging is evidence of that. It's not that I have nothing to blog about -- trust me, I have plenty! -- but I just haven't really felt like it. Blogging mojo ebbs and flows, you know.

Paper crafting mojo ebbs and flows, too. Sometimes I feel like I use up all of my creative mojo for classes and I'm too tired for personal crafting! But once I carve out a little time for myself, I can generally get the crafting mojo back pretty quickly. :)

Today I thought I'd share a few paper crafting projects I've made lately. Simple projects, nothing too exciting, but sometimes those are the best projects to help you get your paper crafting mojo back!

I recently made a set of thank you cards for my daughter to use for parents and students during the school year. The plaid paper matches her school colors.

 The cards were really simple, some with inside messages, some blank. And of course I used my favorite Wink of Stella shimmer pen. I'm not a bling-y person, so this pen adds just the right amount of sparkle.

I bundled up the cards and envelopes with a ribbon and sent them off. I hope she finds them useful this year! If not, I'll be taking them back for myself! :)

While I was at it, I made a double-pocket card for Daughter in a matching color scheme based on a card from one of my recent classes. In this case, I slipped gift cards into the pockets (lucky her!). This card is made from an 8x12 sheet of patterned paper, folded in quite a fun fashion! I think this is one of my favorite folds ever.
 

Here's the original card which was done in a Thanksgiving theme. Sheesh, it's not even October yet and I've already taught Thanksgiving cards. No wonder I never know what month it is! :) Anyway, this card included two message "pull-outs" in the pockets.
 

 Continuing with my recent plaid theme, I used up some plaid paper on these gifts for Daughter's boyfriend. I wrapped the box with kraft paper, then just cut the 12x12 plaid paper into strips to use for the trim. Pretty easy and a good way to fancy up a package for a guy...without being TOO fancy, of course.

And here's one more plaid project (are you sensing a theme here???) -- a baby card and matching bookmark.
 

I used laminating sheets to cover the front and the back, then finished it off with a handmade tassel. I enjoyed making the tassel but need to perfect my tassel-making skills! Cats may or may not have contributed to my issues...

 Here's another card and gift bag I recently made for a friend. The color scheme for the card and bag were inspired by the coloring book I gave her. The bag was the perfect size for a box of colored pencils.


 Hope these paper crafting projects have provided a tiny bit of inspiration for anyone who may be feeling a little blah. Sometimes all it takes is a bit of time at the craft table to brighten the spirits and re-start that mojo!
jp   


23 September 2016

Feline Friday: Casual Friday

 I walked around the corner to find Lily on the back of the couch (a regular hangout) but in a most interesting pose. Of course, I ran back up the stairs to grab my phone so I could capture this most unladylike position.

 Huh? Whatz da big deel?

Lily went on with her "baffing", seemingly quite unbothered that I was laughing hysterically at her Casual Friday pose.

At least that's what I thought...until she stuck her tongue out at me! ;)

18 September 2016

Giant Cat!

Our neighbor kitty has been a frequent visitor of late. HE IS AWESOME. Such a friendly kitty.

The girls have decided they don't want a boyfriend right now :) so whenever I see him, I spend time chatting with him. He's easy to entertain!

 But he is GIANT! The above photos don't show his size, so I added my foot for scale. My feet are of average size. Look how long his body is! I'd guess he weighs close to 20 pounds. He is a giant cat!
He has a good home right across the street, but I'm happy when he makes his way over to visit us. He is welcome any time!
 jp


16 September 2016

Feline Friday: Nature Watching

Our two kitties love watching nature...ON NETFLIX!

Tinsel especially recommends Flight of the Butterflies, a documentary of the annual migration of monarch butterflies. I highly recommend this, too! What an amazing process.

Lily recommends Wild Madagascar. This documentary focuses on the many kinds of lemurs that make the island their home.
 

She was impressed with how some lemurs spend all of their time jumping from tree to tree, and when they do spend time on the ground, all they can do is hop!
 

 Now this might actually be a squirrel. :) Lily is also impressed with squirrels. She would give squirrels a THUMBS UP...if she had thumbs!

Oh, and this is a bug. Lily highly recommends bugs, too.

 Heck, Lily recommends most anything with animals on Netflix! Enjoy some "nature watching" with your kitties this weekend!
jp


15 September 2016

Easy Recipe: Thai Basil Chicken

 I've been growing a few herbs this summer, but none has done better than my Thai basil. It grows crazy fast and smells AMAZING! 

My basil recently got ahead of me and managed to set blooms. In theory, you don't want to let your herbs do that because the flavor can be compromised a bit at that point, but I didn't let that stop me from using this beautiful plant. When I brought it inside to cut off what I needed, I just cut off the blooms first.

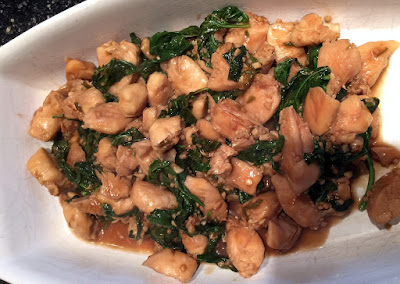
A good -- and easy -- recipe for using up Thai basil is Thai Basil Chicken from Skinnytaste.com. Click HERE for the website and more about this delicious recipe, including a printable version.


This recipe calls for 3 cups of basil leaves. You'll think that sounds like way too much basil, but as soon as you put the leaves into the hot pan, they wilt. It's actually sort of amazing to see that wilting process! In no time at all, you have just the right amount of basil leaves. AND THE SMELL OF THIS COOKING...you'd almost think you were in a Thai restaurant -- if it weren't for the cats standing at your feet hoping for a sample!

This simple dish is SO good and SO easy to make! If you have basil you need to use up, this is definitely a recipe to try!

jp

14 September 2016

Let's Talk About Bladders!

Hey, ladies! I realize this might be an awkward post, but I want to share what recently happened to me in the event that it might help someone else. Remember (as if there were any doubt!) that I'm not a doctor, nor do I play one on TV, and this is not intended to be medical advice. I'm just sharing my experience with you!

Everyone knows that your bladder can be affected by things you DRINK, but did you know that it can also be sensitive to things you EAT? I certainly had never considered that fact...at least not until recently. Here's what happened to me, and maybe it's happened to you, too!
Last fall I was suddenly hit with what I thought to be a bladder infection. If you've ever had one, you will never forget those uncomfortable symptoms! It hit so hard that I sent Spouse to the grocery store late at night on a cranberry juice run. I knew from past experience that with enough cranberry juice, I might be able to stop this bladder infection in its tracks.

Long story short: The cranberry juice didn't work. By the time I went to the doctor a few days later, I was a miserable mess. 

When being tested for a bladder infection, the doctor's office will require you to provide a urine sample. I was 100% confident that as soon as the test results came back, I'd get my antibiotic and be on my way to recovery. 

But there was no sign of infection. My urine, they said, was perfect! On a different day, I might have been excited to hear that news but at that moment, I WANTED MY ANTIBIOTICS! I was sent home with nothing. No answers, no medication.

Even longer story short: This story repeated itself over the next few months. I went back to the doctor's office two more times with what I KNEW to be a bladder infection, each time testing negative. In between visits, the symptoms would improve, then get worse again, at which point I would drink more and more cranberry juice.

In spite of the negative test results, I still believed I had some kind of Secret Undetectable Bladder Infection. Since I couldn't get antibiotics to fix it, I was sure that if I could just drink enough cranberry juice, that would eventually solve the problem. 

Remember the Blueberry Girl from Willy Wonka? I was headed in this direction...turning myself into a CRANBERRY!

Then I discovered cranberry supplements. I decided I'd add these to my cranberry juice regimen. (NOT THE BRIGHTEST IDEA I'VE EVER HAD)
 
You may not be surprised to learn that after a few weeks on my Extreme Cranberry Program, I developed shooting pains in my bladder. I went back to the doctor who recommended that I go to a urologist to rule out REALLY BAD STUFF.

As the doctor talked me down from my panic attack, she mentioned a condition called interstitial cystitis. So before making an appointment with the urologist who I knew would tell me I was dying, I thought I'd look it up. 

BINGO. Every symptom matched. This condition mimics bladder infection...without the infection. And it can be managed in most cases by avoiding acidic foods and drinks.

Here's the gist: In women of a certain age, fluctuating hormones produce changes in the lining of the bladder, making it thinner and more "irritable". Foods and beverages that didn't irritate the bladder before can suddenly begin to do so. Anything acidic -- coffee, grapefruit, CRANBERRY JUICE, tomatoes, yogurt -- can cause the bladder to feel irritated and painful. Even bananas can cause irritation, not because they're acidic but because of the potassium they contain.

 The list of food culprits includes just about everything I was eating! On a daily basis, I was consuming coffee, yogurt, at least two bananas, many glasses of cranberry juice, cranberry supplements, and a variety of other acidic goodies. Cranberry juice really DOES work for bladder infections, but it's one of the worst things you can drink if you're suffering from an irritated bladder.
 
No wonder I was in such a mess! My poor bladder was obviously in a state of high irritation.

I decided to modify my diet to see if that would help. After eliminating or reducing these foods and increasing my water intake, the shooting pain subsided and my symptoms improved substantially. After several weeks of modifying my diet, they completely disappeared. Of course, too much coffee can still cause a bit of discomfort, but I've found that drinking plenty of water will generally help.

Do I think I actually have interstitial cystitis? I don't know, and only a urologist could tell me that. But reducing my acidic food and beverage intake solved the problem, and that's really all I cared about! I reported this happy outcome to the doctor on my next visit.

I'm willing to bet that I'm not the only woman "of a certain age" who has experienced this. If you've had the symptoms of bladder infection without the infection, try reducing your intake of acidic foods and beverages. It worked for me!

As for the cranberry juice, I only use a splash of it now and then to make a cosmopolitan! :)

jp