12 June 2016

Garden/Landscaping Project: Before

 Many moons ago (two years, to be precise), I shared that I had been working with a landscape/garden designer to re-configure my flower beds. My goal at that time was (and still is) to modify my beds to resemble cottage gardens. This is the look that I've always been striving for but have never achieved! You can read more about my original plan HERE.

Well, after the plans were drawn up, nothing happened on this project in the summer of 2014 nor in the summer of 2015. There were good reasons for the delay but this spring, I vowed not to let this project languish for yet another summer! So we engaged a landscape company to help make the original plans a reality. Because the designs were pretty overwhelming for me to decipher, it was great to be able to hand them to someone who would could read them and help me figure out how to get started!

So I'm happy to report that next week we are finally starting on the first step of the project, which will be to enlarge the beds according to the plans and replace the ugly black plastic edging with stone edging. The edging will go all around the house, expanding the beds in some areas where indicated by the spray paint.

In addition to the edging, some bushes will be removed, such as this boxwood and an unsightly barberry in the back garden.
 

Many of the flower areas have no edging at all, so they'll look much tidier with a stone border. After the expansion is done, the beds will also be mulched, which always helps the appearance!

The original plans called for the bed behind the house to be expanded, softening the sharp corner into a more organic shape.

It was interesting to see how much bigger the flower beds will become!

As part of this first phase, we will be adding a few trees, including one marked here by the pink flag, an area previously occupied by a locust tree.

A Japanese tree lilac like this one (but much smaller, of course!) will go in that spot. I think this beautiful tree will add a lot to our backyard.

This bed will get a lot of attention in the next phase, but for now it will be expanded and edged with stone.

In the fall, we plan to start the next phase of the project. At that time, I will work with the landscape guy and crew to dig up, split, move, and add some new perennials to the various expanded spaces. I had hoped we could get to this step during the cooler spring months, but that just wasn't feasible. And of course, it's not a good idea to move perennials in the heat of the summer so fall is the next best option.

This bed is going to fill up the entire corner next to the patio, as marked here. This will make for easier mowing for Spouse and should provide a nice "screen" for the patio.

This narrow bed is a huge mess! Now that I know it won't see any attention until fall, I need to get it cleaned up. It's very overgrown and weedy. YIKES. Truthfully, all of the beds need a lot of tidying up, but I've put off that task as I've been waiting to see how this project would unfold.

We lost a tree a few years ago from this corner bed at the front of the house, so I'm very happy we will be replacing it with a lilac tree on standard, shown in the photo below.

Stay tuned for a progress report on the first phase of this project! I'm very excited to get started on this long-awaited improvement! :)
jp

10 June 2016

Feline Friday: Catnip Friend

Last night I walked outside into our garage and was quite surprised to see Neighbor Kitty standing there. But he didn't stop to talk because he was on his way to the CATNIP!
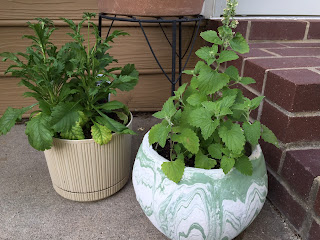
Although I hadn't caught him in the act, I suspected Neighbor Kitty had been back because I recently found my catnip plant nibbled down to the dirt and had to add a second plant to keep up with the demand! Of course, I don't mind one bit because I'm growing catnip to attract kitties who may be passing by our house. Lily enjoys it, too.

Even before consuming massive amounts of catnip, Neighbor Kitty is quite friendly. This sweet tuxedo kitty lets me hold him, but he's quite a load! He must weigh at least 20 pounds!

Of course, the more catnip he ate, the chattier he became!

After a certain quantity, he began rolling all over the patio! 
 

Of course, all of this commotion caused Tinsel and Lily to go to the door to investigate. As usual, Tinsel (not pictured here due to her erratic jumping) wanted to fight Neighbor Kitty through the glass. Neighbor Kitty, completely drugged at this point, just looked at her with mild amusement. :) 

Lily, on the other hand, seemed quite intrigued by this big boy.
As if in an effort to impress us, he purred loudly and made some serious biscuits with those massive paws!

After initially pulling back his ears, he seemed captivated by Lily's lovely appearance through the screen.

 She didn't even hiss at him! Can you see her little face peeking out? Our pretty girl was definitely on her best behavior.

Of course, these two will never be allowed to meet in PURR-son. But could this be love through the sliding door? 
Or is it just the catnip? We'll see what the summer brings!
jp
09 June 2016

Grill Cart to Garden Cart: Done!

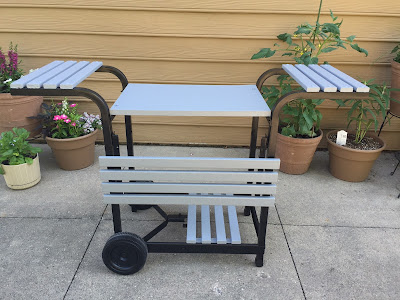
Well, it has been an interesting and somewhat labor-intensive project, but I'm happy to report that the garden cart is done! This old grill cart had been stored in the basement of Spouse's parents' house until his mom got the idea that it might make a nice cart for plants on our patio.

Spouse ended up helping with the final coat of gray paint. I guess I have a way of pulling him into my projects (I think his exact term is "roping"!) but in this case, I really needed his help. I was getting very discouraged with the project and he stepped in to save the day. Thanks, Spouse!

 After he finished painting, Spouse put the cart back together. It looked very nice and tidy. Of course, he thought the project was done. So did I, until I stepped back to really look at it.

 The cart looked very nice with plants on it, but in my mind it still looked like a grill cart. So I started contemplating what I could add to it to make it look more garden-y. I scoured Pinterest for pictures of potting benches and similar tables, hoping to spark an idea or two.

I noticed that potting benches have something along the back side that gives them height and often include signs and other garden art. With that general idea in mind, I stopped at a few garden stores to see what I could come up with for either the back or the front of the cart. Of course, I brought home and returned a couple of different things. This is what happens when you're not sure what you're looking for but know that you'll recognize it when you see it! :)

 After checking at all the local garden stores and coming up empty, I remembered one nursery I'd forgotten about completely. Lo and behold, there it was...the perfect piece for the front of the cart! It was the perfect width -- TO THE INCH! -- AND the perfect color, a great blend of functional and cute! Then I picked up a short piece of wire fencing (which also happened to be the perfect width!) to provide a bit of height at the back of the cart.

I carefully broke the news to Spouse that this project was not QUITE done and luckily, he took it pretty well! After attaching the planter piece with screws to the front edge of the cart, he drilled two small holes for the fencing and poked it down into the main shelf. The wide front shelf pictured in the top photo is now at the back against the house, right behind the wire fencing. Turning the cart around this way allows me to put larger pots on that shelf without the risk of them falling off and breaking.

 My three small herb pots fit perfectly into the tin buckets without repotting them. That left plenty of space for the rest of my herbs and a couple of flowers as well.

My dill plant is not doing well at all, but the cilantro and sage are thriving! I've been harvesting my herbs almost daily! :)
 

 I've found that it's really nice having the smaller pots up off the patio away from critters and easily accessible for cooking. Now that they're on the cart, I actually remember to use them! :)

Many thanks to my mother-in-law for the cart and to Spouse for helping with this project! Although it took some time, I'm glad I tinkered with the cart design until I was happy with it. I'm really pleased with how it turned out and look forward to using it throughout the summer!
jp

06 June 2016

Old Made New: Camping Lantern

A few items from my parents' house are residing in our garage, including our camping lantern from the 1970's. I remember being shocked to find this old lantern in my dad's shed as I cleared out items for the estate sale. Seeing it brought back so many poignant memories of the camping trips we took while I was growing up. It was one of the first things I brought home.
 
My parents and I, along with our dog Tammy, spent a lot of time camping and fishing during those years. In fact, most any place we traveled, we took the pick-up camper and I rode along in the top over the truck cab, sprawled out on the bed with a stack of books, occasionally looking out the window as we drove. 

I have many, many fond memories of those times. I often made charts of our fishing progress, keeping track of who caught the most. After a successful day by the lake, my dad would clean the fish and put them in a yellow plastic dish pan which I would carry to the campsite. Mom would fry them up and we'd have dinner around the picnic table, the lantern dutifully lighting the space outside the camper.

After all this time gathering dust in my dad's shed, I wasn't even sure the lantern still worked. And as crazy as it might sound, I hadn't felt able to test it until recently. When you lose someone you love, certain objects you associate with them take on a special significance. For me, it has taken a lot of time to be able to hold these objects and feel more good than pain.

So last week I finally took the lantern to the battery store. Four big batteries later, it lit up like new.

Will I ever take it camping? Maybe, maybe not. But for now it's nice to just flip the switch and remember the times I spent around the picnic table with my mom and dad and Tammy in this lantern's warm glow.
jp

03 June 2016

Feline Friday: Nature Watch

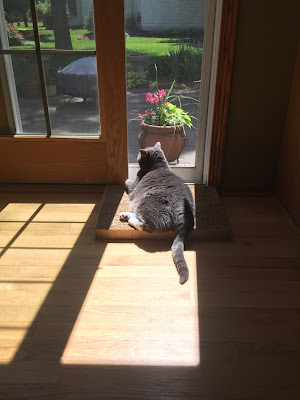
Ahhhh...sliding door open, sun shining in, birds singing...What a PURR-fect way for a kitty to do a little nature watching!

Oh, look! A bug!

Wait! A bird!

Hey, there's a squirrel!

Oops...This Nature Watch has been interrupted by a nap! :)

02 June 2016

Garden Season Begins!

 Due to our trip to Texas, I got a bit of a late start on planting my pots this year. I expected things to be picked over when I got to the greenhouse(s) but to my surprise, there were still plenty of flowers to be had!

My favorite local greenhouse is Piney Ridge. It is open from April until they run out of plants, which is usually sometime in June.


I had no trouble rounding up enough flowers to fill all of my patio pots. This year I saw a few different flowers, including black petunias and all of these beautiful foliage plants! I briefly considered going with a color scheme like the one in this photo, but then I decided I needed a few blooming plants, too.
  

In all, I made three trips to various greenhouses to fill up my planters. I can never go just once!
 

This year I bought a Mexican Bush Sage plant. We'll see how it does.

I also bought a double vinca, which was a new plant at the greenhouse. So far it looks healthy but hasn't bloomed much. The jury is out on this one.

I subscribe to the "thrill, fill, and spill" concept for creating balanced pots. You can see it in this sample at the greenhouse: Something tall (the "thrill"), something that cascades over the side (the "spill") and something that spreads and covers the gaps (the "fill").  This year I noticed that the "thrill" plant does not need to be exactly in the center of the pot. It can be at the back, as shown here.

 Having cleaned out all my pots, I gathered all of my plants to figure out which combination went in each pot. I had a mental idea of this at the greenhouse but it never works out quite the way I planned it!
 

 For my "spill" plants, I chose a few different varieties of sweet potato vines. I love the color and they always seem to do well.
 

 For my "thrill" plants, I purchased a few taller flowers such as this angelonia.
 
 For this pot, I put a spike plant at the back for the "thrill" effect. Positioning it at the back gave me more room for larger "spill" and "fill" plants.
 

 Vinca and sweet alyssum make good "fill" plants.
 

I love the deep purple color of these salvia plants!


Here are all the patio pots just after I planted them. A week later, they have already filled out quite a bit.

I usually avoid pink and red but I caved in on these pink vincas. They're a nice contrast to all of the purple in my pots and gardens.


I also have several herbs in pots, including mint, basil (a clipping from Bailey's plant in Texas), my rosemary that wintered over inside, cilantro, dill, and (of course) catnip which is not pictured here. Everything is doing well except for the dill which now looks very poorly for some reason. I fertilized it and am hoping for the best, but it may have to be replaced. The herbs will go on my garden cart. The catnip will stay on the step so that it is reachable by the neighbor kitty when he comes calling. :)

Oh, hi, Lily! She wants some fresh catnip!

I also bought a tomato plant so that I can compete with Bailey, who has already had at least one ripe tomato! I bought a large plant since she had such a head start. It has several blooms already so I can see this is going to be a stiff competition! (Not really...I haven't grown a tomato plant in years so we'll see if it even lives!)
Here's to a successful (I hope!) garden season!
jp