18 January 2016

Christmas Baking

 We did a little bit of baking over Christmas break. I, for one, am still paying for it at the gym! Luckily we gave away quite a few cookies, or I'd be in even worse shape!

We did keep the baking and treat-making to a dull roar this year because there are so few of us around to eat the stuff. Bailey made Oreo Balls (YUM!) but we skipped the wonderful Peanut Butter Balls we made last year. They're just too irresistable!

I always make gingerbread, and this year I even made a batch at Thanksgiving to take to Bailey in Texas. If you're looking for a fail-proof gingerbread cookie recipe, I'd definitely recommend this one. I've been making these cookies for years -- with no fatalities! :)
 

 I usually don't go to the effort of making cut-out sugar cookies, but for some reason I wanted to give it a go this year. Bailey and I baked a batch one night, then the three of us frosted them the next day. I made a point of using some of my grandma's old cookie cutters.


I can say that it's been a very long time (if ever) since we all sat down and frosted cookies together! As you can see, we needed all hands on deck to frost all of these cookies!
 

I'm fortunate to have the sugar cookie recipes that both of my grandmas used each year. This is my maternal grandma's recipe, written out by my mom. Mom had a habit of only writing parts of recipes and very sketchy directions, but this one is complete. The cookies were great!

I mixed up (way too much) powdered sugar icing and then we set to work. As you can see, the icing was not elaborate! We did not get out my other grandma's frosting "squirters" which might have yielded fancier results. No matter...the frosted cookies were quite tasty!

I made a LOT of yellow frosting (why???) and put myself in charge of all the bells and stars. We had a lot of yellow bells and stars. :)

The next day, I packaged up some cookies to give away using these cute little waxed paper bags I found at the grocery store this fall. I had been looking forward to making these treat bags!

After adding a few cookies, I stapled a folded and decorated cardstock "topper" to the top of each bag. This was a fun way to use a few Christmas papers and embellishments.

Next year, I hope to start earlier so that I can make many more of these treat bags. In addition to being a festive little gift, it's a great way to get a few cookies out of the house! :)
jp

16 January 2016

Yoga: I'm a Believer

I mentioned awhile back that I've started to practice yoga, thanks to my daughter's encouragement. I had thinking about starting yoga for quite awhile, so this is not exactly "out of the blue". In fact, yoga practice has been suggested to me on more than one occasion as a way to relieve stress and anxiety. 

When Bailey was home over Christmas break, she helped me get plugged into two great online yoga communities, and I'm now over halfway through two 30-day yoga challenges. Doing a single 30-day challenge would have been sufficient but I wanted to jump-start the process -- and I couldn't decide which of the two challenges would be best for me. Each instructor has her own style and approach. So why not do both? :)

A little context here: My body is so inflexible that back when I was in elementary school, I was unable to do tumbling like the rest of the kids. In fact, during a somersault one day, something cracked or popped in my lower back so loudly that it echoed through the gym. It was not one of those "good" cracks -- it was incredibly painful and I could not stand or walk well. I was taken straight to the doctor, where I was told I should never do tumbling again. Instead, the doctor prescribed...YOGA. So from that point on during the tumbling unit, I sat in the corner of the gym with my yoga book and did my best. Of course, I did not sustain that effort long-term but looking back, I sure wish I had!

So I find it a little funny that I'm now -- many, many years later -- getting back to something that obviously would have helped me a lot! Now that I've worked my way through over 30 yoga videos, here is what I've learned:
  • I should have started practicing yoga long ago.
  • My inflexible body is starting to loosen up.
  • Stretching feels really good.
  • My balance is improving. Yoga requires you to stand on one leg in various poses. I didn't realize I was wobbly until I started practicing yoga.
  • Yoga requires you to hold poses while you breathe through them, and this strengthens the muscles and improves the balance. I had not thought about that prior to starting this practice.
  • Yoga is very hard work. It takes a tremendous amount of strength to move "effortlessly" from one pose to the next (called a "flow"). I'm really terrible at it, but each day I see tiny (emphasis on the word TINY!) improvements with less pausing to "re-set" between my poses. 
  • My arms are not nearly as strong as I thought they were. Yoga is definitely pointing that out to me, as many poses require you to support the weight of your body with your arms. But in the last couple of weeks, my arm strength has already improved considerably.
  • Downward Dog is tough for me but it's getting a little easier with practice. I understand that it's considered a "resting pose" -- HA! Far from that for me!
  • Yoga moves you focus on the present moment. This is a challenge for me, as I'm always thinking ahead and have a lot of trouble just being in the present.
  • I really like the holistic aspects of yoga practice. I know that the mind/body connection is strong, and yoga practice makes you much more aware of that link.
  • I tend to hold my breath, both in yoga and in life. I need to relax and breathe. Good advice for daily living.
Here's to finishing both 30-day challenges and seeing what comes after that! After even this short amount of time, I can definitely see the benefits of adding a yoga practice to my fitness routine. Although it's hard work, I'm very glad I'm getting started!
jp


15 January 2016

Feline Friday: A Series of Bad Decisions

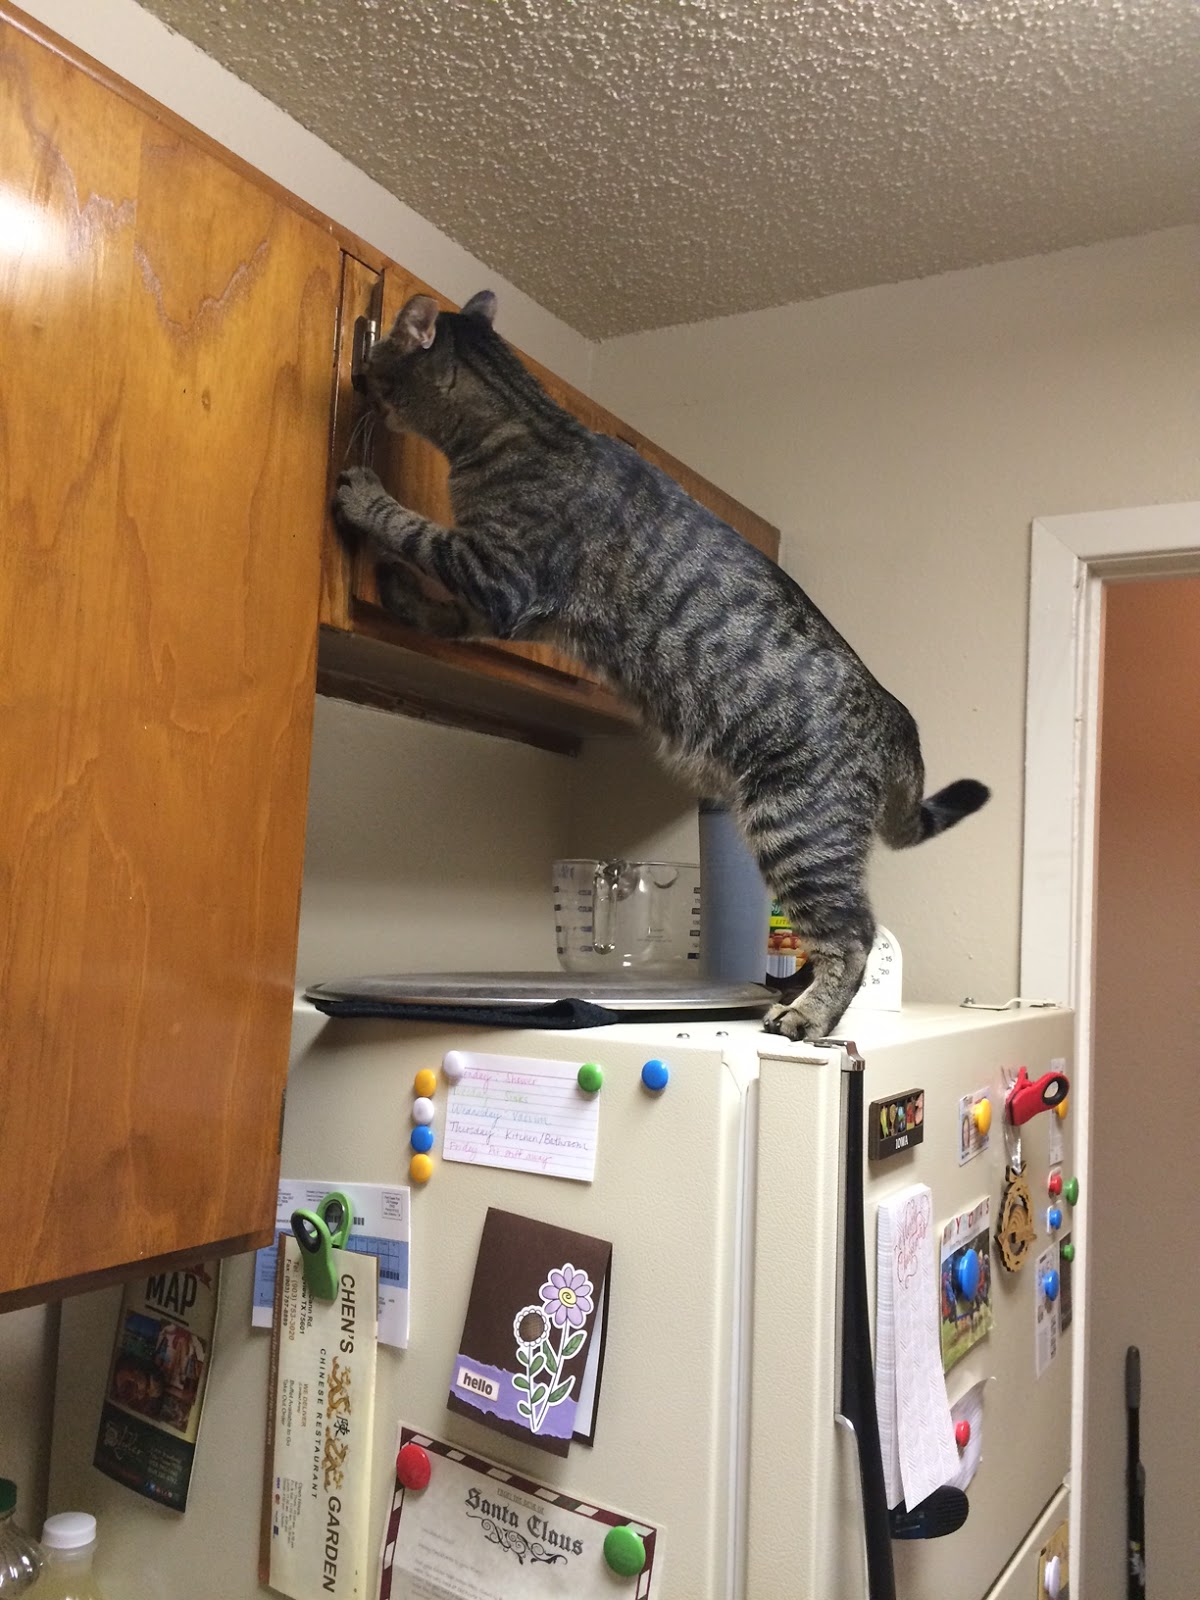
Ever since Rory came to live with Bailey, she has been OBSESSED with going in and out of the drawers and cabinets in Bailey's bathroom and kitchen. None of them have latches so they open easily, and it turns out Rory has quite the skill set when it comes to this type of manuevering!

Take a look at this quick video that Bailey caught shortly after Rory arrived on the scene:

Just this week, Rory was busy opening some previously unexplored kitchen cabinets. Bailey watched (and documented!) as Rory made a series of bad decisions on her way to the top of the cabinets, one of her daily lookout perches.

I'll admit that this is the first time I've seen a cat wrapped around a stack of dinner plates!

Yes, our Rory is STRADDLING that stack of plates.

 I guess we know who is looking into child-locks...and who will soon be washing some dishes! :)
jp


14 January 2016

Holiday Decorating: Using Heirlooms


After I lost my mom in 2008, I could not begin to look at her holiday decorations. My mom was Christmas to me. Our house and holiday table were always beautifully decorated and she went to great efforts to make sure Christmas was a special time. It was just too painful to unpack the decorations I associated so closely with her. I could not even bear to bring any of her holiday decorations home until after my dad passed away in 2013 and I had to clear out my childhood home.

It has taken me quite a long time to be able to put out my mom's Christmas decorations and try to integrate them into my own. But it's true that time softens the edges of grief, and this year I was able to use a few more of Mom's things and have them bring to mind all the good memories I have of her.

I always loved these NOEL letters, but my mom never seemed to use them very often. I am guessing it's because each letter has a hole or two in the top for candles. I don't care for the look of candles in them, and I'm betting she didn't either. Without candles, the holes are quite noticeable.

I decided to punch circles out of similar-colored cardstock and lightly adhere them over the holes. That did the trick for me, and this year I used the letters on the little bookshelf in our entryway. I brought it home from my parents' house, too.

The bottle is one I painted this past fall, with greenery and a plaid bow added.

On the second shelf, I put out my mom's very cute little set of jadeite childhood dishes which happens to be the same color as the NOEL letters. The book belonged to me as a child. You can tell by the binding that it was very well-loved! I am lucky to have many of my childhood books.

When I was cleaning out my dad's garage, I found a bucket of Christmas bulbs in red, green, and blue. My dad absolutely hated putting up Christmas lights but my mom always insisted upon it, at least when I was a child. Let's just say he lacked the holiday spirit while he was stringing them on the house! :) So of course I could not part with those bulbs. I love the look of them in one of my mom's old bowls.


This little snowman belonged to my paternal grandma. My extended family gathered at my grandparents' house each Christmas Eve, and this little guy was always on the scene. When my grandparents moved to a smaller house, he was one of the items I got to keep. This year I put him on a small red chair that belonged to me as a child. I have a series of photos of me sitting on this chair with a kitty when I was just a couple of years old. It's very special to me!

These elves belonged to my maternal grandma. I loved seeing them at Christmas each year. She would pose them in different ways around her living room. I found the elves in a box when cleaning out my childhood home and literally wept with joy. I had no idea that my mom had them tucked away all those years.

I bought the little wooden village on a class trip to New York city when I was in high school. We went to visit the United Nations, and I was thrilled to find this little German village in the gift shop. I look forward to setting it out each each Christmas. This year, I put it on a ceramic stand I found in the Target Dollar Spot and covered it with a dome from the thrift store. It's funny how making a little change can make an old thing like this village seem new again!

I always loved my mom's Lefton holly dishes. She didn't get them all out at Christmas because she was afraid of breaking them. When I found them in my parents' basement, I couldn't believe how many pieces she actually had. These holly dishes are some of my dearest possessions. I especially love that little lantern.

My mom's collection includes candy plates, jars, sleighs, and other small pieces, perfect for desserts. This year I got out the cake plate which I don't remember my mom ever using. It was perfect for cookies and would even work well with my glass cake dome.
 
It has taken a very long time, but I've finally found that using heirlooms in my decorating brings back fond memories and helps me feel closer to my parents and grandparents. I love looking around our house and feeling that there is so much meaning and significance to our holiday decorations.

jp


13 January 2016

Birthday Love

Happy birthday to our smart, talented, strong, brave, and precious daughter! It's an honor and blessing to be her mama!
jp

12 January 2016

Holiday Decorating: Domed Christmas Tree Displays

Back in November, I found some small glass domes at a local Goodwill. I wanted to use them to cover a tiny truck or car hauling a Christmas tree. It took some hunting around for the exact size and look of vehicle I'd envisioned, but I finally found what I needed to complete this project...and in time for Christmas!

Now I'll confess that as a child, we never strapped a Christmas tree to the top of a vehicle. I can only remember having a real tree on a couple of occasions, and those trees were cut from our front yard when they grew too big for the space where they'd been planted. Most of the time we had an artificial tree. Maybe that's why I'm so captivated by little vignettes like this -- I'm trying to re-create a childhood I never had! (OK, that's a bleak thought for a Tuesday morning. Let's move on! LOL)

The domes are only about 3" wide so I had to find a toy truck/car that would fit. I quickly discovered that most toy trucks are too modern-looking for this type of project. A monster truck was not the look I was going for, nor did I want to pay for a true collector-type old toy vehicle! Finally I found a suitable truck and car at our local Fleet Farm store.

Still, they looked a bit too shiny and needed to be roughed up for the proper vintage look. One day I stumbled up a small bottle of Antiquing Medium at Hobby Lobby and decided to give it a try.

I sanded the vehicles and wiped them down with this thick, brown liquid.

The scuff marks picked up the liquid and created an antiqued look. I was very happy with the results!

 
The other challenge was finding some decent-looking trees in the proper size to fit under the dome. I found these trees at Fleet Farm in the area with small village houses. They also needed to be roughed up a bit, and I didn't care for the wire "trunks" showing at the bottom.

I wrapped the trunks with thin natural twine and glued it in place, then I rubbed the trees with brown Distress Ink. That seemed to do the trick.

Finally, I wrapped twine around the trees, strapping them to the tops of the vehicles. The tree in the truck had to go in at an angle because I didn't have room under the dome for it to extend out in back!

I put both vehicles on top of small wood blocks (found at Hobby Lobby) for a little bit more height and to carry out that "we-just-came-from-the-Christmas-tree-farm" look.

The finishing touch was to add a bit of "snow" around the vehicles.

The vehicles fit perfectly (just barely!) under the domes! WHEW!

It was fun to put these little treasures out for Christmas. They are small enough to sit on top of a stack of books without taking up too much space.

I really enjoyed making these little displays! It was a bit of a challenge finding the right pieces to fit under these small domes, but in the end I was happy with how they turned out. I'll look forward to putting them out again next holiday season!


jp

11 January 2016

Card Portfolios from Envelopes

I realized recently that it has been quite awhile since I've shared anything cardstock-related on my blog. That's somewhat embarrassing, since the word CARDSTOCK is in my blog title! I have no good excuse to offer up for this! So today I'd like to share some card portfolios I've made recently. This is a relatively quick project which makes a nice little gift!

Back in November, I included a card portfolio in one of my classes at Memory Bound. I found the idea for the portfolio itself online. You simply take two large envelopes and cut the flap from one of them. Tuck  and adhere the remaining flap into the other envelope so the two are connected together to make a portfolio, like this:

 After that, you can do as you'd like with the portfolio. You can wrap a ribbon around the entire operation so that it can be tied shut. I added two small note cards and two small lined envelopes to this particular project using the papers we were using in class. The cards and the envelopes tuck inside the portfolio perfectly.

For Christmas, I made a couple of portfolios for family members using the same idea with some papers from October Afternoon.

A coordinated paper line makes this project easy!

This time, I fit three note cards and matching lined envelopes into the pockets.

 I used stamps, die cuts, and punches to decorate the outside of the portfolio.

Recently, I made another portfolio for a friend using a different October Afternoon paper line (I love OA!).

 This is a great way to make use of coordinated papers you may have in your stash! 
 

I know I'll be making many more of these card portfolios in the future. They make nice hostess gifts or sweet, small presents for friends.
jp