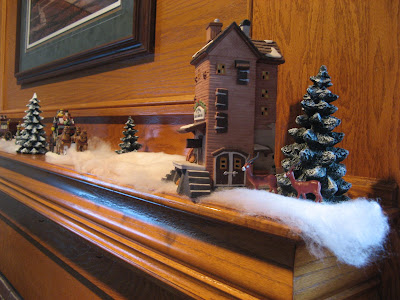
Many, many years ago, my mom started buying me houses from the Department 56 Dickens Village. I often received one or two houses for my birthday and for Christmas each year, so my collection grew very large over time (read: I've had a lot of birthdays). As the years passed, I added trees, people, and other accessories. I now have over 35 houses with no more room to expand!
This year I was later than ever getting started. Luckily, I had some help from Lily! She did a quick inventory to be sure all the houses were accounted for. Yep! Weer gud to go, mommie!
As you might imagine, putting up the village takes many hours. It is such a big job that I sometimes try to talk myself into putting up only a few pieces. But as soon as I start working on it, I can't bring myself to stop until every single house is lit and every village person is perfectly placed. I guess Christmas can't come to our house until the village is up!
This year I was later than ever getting started. Luckily, I had some help from Lily! She did a quick inventory to be sure all the houses were accounted for. Yep! Weer gud to go, mommie!
Suddenly, snow began to fall! It always snows in the Dickens Village, you know.
It's probably no surprise that I am very picky about how my completed village looks. Luckily, I have a great place to display it on the shelves around our fireplace. A few years ago, Spouse drilled a hole in the back of each shelf so that the electrical cords can easily reach the outlets below.
After taking the houses out of their boxes, I first decide where each one will be placed. I use empty boxes to create a second level. Once the rough structure is in place, I position the houses, attach the cords, and plug them into a large power strip. Things look really messy at this point.
This photo shows a portion of the village with the houses and buildings in place.
Sheesh, dis is hard work, Mommie!
Next, I tear pieces of quilt batting "snow" and begin placing it over the boxes and cords, lifting up the houses as I go and using bits of batting to and add hills. Tearing (rather than cutting) the batting creates softer, more natural-looking snow. Once the snow is in place, the village begins to look more finished.
Next, we inspect all of the trees and place them strategically around the houses and buildings. Trees help cover gaps and add texture and interest to the display.
Then I add the people and small accessories to complete the scenes.
Finally, we add a few houses and accessories to the mantel. Tinsel was a big help with this part of the set-up!
Like the rest of the village, this part of the display looks much better once the snow, trees, and people are in place.
Here is another area of the village after the set-up process is complete.
A close-up shows a small ensemble playing outside of the puppet theatre.
Setting up the village is hard work, but it's well worth the effort! As you can see, it's a big part of Christmas at our house!


Wow, your village is GORGEOUS! I'd love to see a picture of all of them together, if you can get one that way? I just started my village this year, but only have 3 Dept. 56 pieces (all the rest are cheap imitations). I think I'm going to leave mine up until February cause it's not just for Christmas, right? :)
ReplyDeleteThanks, Benita! I will try to get a picture of the whole thing. It's actually spread over 3 places in our house; I can get 2 of the groupings at once. I have enjoyed my village so much, and I know you will, too! I often leave mine up until March! I figure as long as there is snow, it's good! :)
ReplyDeleteIt looks lovely! I understand about how much work it is to do. I have my Jim Shore collection and my snow globes and I'm not sure which is worse, getting it out or putting it away, but I can't imagine Christmas without them.
ReplyDelete