26 April 2013

Feline Friday

Like someone squeezing into too-tight jeans, Lily thinks she still fits into the liner of the napkin basket.

19 April 2013

Feline Friday: A Trip to the Great Outdoors

 The weather has warmed up only slightly, but enough to make the kitties clamor for a stroll outside! They've both been meowing incessantly at the back door so on a recent "nice" day I decided that they could each go out for a walk and good brushing.

 Lily was happy because she got to go first. It had rained earlier in the day, but it was warm enough that I went barefoot for the first time this spring -- as evidenced by my toes in the picture!

I love watching Lily's little nose sniffing the air around her, taking in all of the outdoor scents. It was a very breezy day, and I wondered what she detected with that nose! Knowing her, it was probably McDonald's. :)
 

Being a strictly indoor "city cat", Lily much prefers the patio. She got a good brushing while she was on the patio and, although I groom her regularly, I think she lost about a pound of winter fur. She's ready for summer now!
 

 It's taken several outdoor excursions to get Lily comfortable in the grass, but she's still not sure what to think about it. She always leaves one paw in the UP position
  

 Here again, one paw UP!
 

 She finally decided she'd had enough of the grass. It's hard to walk around with one paw always UP!
 

The minute we went back inside, a fight broke out! Tinsel was standing at the back door, all excited to put on the collar and leash, but Lily would not relinquish it. "I got to go out FIRST!" she bragged.
 

When I finally got Tinsel all suited up, she could not have been more eager to go out. But the minute we stepped onto the patio, she absolutely freaked out about the wind and wanted to go back in. It was just like getting a child all bundled up to go play in the snow only to have her stay outside 30 seconds!
  
 It's OK, Tinsel! We'll try it again on a nice, calm day!
jp


17 April 2013

Step by Step: Taylored Expressions Stamp & Die Sets

 In the past year, I've become a big fan of stamp and die sets! I first bought the Hero Arts/Sizzix sets and have more recently purchased some by Taylored Expressions. As you can see in this post (written by Bailey last summer), the Hero Arts/Sizzix dies are open on the back, making it very easy to center them around a stamped image and cut it out using the Big Shot. The Taylored Expressions dies are "solid" on the back, meaning that you can't see through the back of them, so it takes a couple of additional steps to use them. In today's post, I'll show you how to do it, step by step!

Considering my great love for owls, I could not resist this adorable owl stamp and die set. The owls are cute (I'm picky about owl faces! No creepy owls!) and the greetings are great for cards.


As you can see, the backs of these dies are solid and each one comes with an "alignment hole". I'm glad I read that on the Taylored Expressions website, or I would have cut them off!!! When you first open these dies, you have to snap them (or cut them) apart.
 

 Next, you'll need to make a template by cutting your die on a piece of scrap cardstock. This is an extra step which is not required for dies which are open on the back. In a minute, you'll see why this is necessary. I used a piece of brown cardstock and ran the die through my Big Shot on Tab 2 of the Multi-Purpose Platform.

 Next, stamp your image on cardstock. (If you plan to color it with Copics, be sure to use Memento ink and Neenah cardstock! I learned that from my friend Katie in her Copic Marker Basic class at Memory Bound!) I stamped my image onto white cardstock.
  

 Now align your template around the stamped image. See those holes? Using a very fine-tipped pen, draw around each one. Taylor recommends making a "ring" versus coloring in the entire hole so that it's easier later to align the die.

 So now we have the stamped image with the holes outlined.
  
Now you'll see why we needed to do those extra steps! Position your die (ridge side toward the stamped image) by placing the alignment holes around the outlined rings. When properly positioned, the rings should not be visible through the holes on the die. Secure the die to the cardstock with a Post-It note or removable tape so it does not shift when you run it through the Big Shot.
  

And here's your cut-out image, with a little bit of white showing around the edges. (Don't look at my coloring too closely as it leaves a lot to be desired!)
 
I love all the new stamp and die sets which are on the market right now! Once you try them, you'll be hooked!
jp


15 April 2013

Step by Step: Die Cutting Printed Text

 In today's post, I'll show you a quick little trick for die cutting around printed text. While I sometimes enjoy stamping, I'll admit that I often prefer the clean, crisp look of printed text, especially if I'm using textured cardstock. I also like to be able to customize my text to fit the situation.

For this project, I started with my new 3x3 Tuck and Close Notecard die by Taylored Expressions. I've made several cards with this fun little die! Because of its small size, you can cut three cards from an 8.5x11 sheet of cardstock.

 The die itself has a nice scoring line and a little half-moon for the closure. When cut, it has a little extra "room" in it so you can use it as a lollipop holder! I'm not sure why I haven't tried that yet. You can see an example on the Taylored Expressions website
 

But I digress! In this post, I want to share a bit about die cutting around printed text. This is a similar technique to the one I used in making labels for my card basket, with a couple of twists.

For this particular card, I planned to use my new owl stamps. (How many owl stamps does one person need? I don't even want to count how many I have at this point!) I colored and cut out the owl and branch (more on that in my next post) and determined where I would position them on my card.

In this case, I wanted to print "HELLO THERE" on my card. I chose those two words so they would line up exactly when using the Pharmacy font. :) I planned to use my Spellbinders square label die, so I placed the actual die on the card front to determine approximately where the text would be positioned on it. Based on that, I could tell that the text needed to be in the upper right corner of the die cut piece. 

With information in mind, I measured the die and created a text box of the same size using Word. I positioned my text within the text box in the proper spot, then I removed the lines. (Did really need to create that text box? Couldn't I have just situated the die around the text? Yes, but having the text box gives me a visual confirmation on the screen of how the text will look when positioned on the die cut!)

Next, I printed the text, positioned the die around it (with the ridge side down), and ran it through the Big Shot.
 

 And here's the completed card, with the text positioned exactly where I wanted it, leaving room for the other elements. (Don't look closely at the Copic coloring, as it leaves quite a bit to be desired!) I saved the template on my computer to use for future cards. Just print and cut!

What would I do without Word and my Spellbinders dies? They are two of my favorite tools for card making!
jp

12 April 2013

Feline Friday: Hungry Kitty

 
Ever been on the receiving end of THIS kind of glare? There's no ignoring a hungry kitty!

08 April 2013

Favorite Recipe: Salade Nicoise

 Spouse was gone for a few days recently, so once again I took the opportunity to make a few dishes that I enjoy, one of which is Salade Nicoise. He'll eat it but he doesn't love it, so why share it when it's SO GOOD? Check this post for my recipe. I only loosely follow it, this time adding eggs and leaving out the mushrooms.

  I had a few new potatoes left from another recipe, so I thought this salad would be a great way to use them up.
 

Since it's only April, the green beans I found at the grocery store left a little to be desired, but once steamed they tasted just fine.
 

 Hard-boiled eggs are a nice addition to this salad.
  

 Here's the completed salad! What a yummy lunch or dinner, and I still have some left! NO SHARING!
 

05 April 2013

Feline Friday: Fitted Sheet Bonnet

Sorry...I could not resist! Thanks for being a (relatively) good sport, Lily!


04 April 2013

Step by Step: Recyclable Easter or May Baskets

  We recently returned from a trip to visit our daughter at Indiana University. This was the first time we'd been able to see her on Easter since she's been in college, so I had the opportunity to take her an Easter basket instead of mail her an Easter box! 

Of course, I wanted to take a basket to her boyfriend, too. I've found that separate containers are best so that the candy gets distributed evenly! (Of course, I'm not naming any names here! LOL) Being mindful of limited space in their apartments, I wanted to create Easter baskets that could be recycled. I also challenged myself to make them from supplies I had around the house -- no shopping!

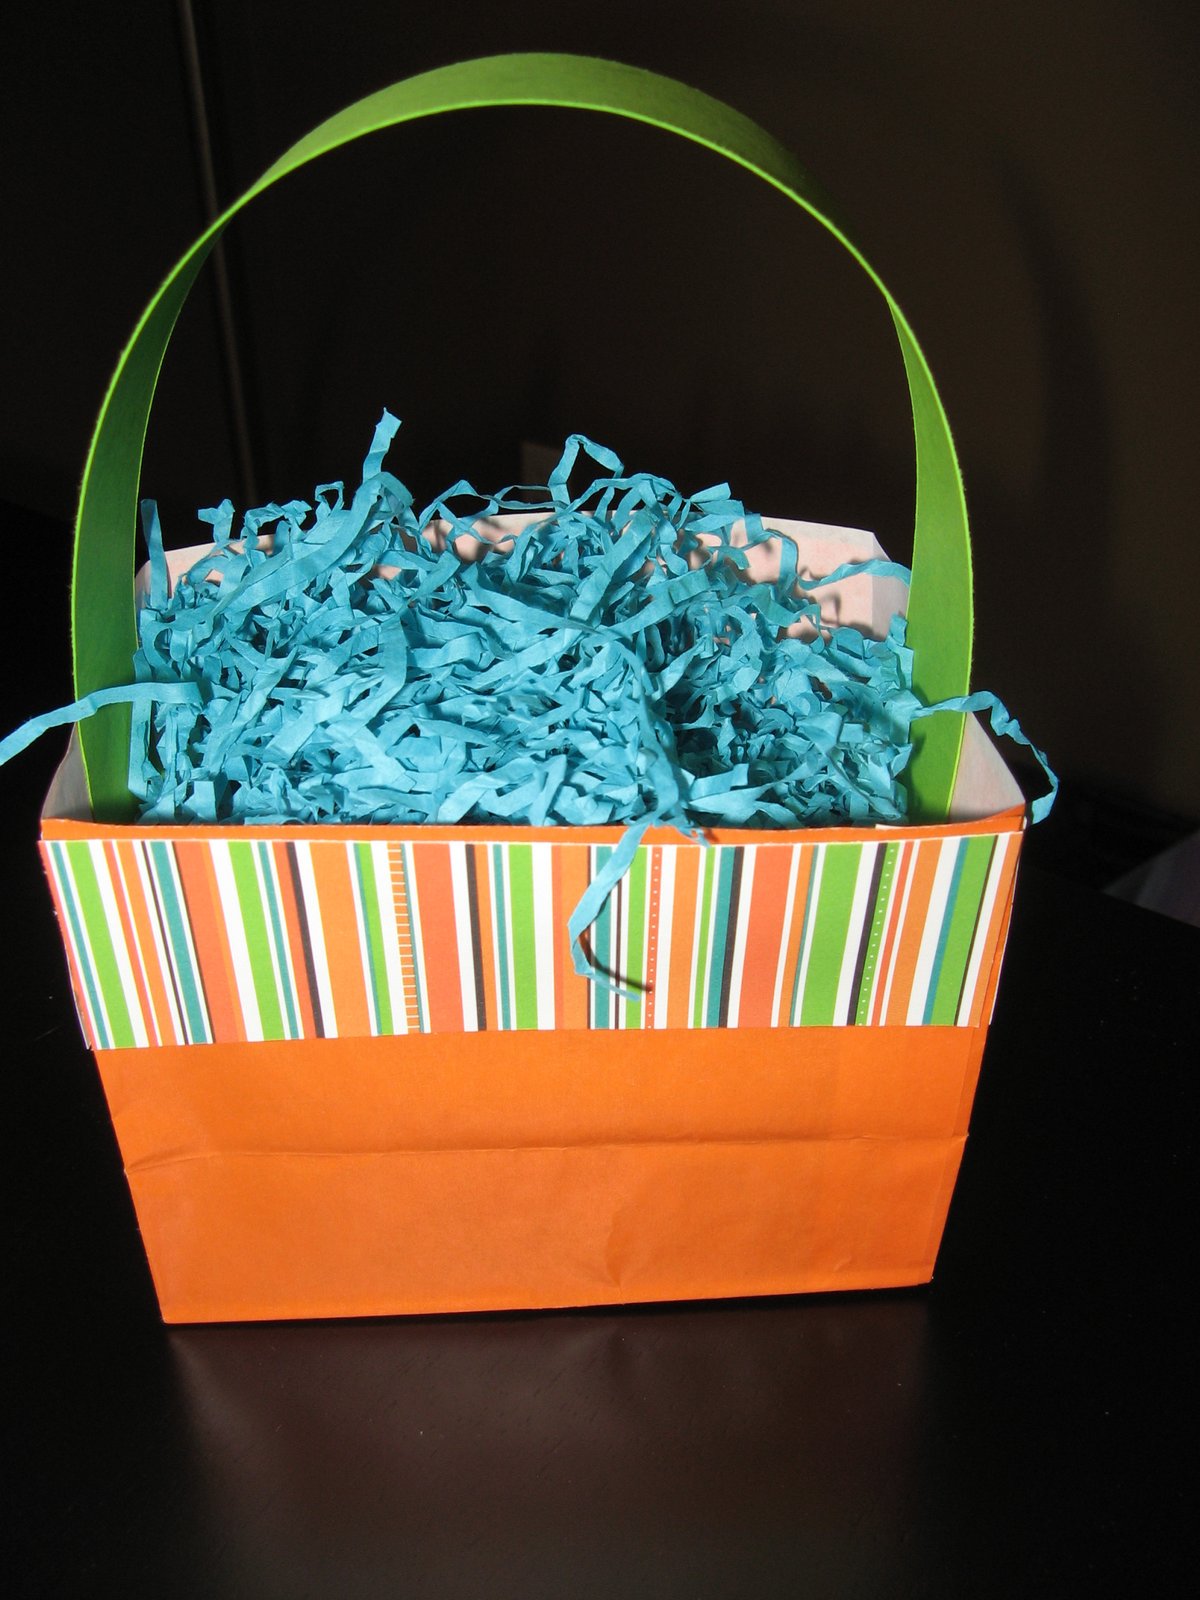
I started with pink and orange lunch bags I found in my stash, but any color would be fine. Honestly, the color of my shredded Easter grass dictated the colors of the baskets I created!

With a paper trimmer, I cut each bag down to about 3.5 or 4 inches tall.

Next, I found patterned paper and cardstock that would match the bags and Easter grass. I cut strips for handles and trim.

I placed a bit of Scor-Tape on the end of each handle strip, then adhered it to the inside of the bag.

 Next, I folded the patterned paper strips to fit around the bag then adhered them with tape adhesive. Suddenly, a paper bag became a basket!

I filled the baskets with Easter grass...

...then added tags with a monogram sticker letter for each one. Filled with candy, they made fun little recyclable Easter baskets! They held a surprising amount of candy, too. Of course, I had to eat what would not fit. :)
 
If you live in an area where the May basket tradition is practiced, it would be fun to make these paper bag baskets for May Day, too. They would also make easy, inexpensive favor bags for birthday parties. I love using up leftover supplies for projects like this!
jp